USER GUIDE
ONLINE EXAM SOFTWARE
EXAMQR
A. Introducing the ExamQR online exam software
ExamQR is a complete solution for running online exams, developed by TEX Vietnam JSC. It is designed to fit the needs of schools, universities and training centers, and simplifies the whole exam process from preparation through delivery to grading and reporting.
Key benefits
- Easy management: Create and manage exams, subjects, schedules, rooms and candidate lists in a systematic way.
- Flexible: Supports multiple-choice, essay and practical exams (with programming file attachments).
- Highly secure: Requires fullscreen mode for multiple-choice exams, so candidates cannot open other applications.
- Real-time monitoring: Proctors can follow each candidate's progress and see who has joined and who has submitted.
- Varied question types: Supports many question types, such as multiple choice, true/false, and questions that require a practical file attachment.
Main features
For exam organizers:
1. Create and manage exams with full details
2. Enter subject information with separate settings per subject
3. Manage the schedule: sessions and rooms
4. Choose the proctors assigned to each room
5. Import candidate lists from an Excel file
6. Import multiple-choice or practical (programming) tests from a Word file
7. Run and supervise the exam
For proctors:
1. Supervise candidates during the exam
2. View each candidate's exam status
3. Print result sheets for multiple-choice exams
4. Export candidates' submitted files from practical exams
For candidates:
1. Sign in to the exam room with a candidate code and password
2. Take multiple-choice exams in a secure fullscreen environment
3. Take practical programming exams and attach the work file
4. View the result after submitting (if the setting allows it)
Workflow
1. The exam organizer creates an exam and enters the subjects, schedule and rooms
2. Import the candidate and proctor lists
3. Import the tests in the standard format
4. Activate the exam with the "Start exam" button
5. Candidates sign in, take the exam and submit
6. Proctors monitor the exam and export the results
Highlights
- Friendly, easy-to-use interface
- Bulk data import from Excel saves time
- Generating many shuffled test versions improves test security
- Real-time monitoring keeps you on top of the exam
- Easy export of result reports and candidates' submissions
ExamQR is a powerful tool that helps schools, universities and training centers run exams professionally, transparently and efficiently, reducing the effort and time teachers spend on organizing exams and grading.
Tutorial video: https://youtu.be/Xq3l73tMiwk?si=0ia_jEOdJMopuSkM
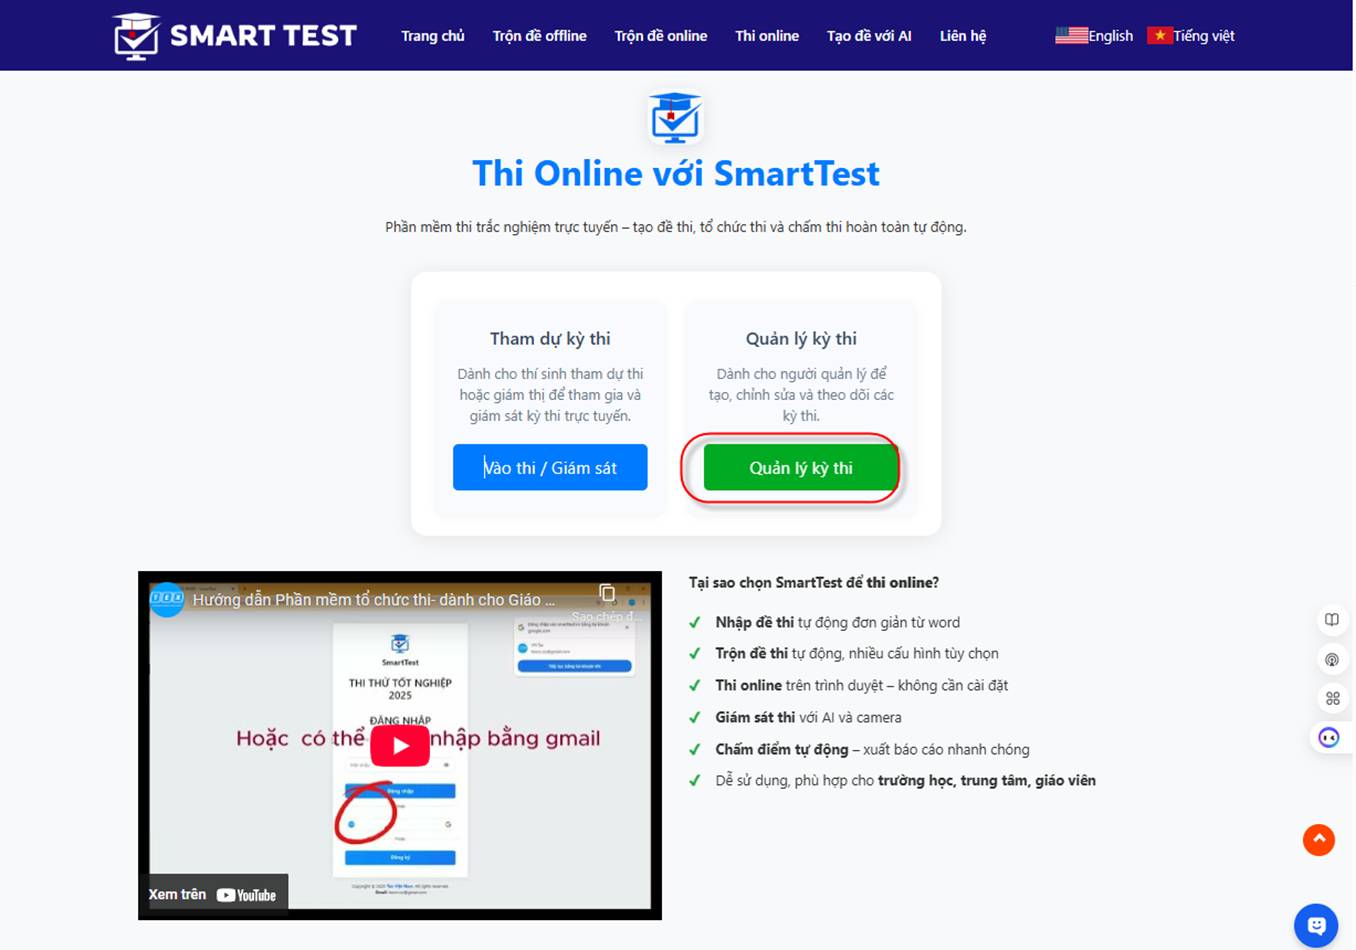
Sign in to the software at: ExamQR - Multiple-choice test shuffling software:
https://examqr.com/. Then choose “Online exam”
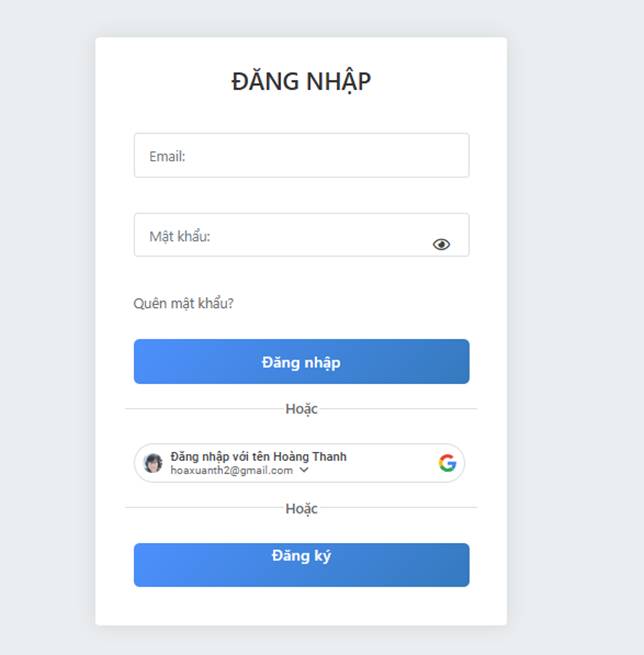
Choose Manage exams - sign in automatically with your Google account, as shown below
B. USING THE SOFTWARE
- Exam workflow
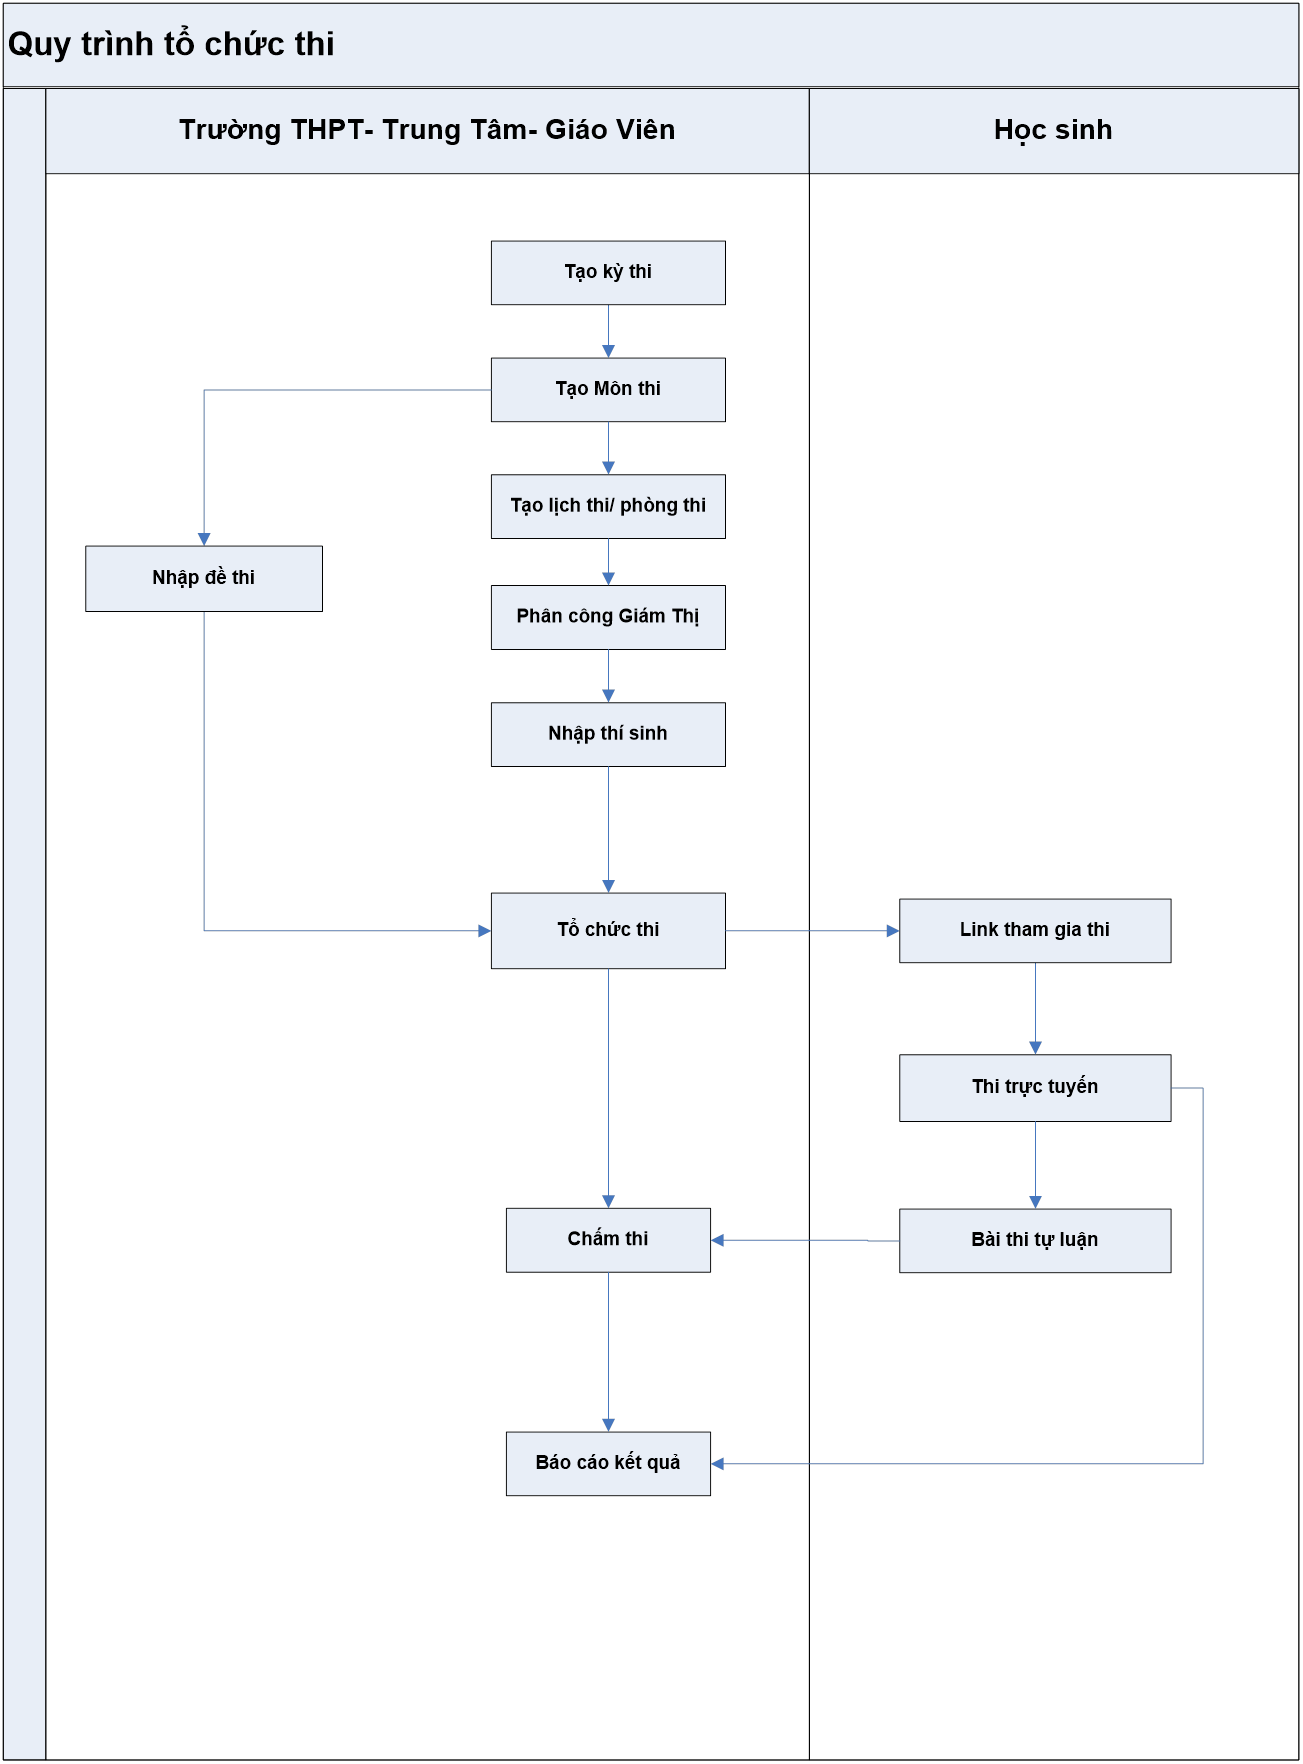
I. Exam organizer
A. Create an exam
• Create a new exam: Choose the Exam menu. The system shows the list of exams that have been organized.
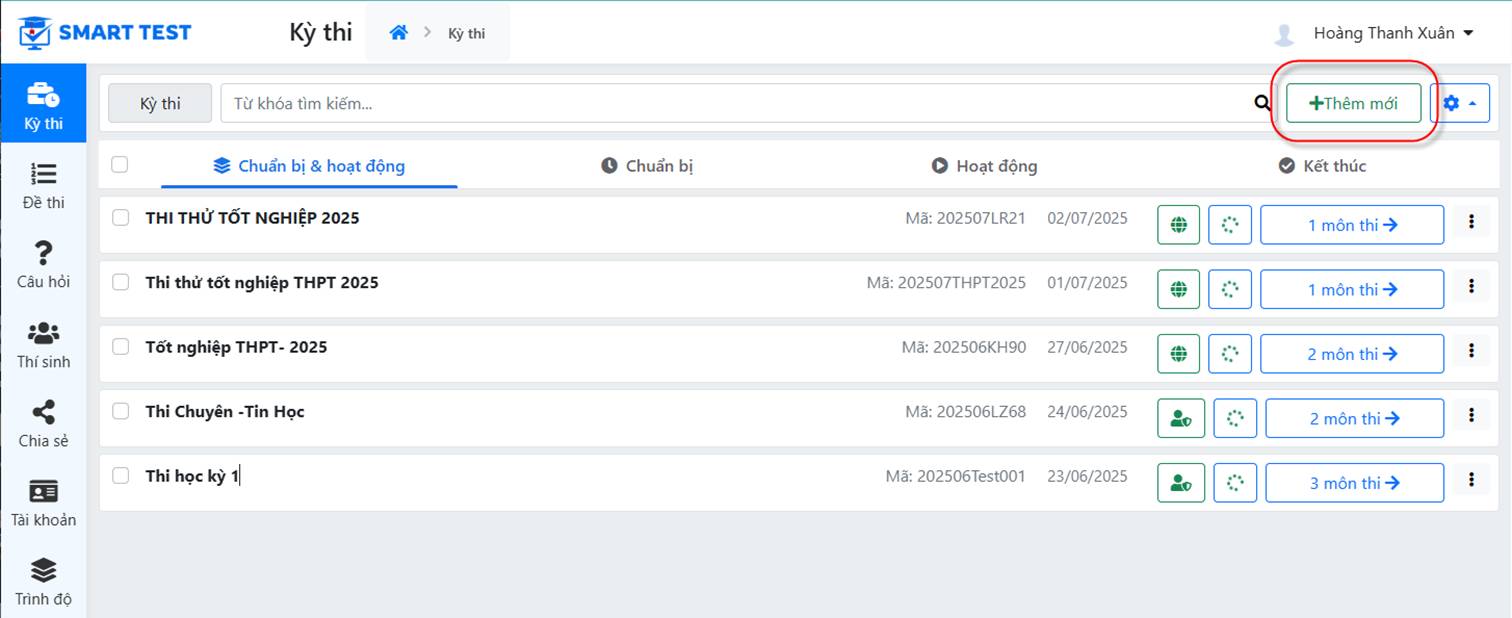
Exam management screen
• Click the  button. The screen for entering the new exam's details appears.
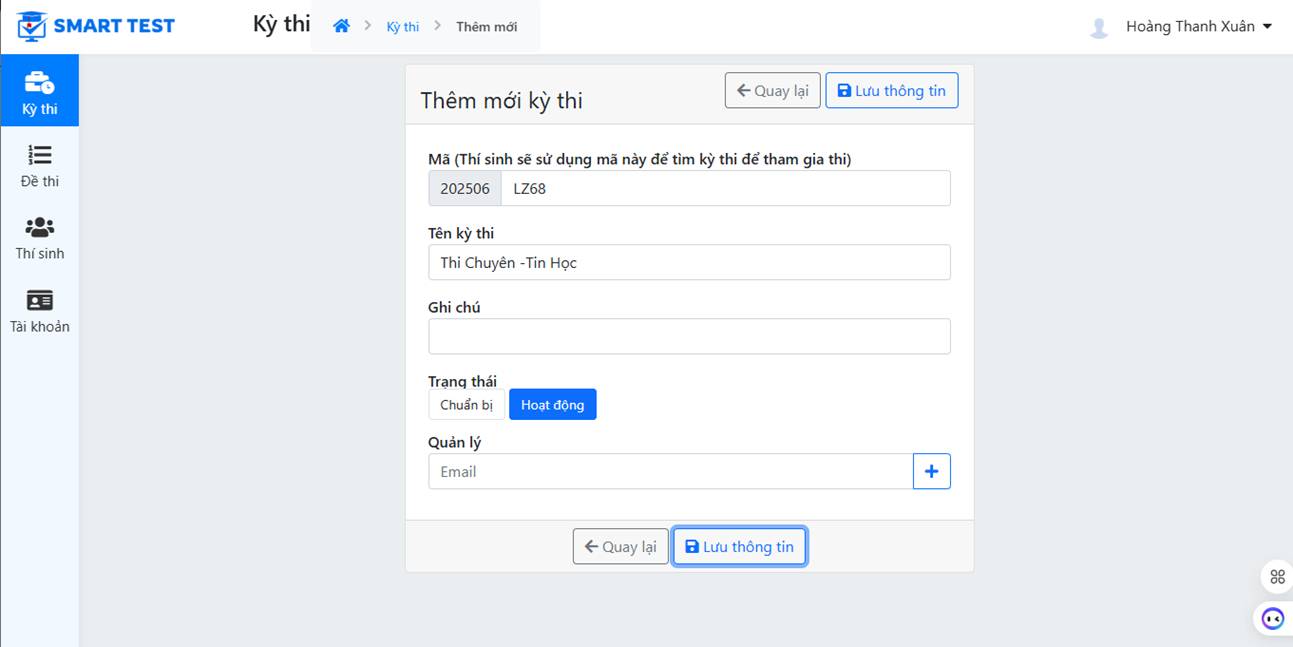
Exam details screen
B. Start entering subject information
0. Enter general information
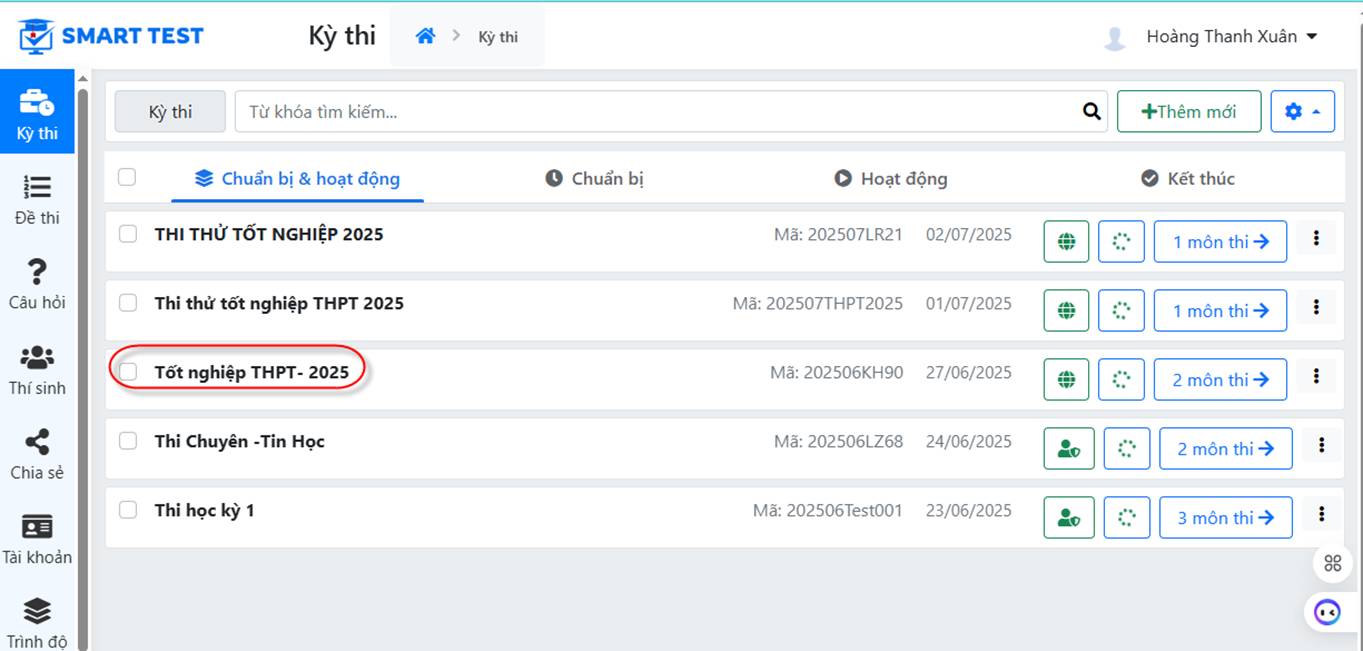
From the Exam menu, choose the exam you will run. The exam screen shows the list of subjects organized in that exam:
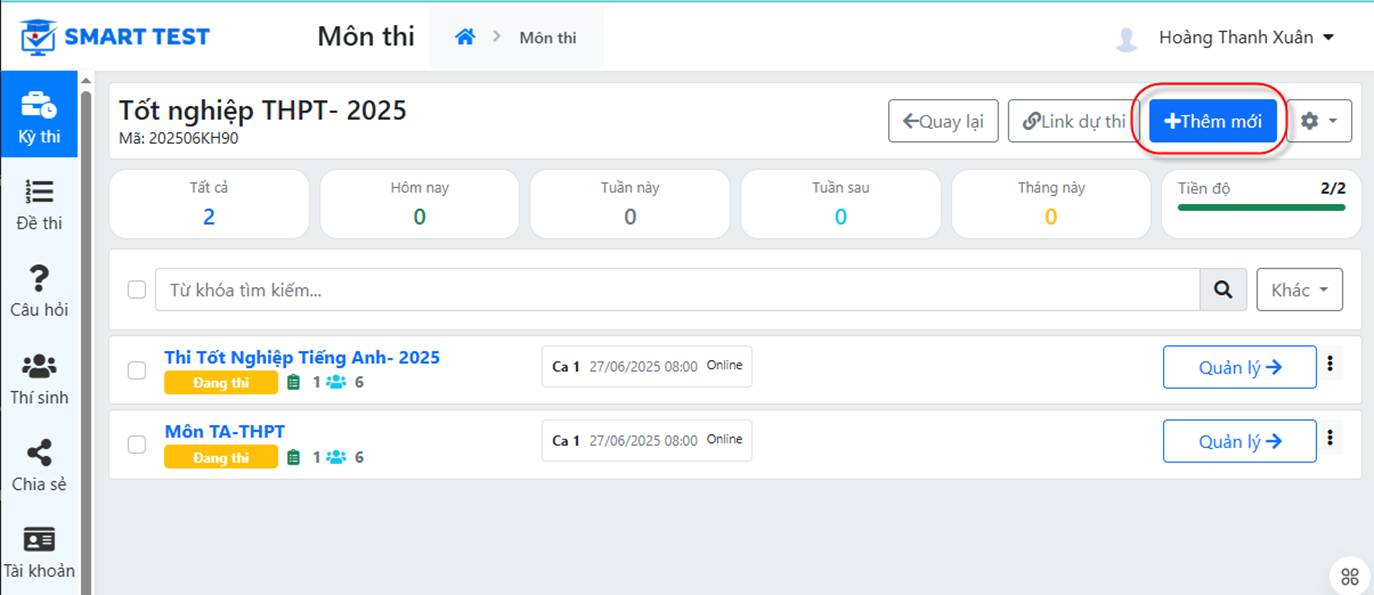
Screen for managing the subjects in an exam
Then click the  button. The subject entry screen appears.
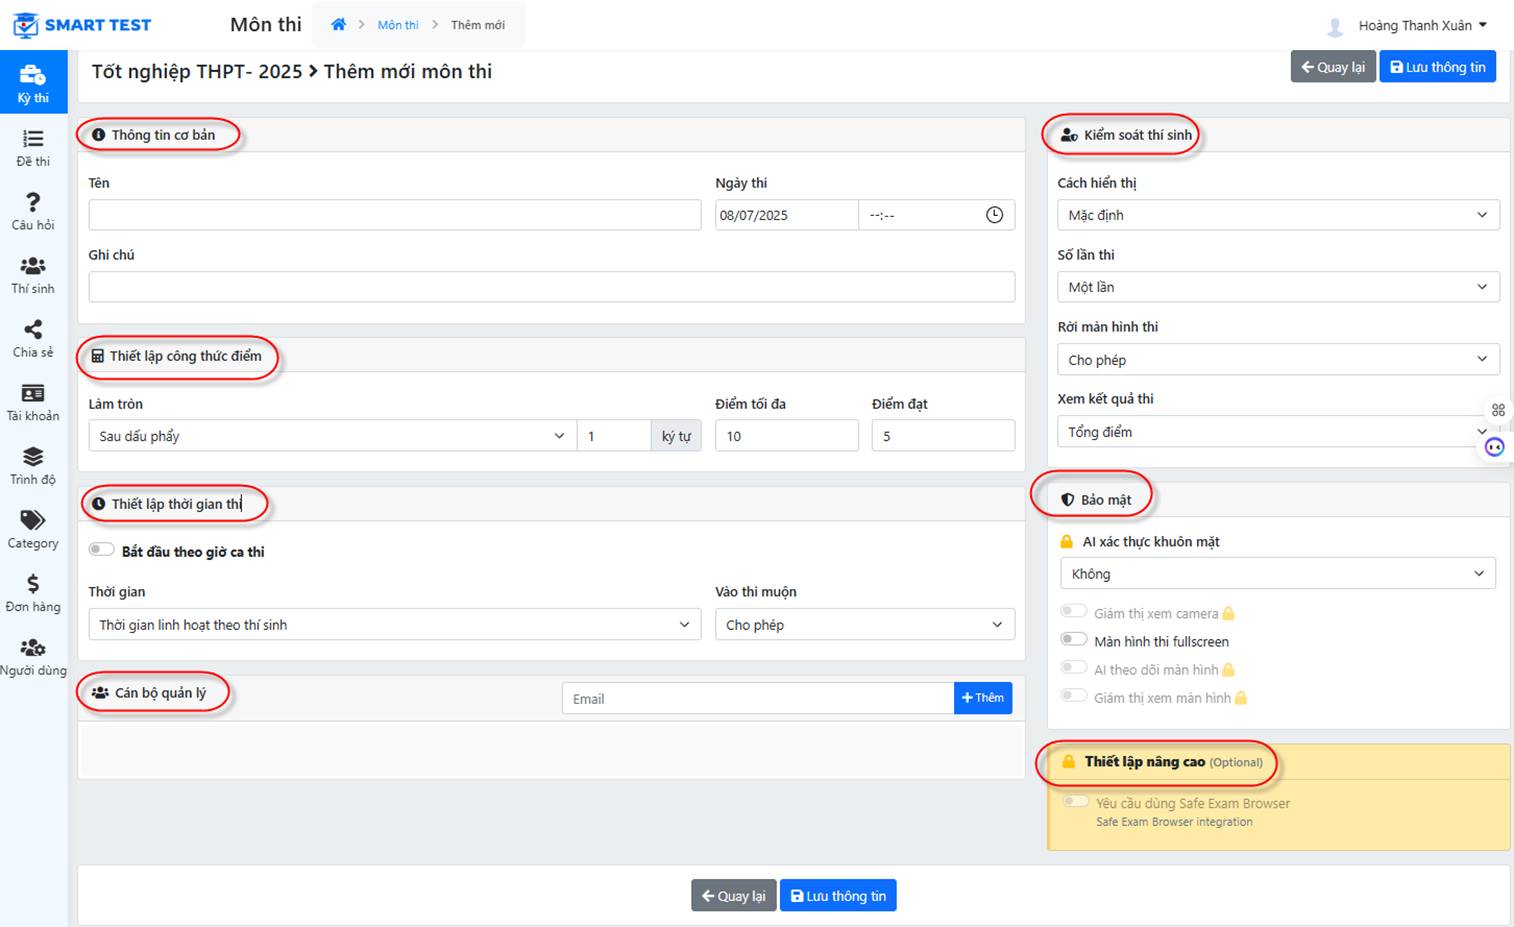
Subject details screen
General information:
- Enter the subject name
- Notes
- Exam date and time
Score formula settings:
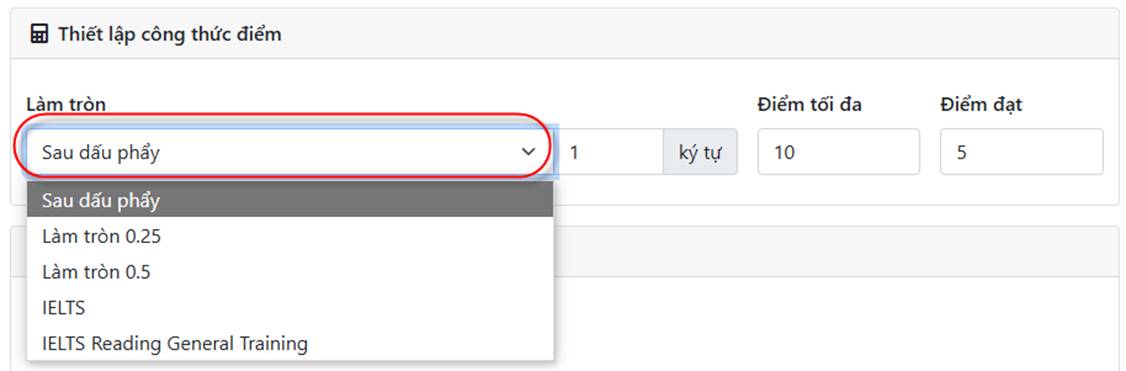
- Rounding: Number of decimal places; round to 0.25; round to 0.5; IELTS, IELTS Reading General Training (rounded to the IELTS scale), and so on.
- Maximum score:
- Passing score:
Exam time settings:
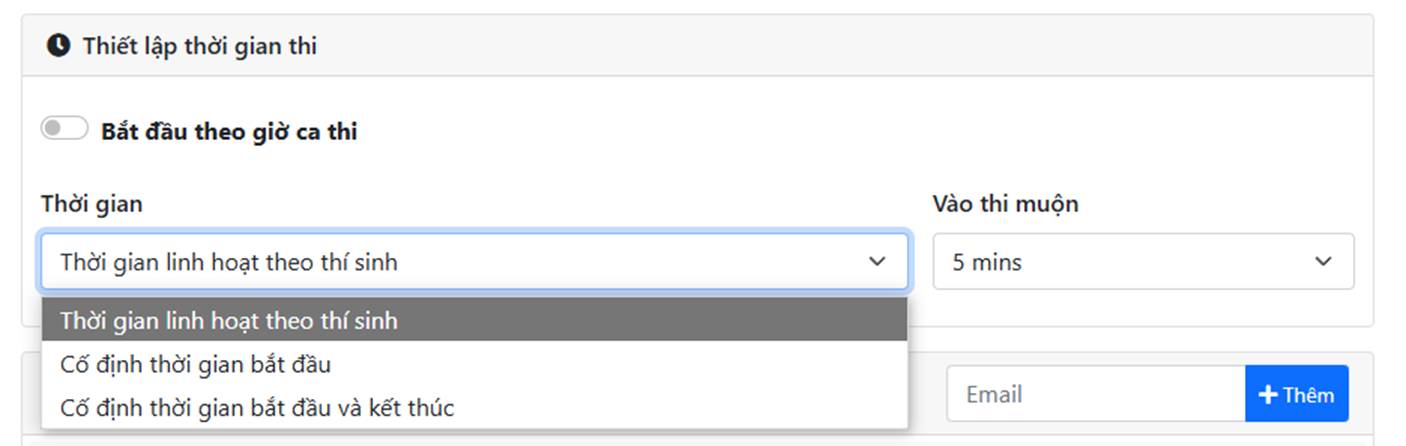
- Start by session time: If enabled, the exam time follows the sessions and the schedule.
- Time: You can set a flexible exam duration per candidate, or fix the start time or the end time.
- Late entry: Choose the number of minutes a candidate may enter late.
Managers: Lets you transfer management of the subject to another person by email.
Candidate control:
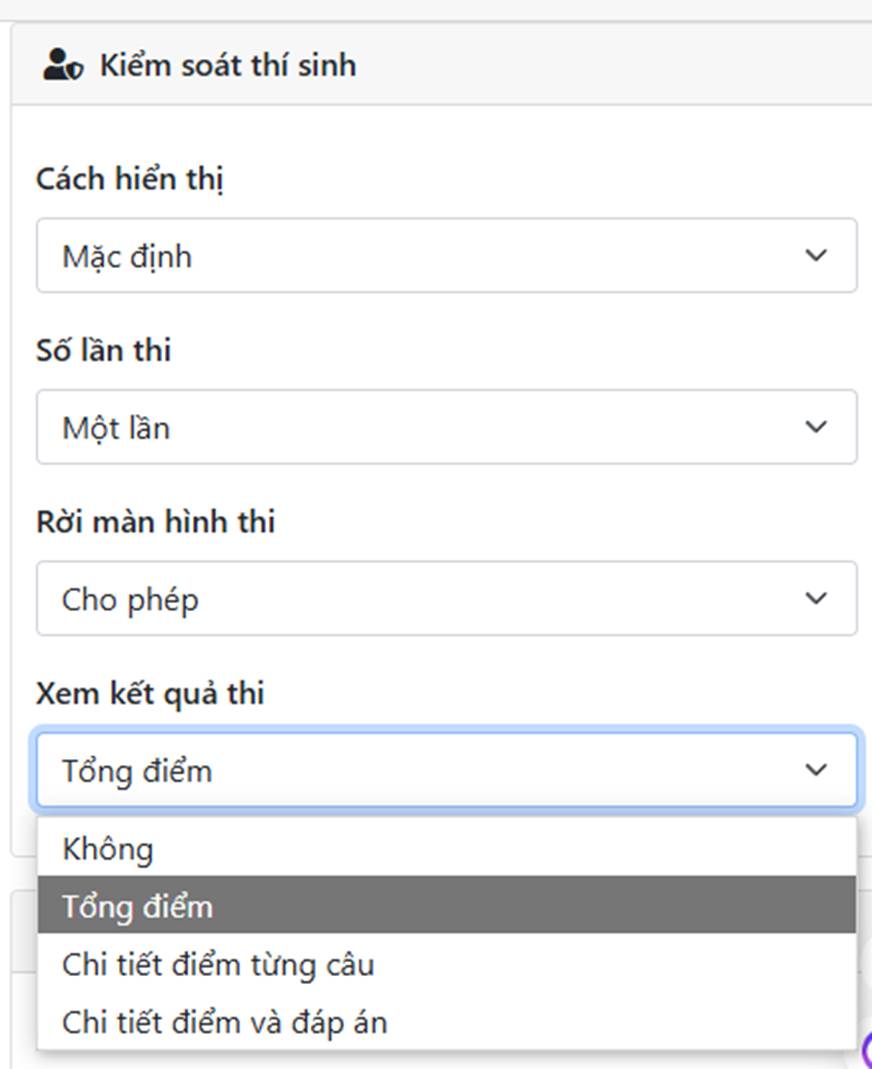
- Display mode: The candidate's exam screen can show all questions of the test, or one part at a time, or one question at a time.
- Number of attempts: Sets how many times a candidate may retake the test (1, 2, 3).
- Leaving the exam screen: Sets how many times a candidate may leave the exam screen. If the limit is exceeded, the test is submitted automatically.
- View results: You can choose how results are shown: total score only, score for each question, or score details with the answers.
Security: (These features are unlocked when the user upgrades their plan)
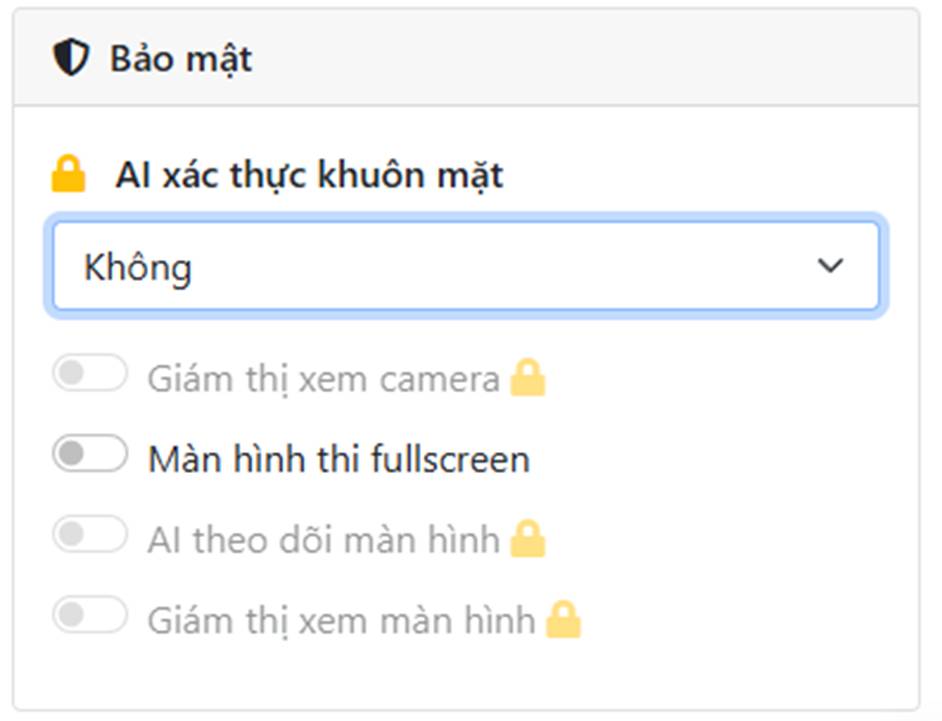
- AI face verification: There are 3 options: no verification, candidates verify themselves before entering the exam, or a proctor verifies them by phone before they enter.
- Proctor views camera
- Fullscreen exam screen
- AI screen monitoring
- Proctor views screen
Example: after you enter the subject information, the exam is displayed as follows:
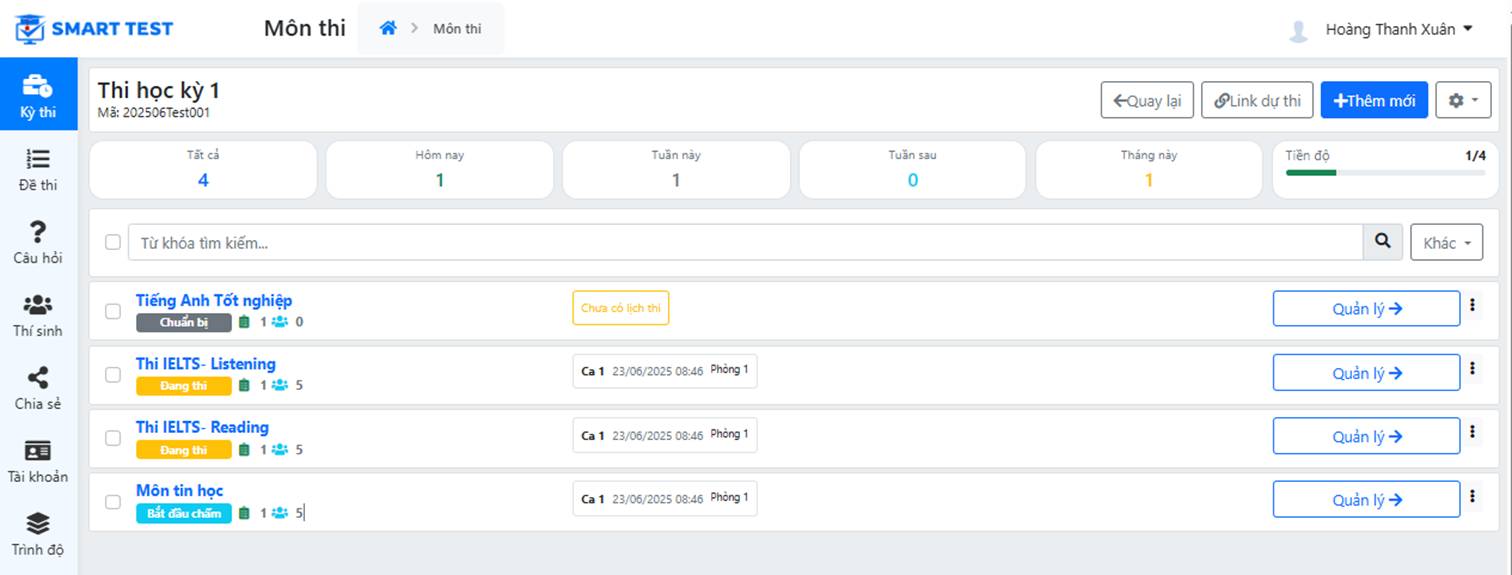
Each subject has a status: Preparing, In progress, or Start marking (for essay subjects).
The exam organizer can select a subject that is in the Preparing status, then click the  button to see its details and enter the other settings for the new subject:
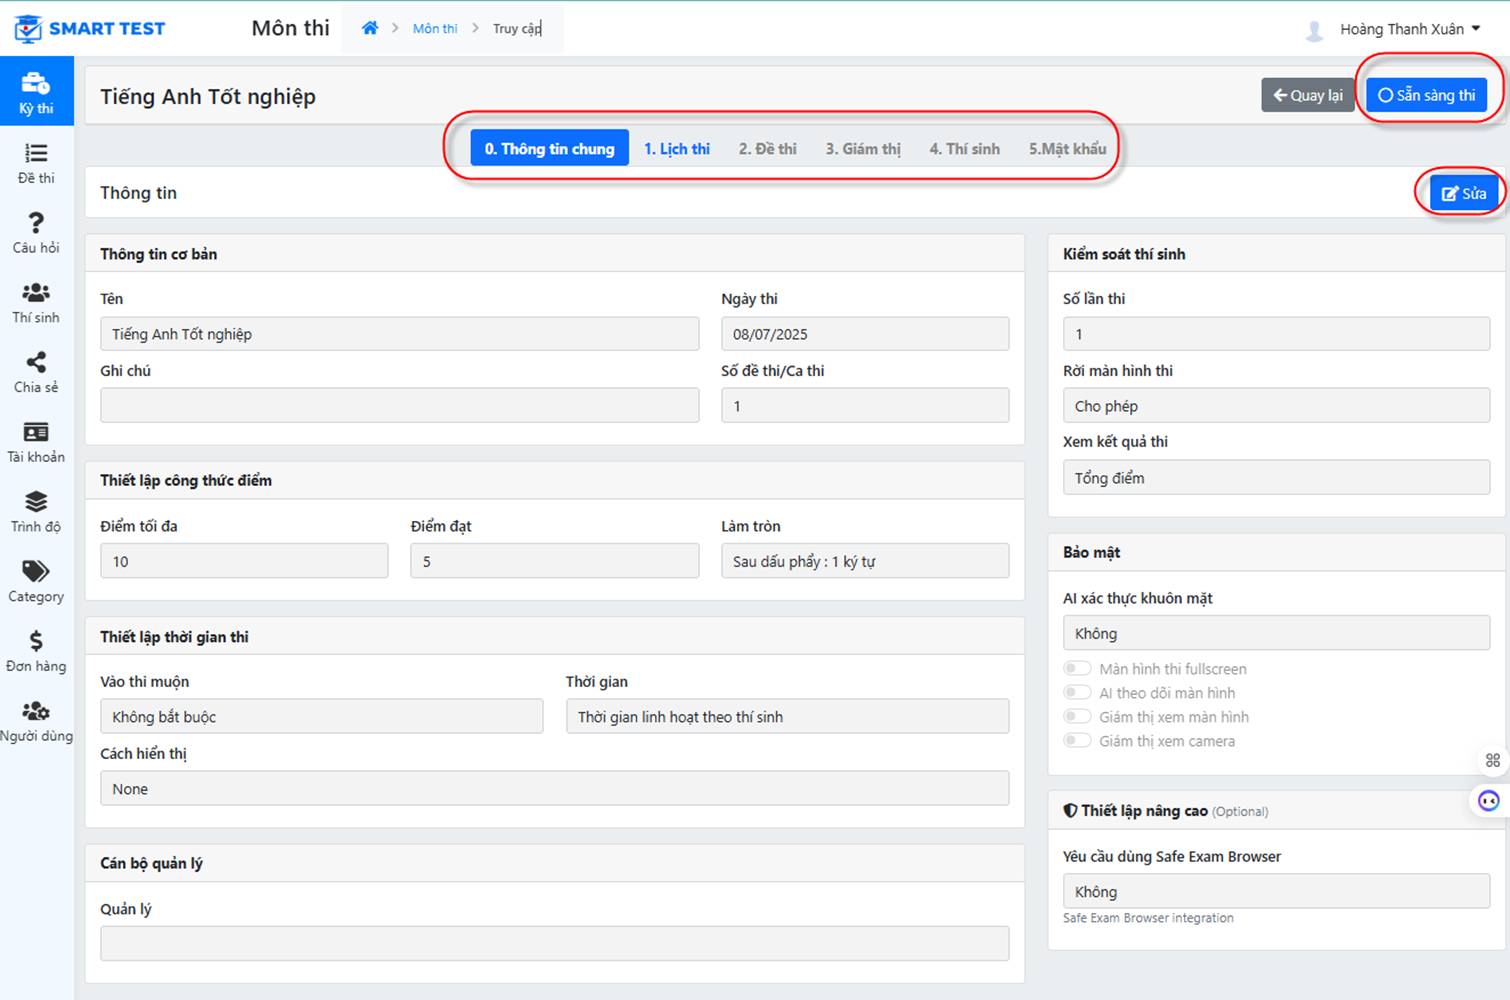
1. Enter the schedule: sessions and rooms
Choose the menu Exam - choose any subject and click the button. The subject management screen appears.
On the Subject screen, choose the Schedule tab to enter the sessions and rooms, then click Save.
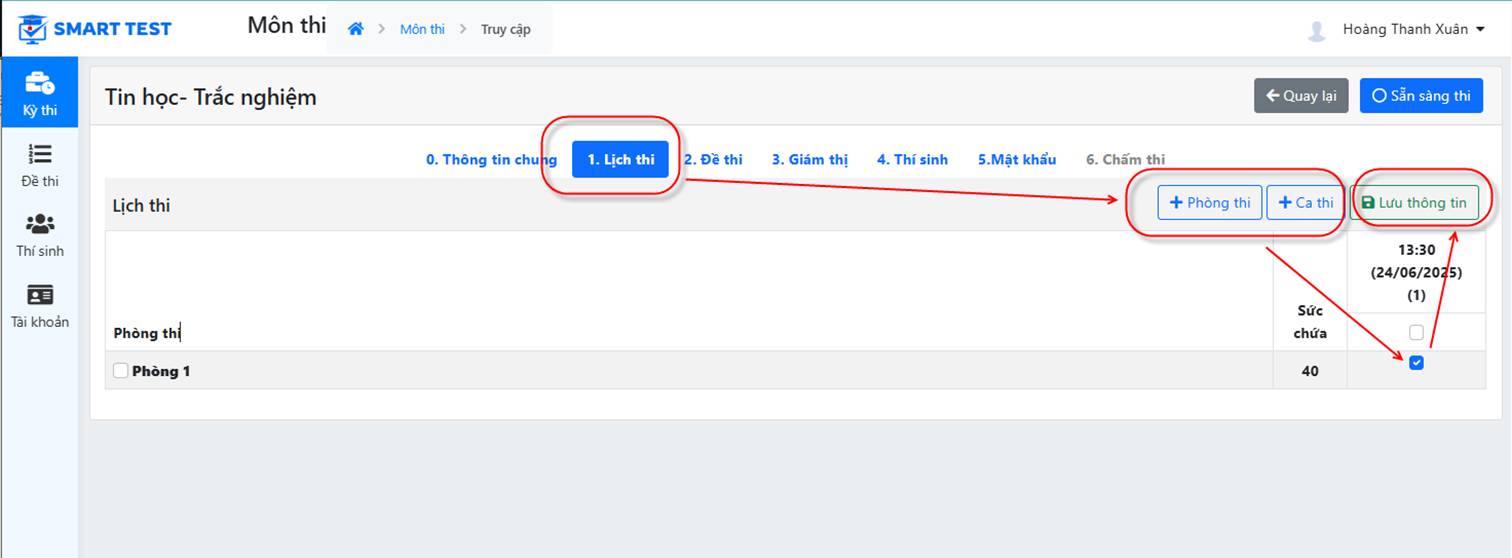
Enter session information:
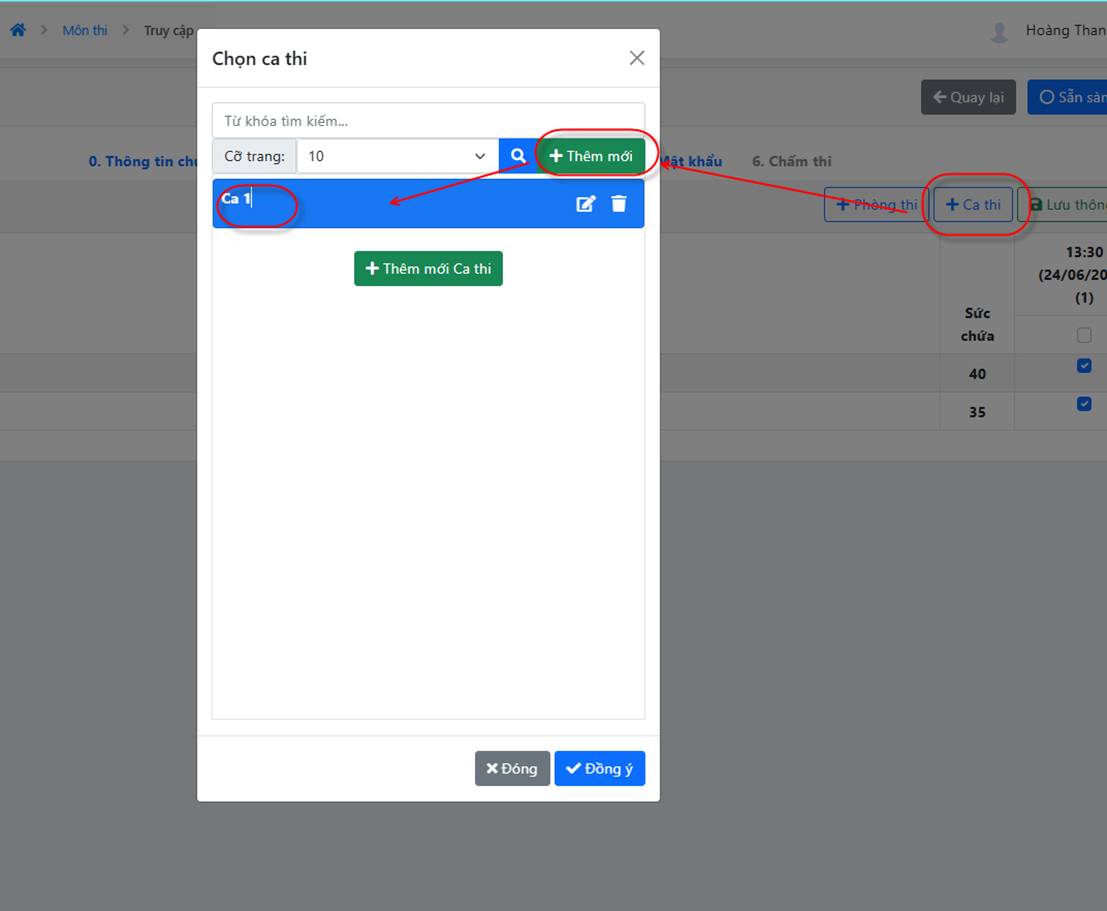
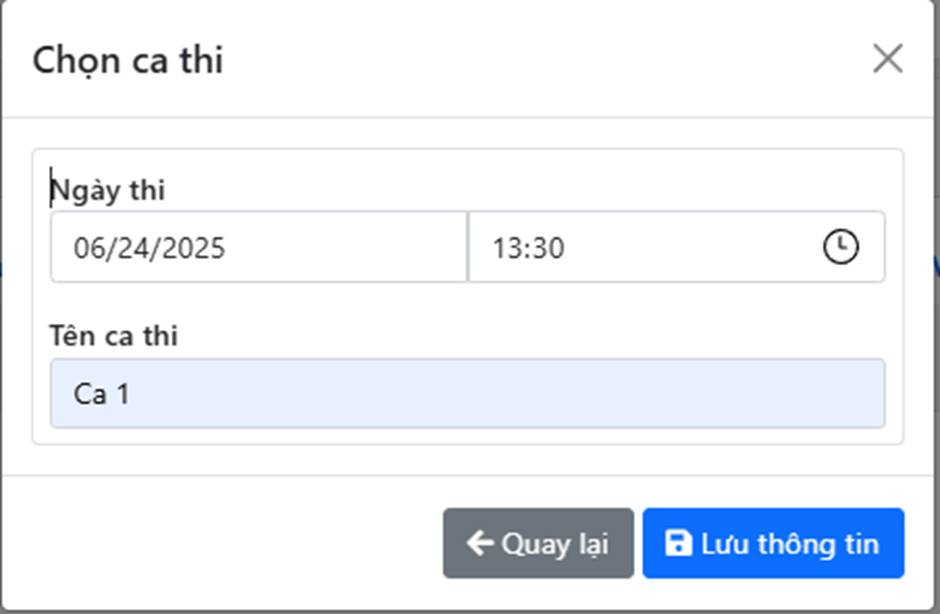
Add a new session: exam date, exam time and session name, as shown below
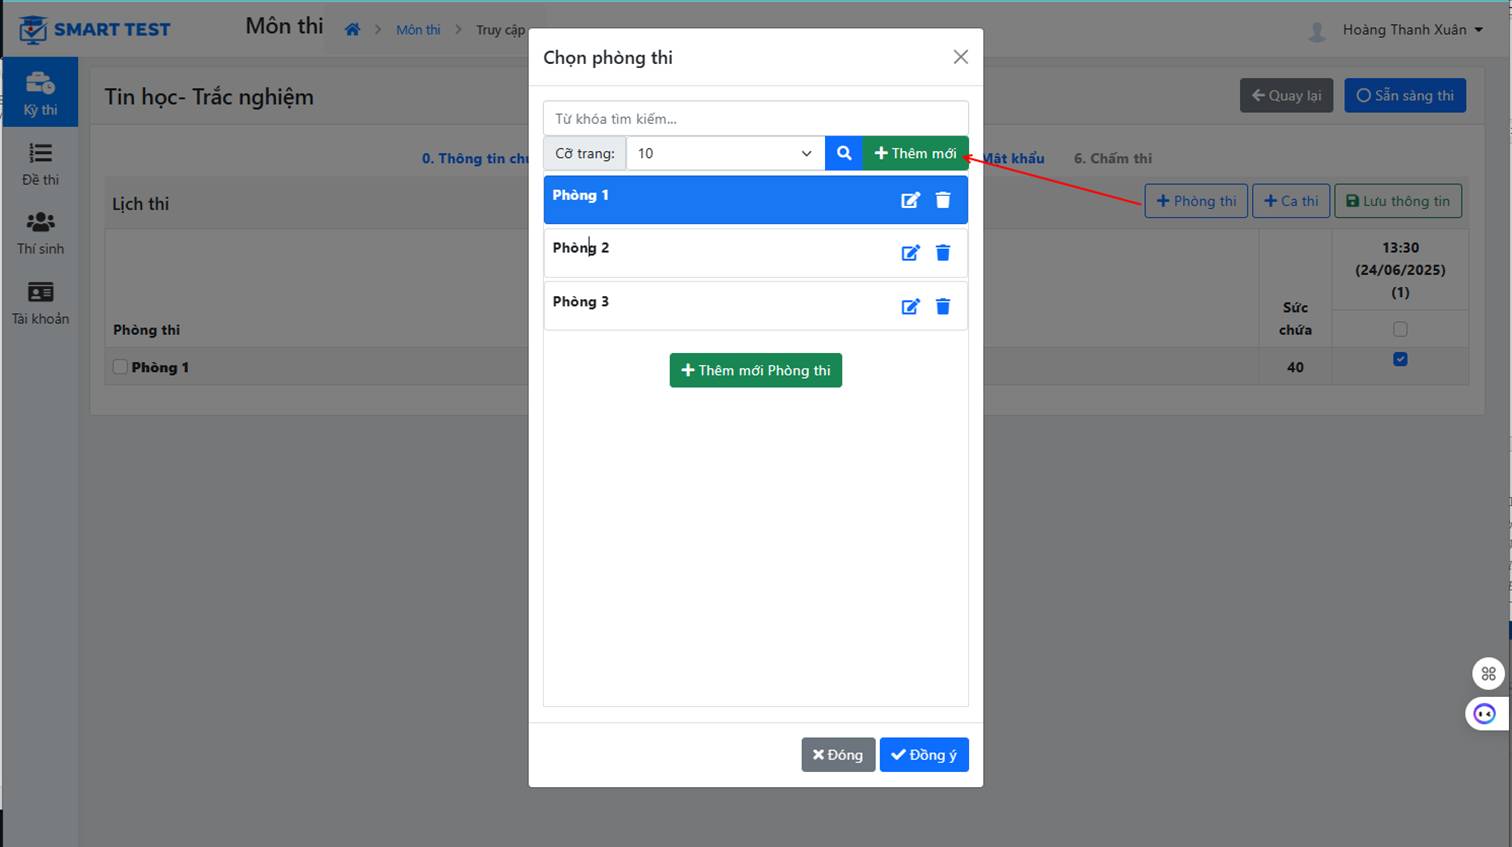
Choose rooms: you can add a new room or pick a room entered previously
2. Choose the test
- From the subject screen, the exam organizer chooses the Tests - Select tab
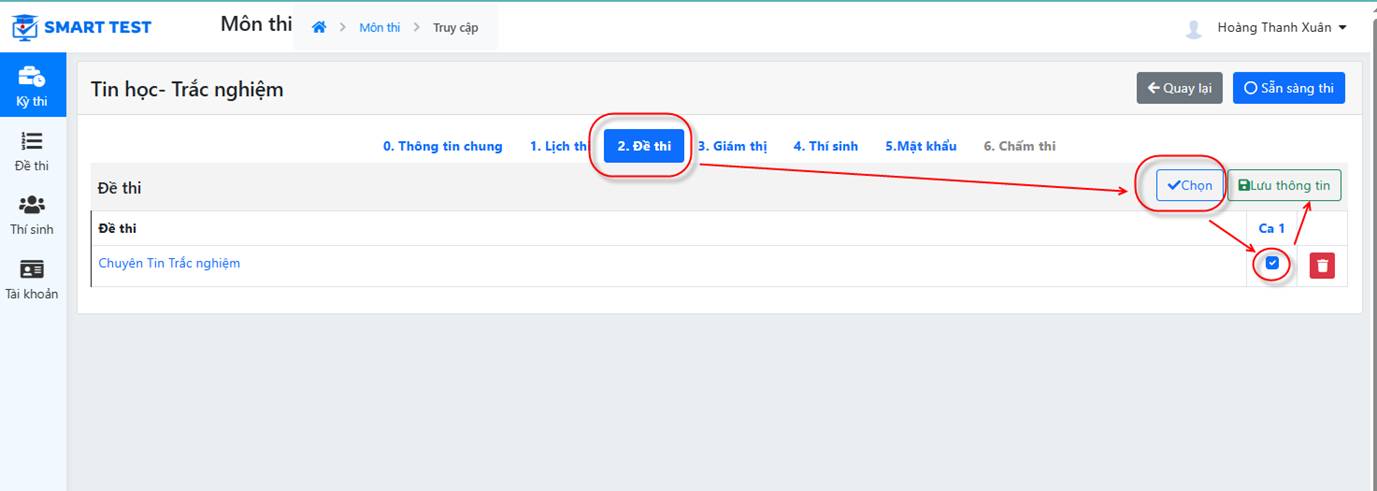
The screen lists the tests already entered in the system. Choose a test to assign to the subject for candidates to take:
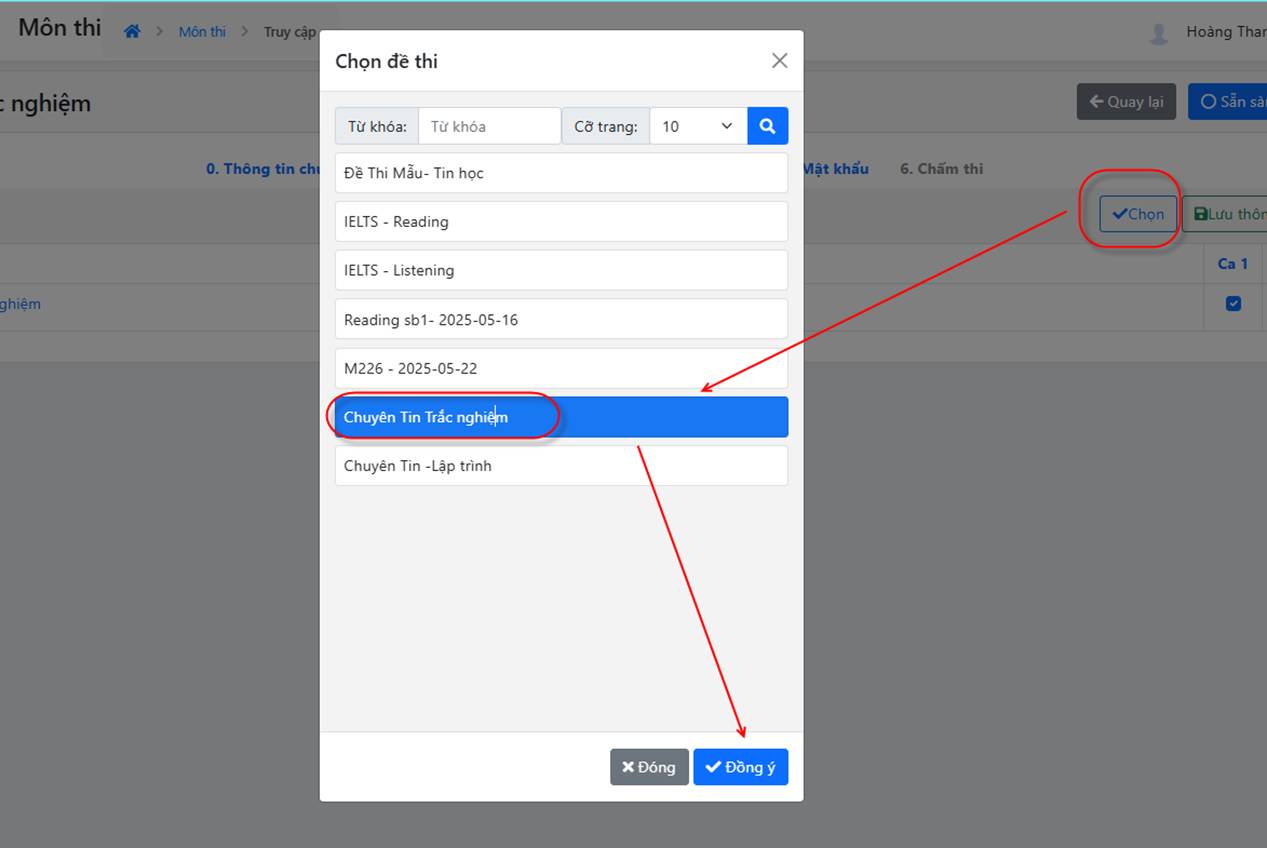
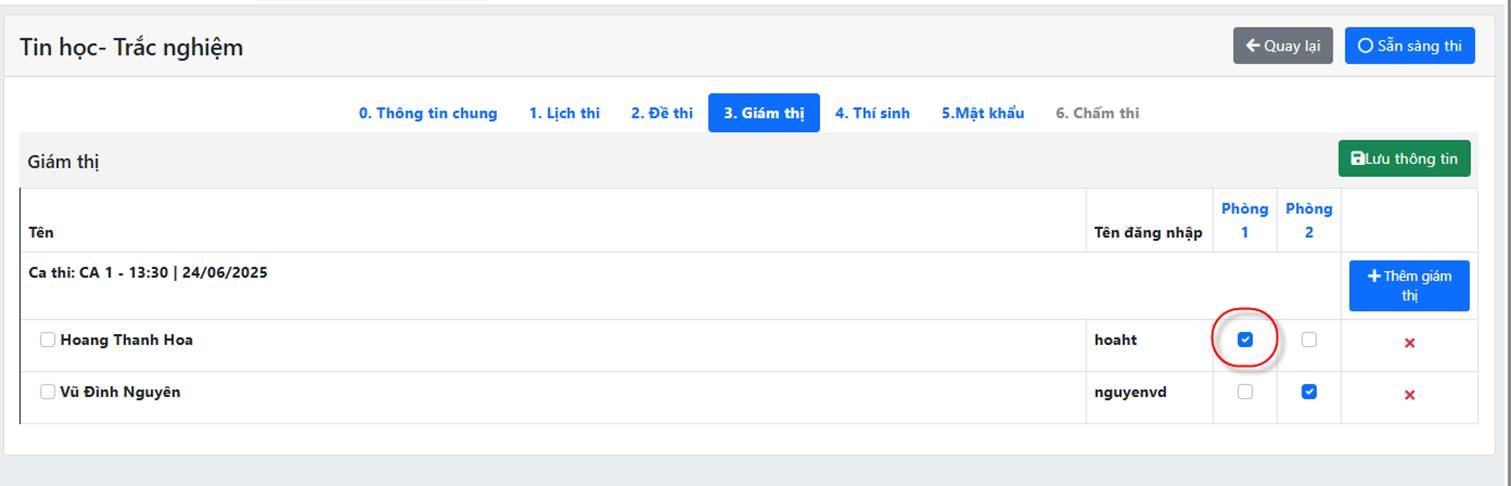
3. Enter proctors
• Add the list of proctors for each subject.
From the Subject screen, choose the Proctors tab
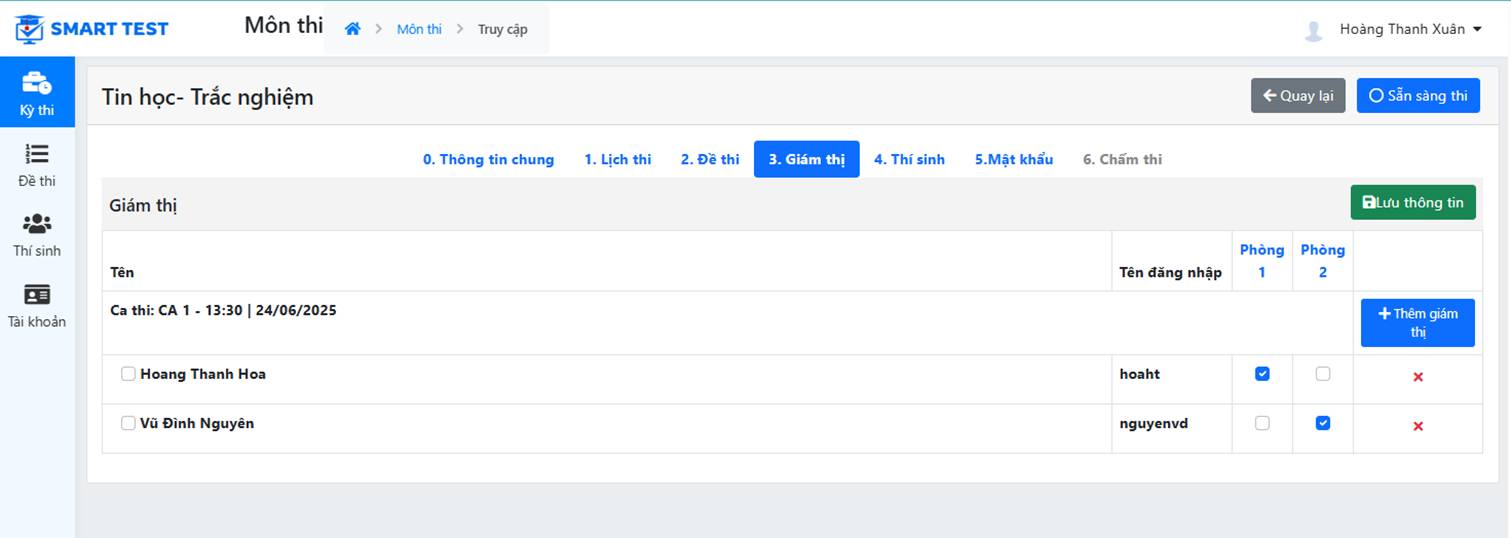
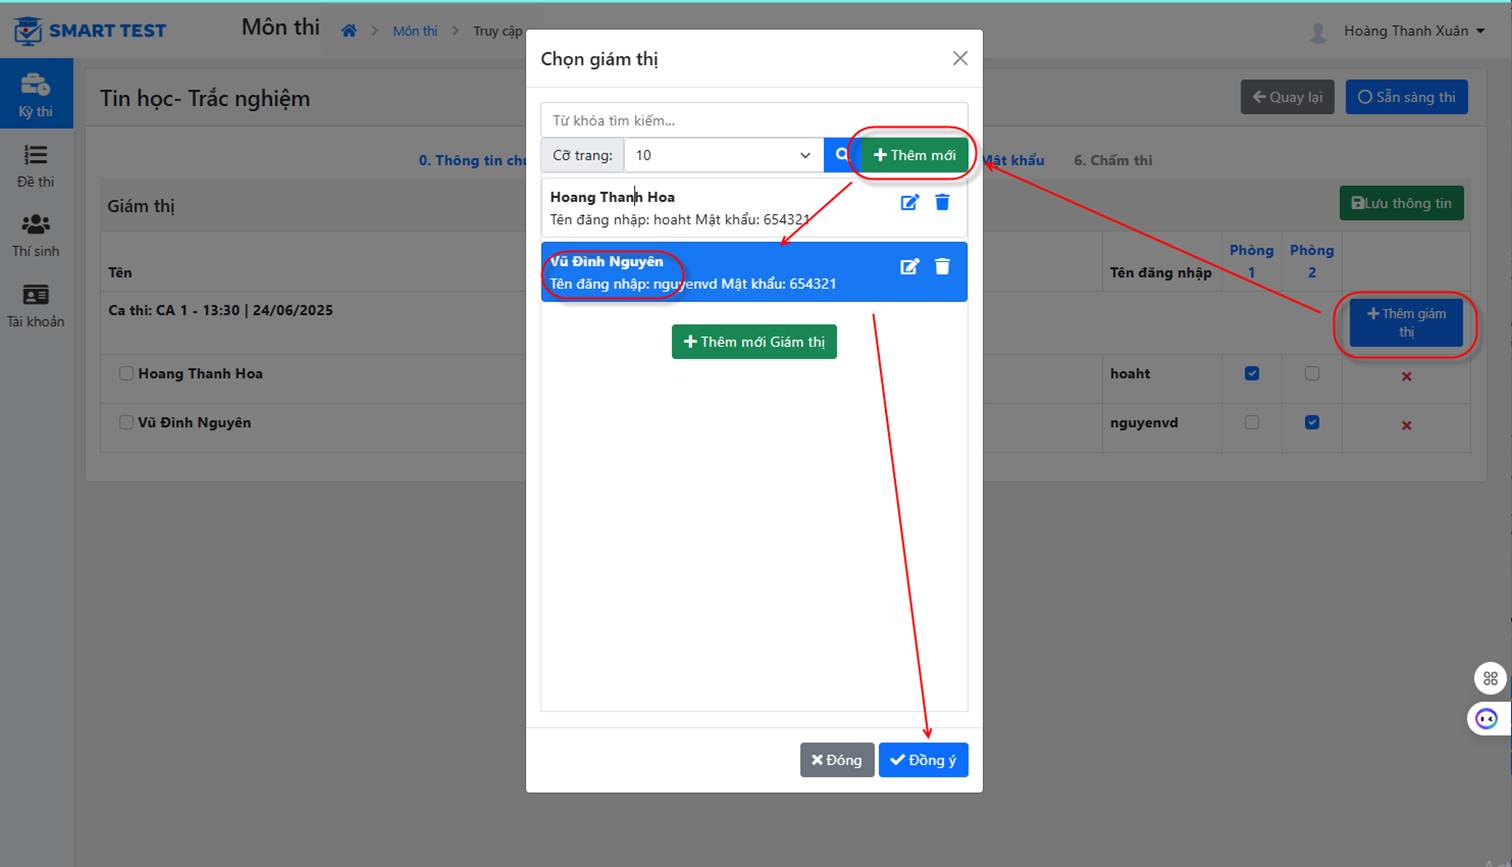
Add the list of proctors
• Proctor list screen: select the proctors who will supervise the exam
Next, tick the checkboxes to assign proctors to each room, then click Save as shown below
4. Enter candidates
From the Subject screen, choose the Candidates - Import file tab
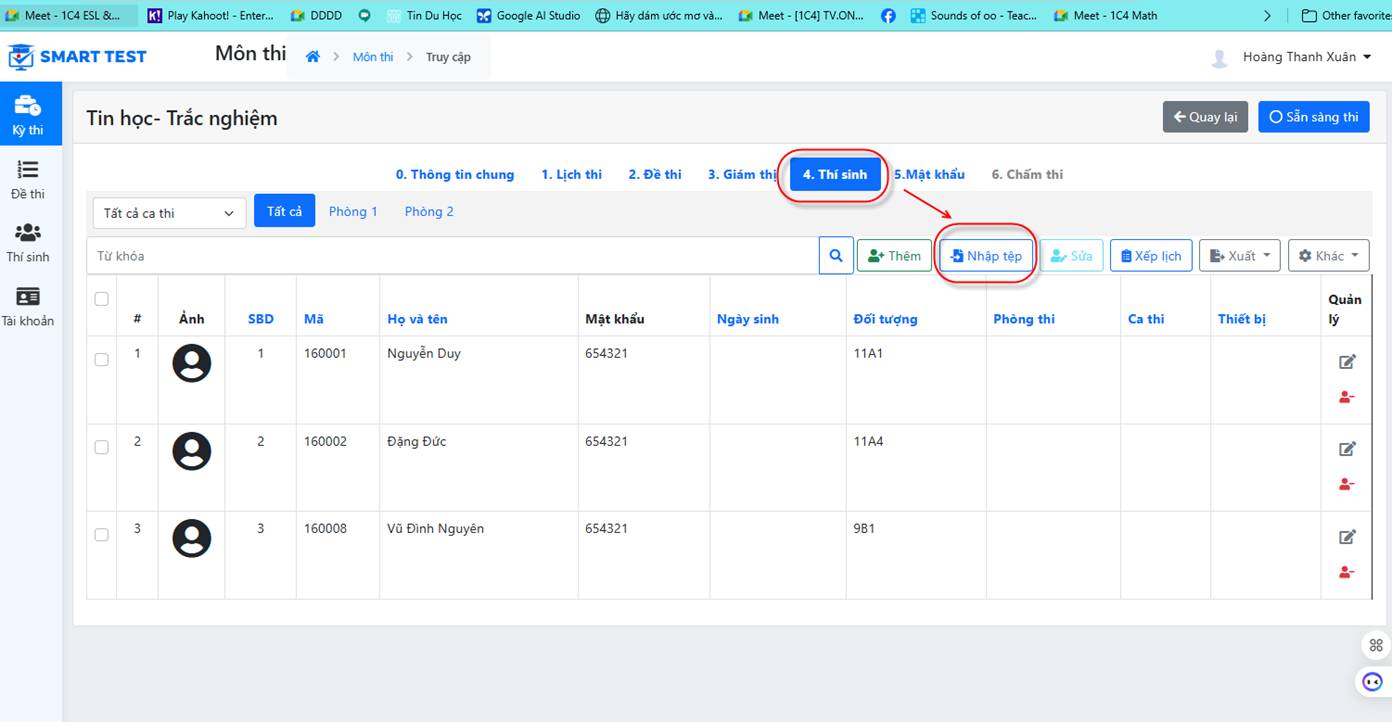
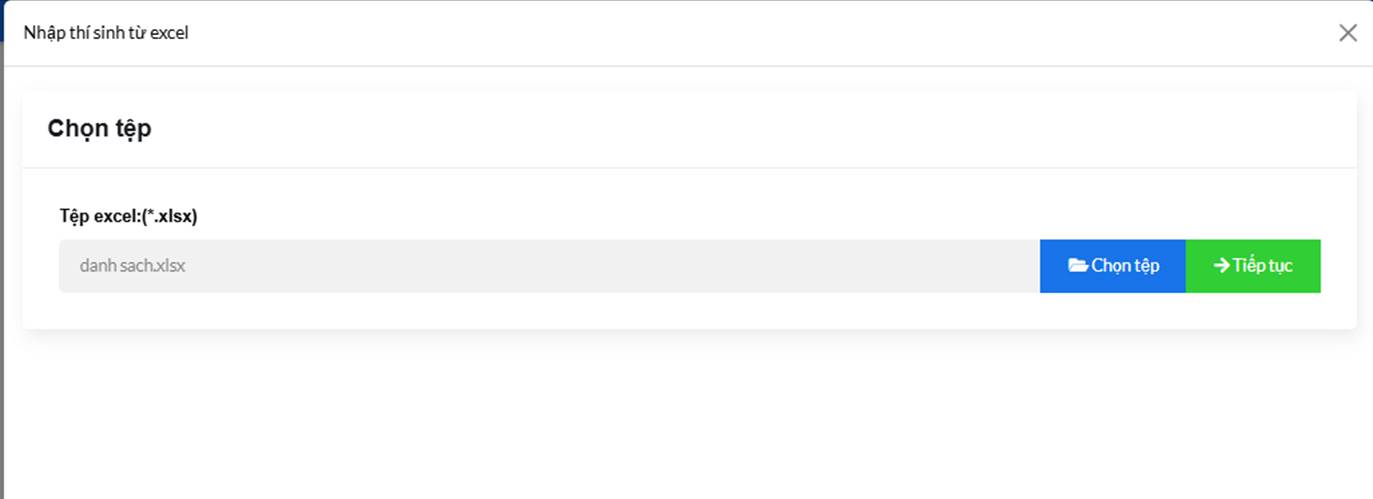
Import the candidate list file:
Choose the candidates' Excel file from your computer:
Choose the settings: the sheet name and the matching information columns in the Excel file
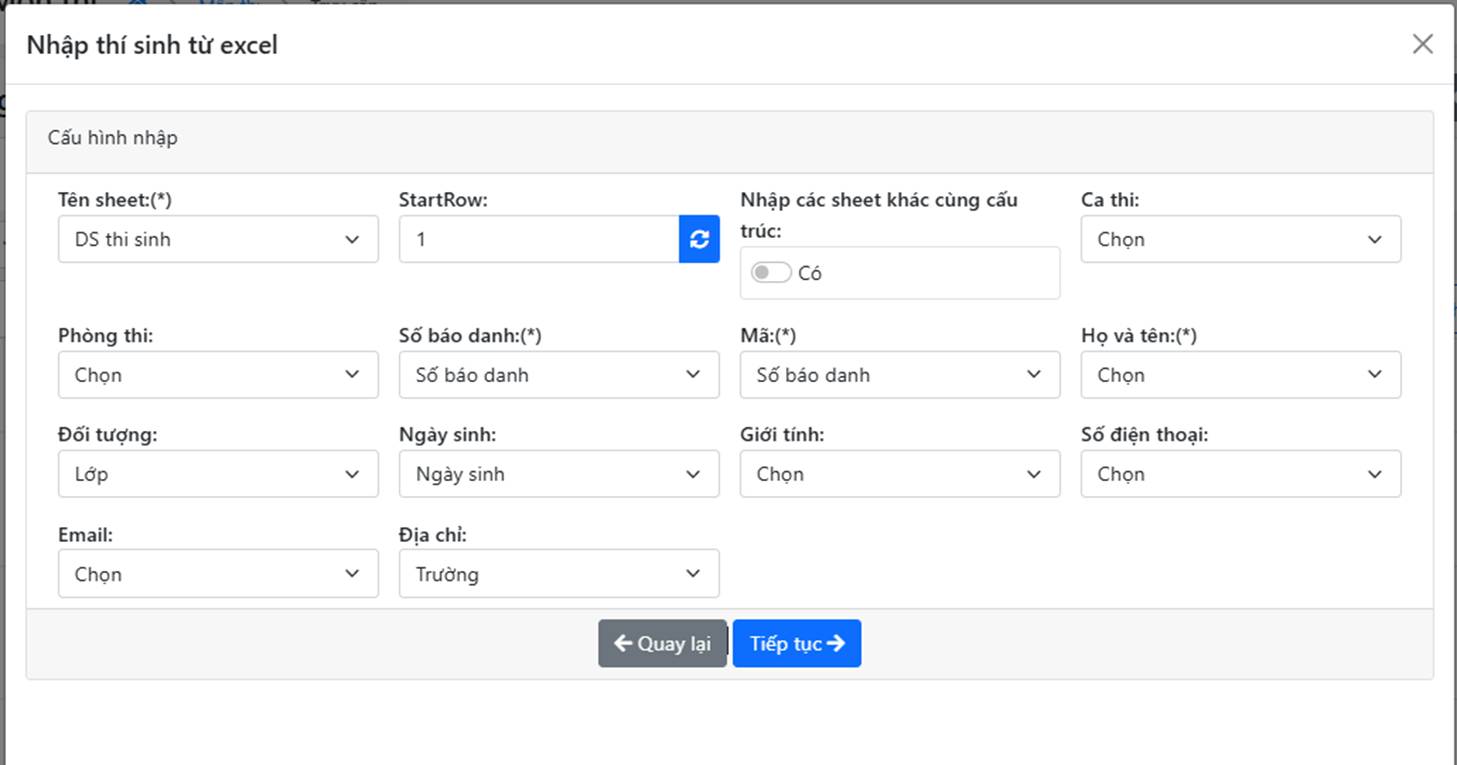
Continue
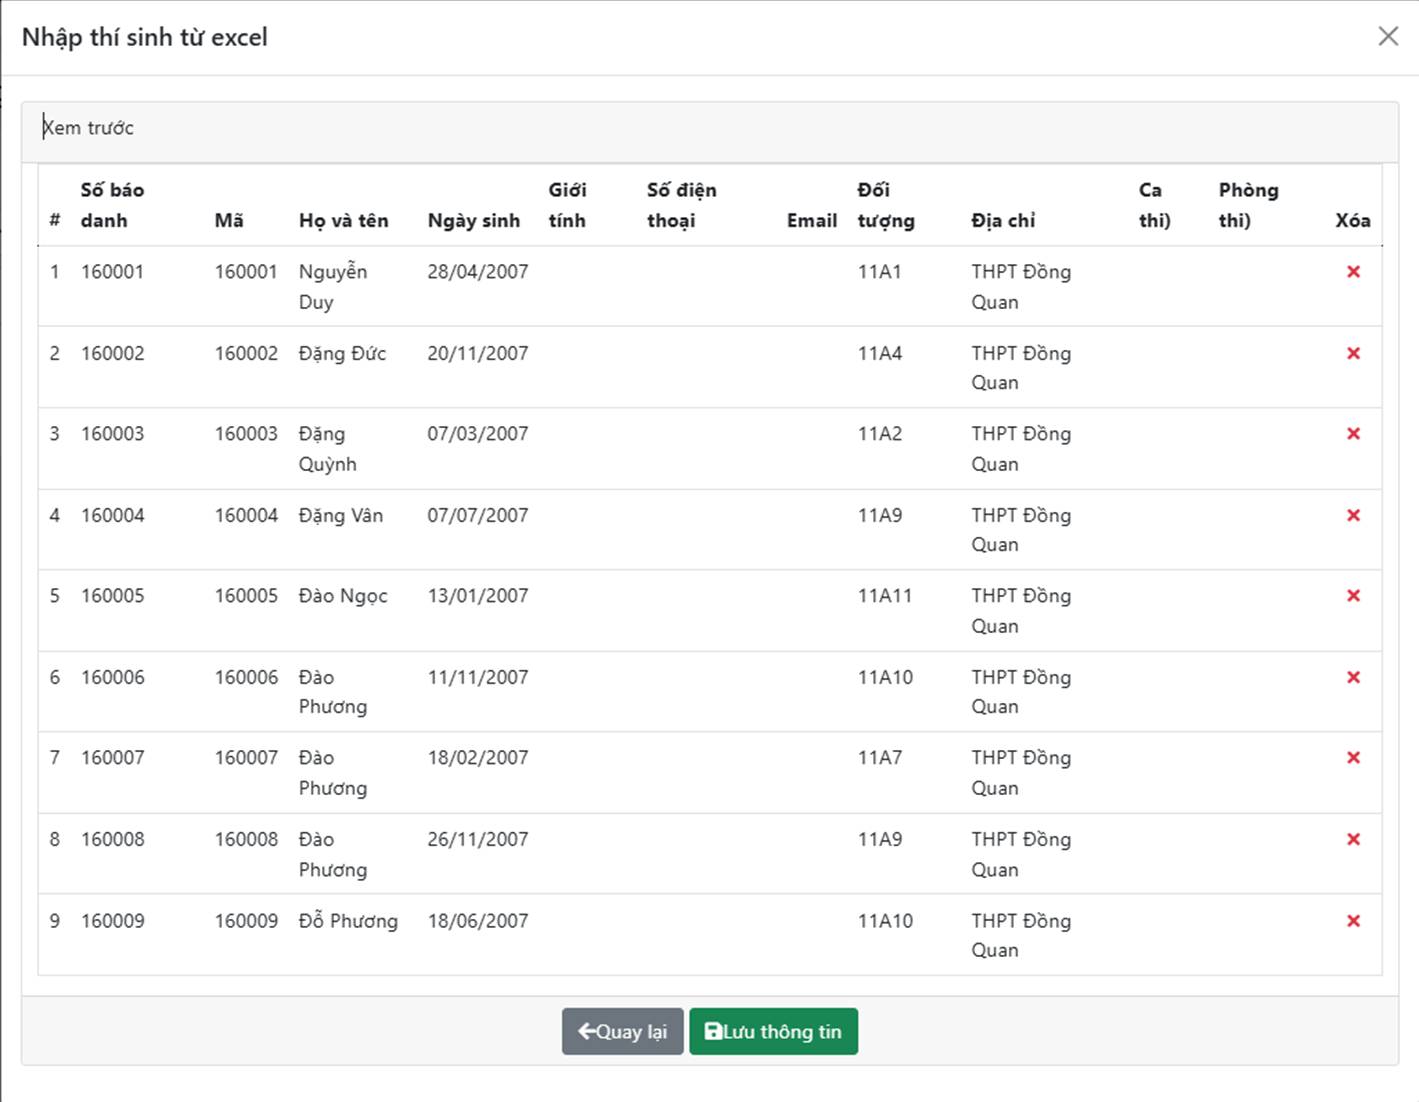
Continue:
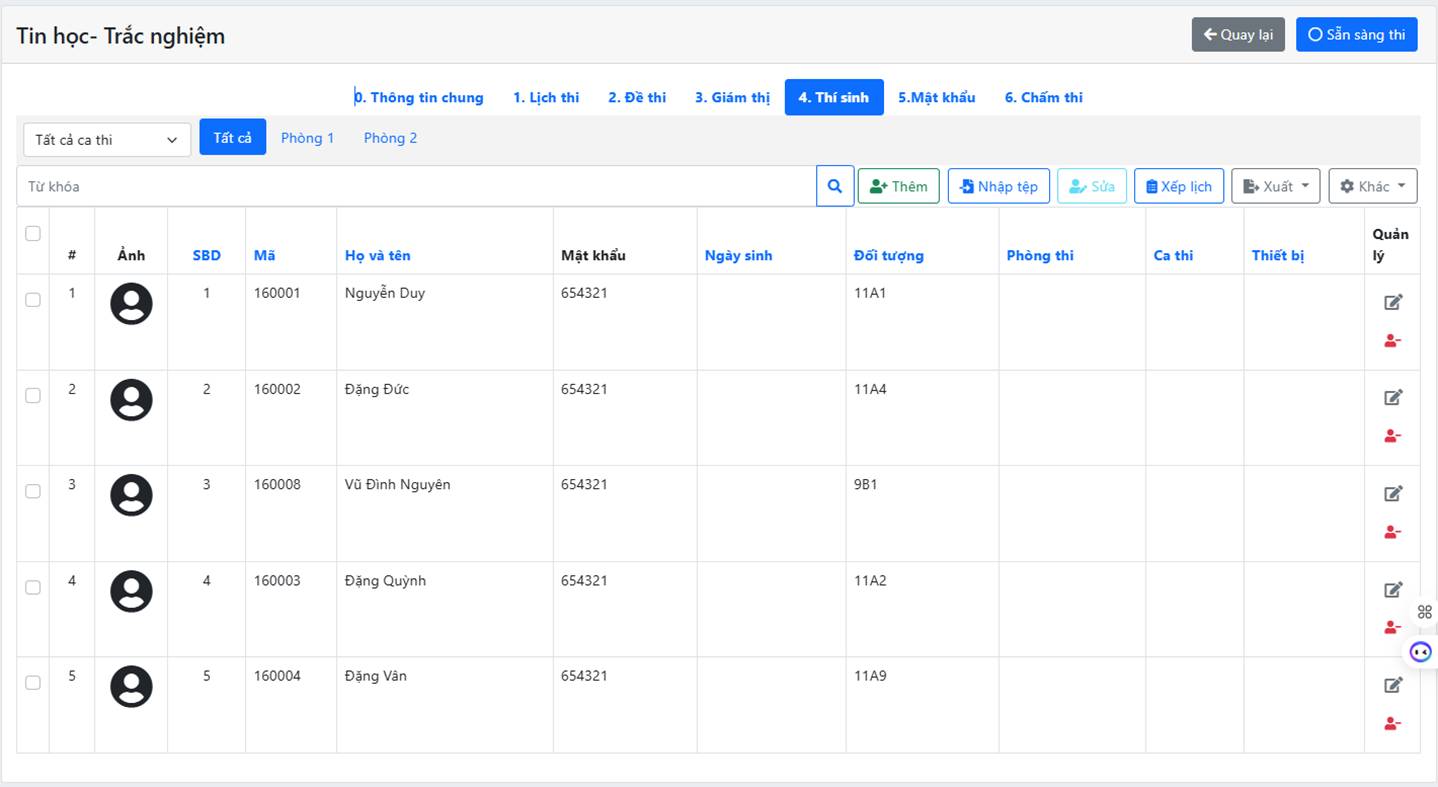
Set candidate passwords
Set candidates' sign-in passwords from their date of birth: when signing in to the exam, a candidate enters, for example, code (112005) and password (03052007)
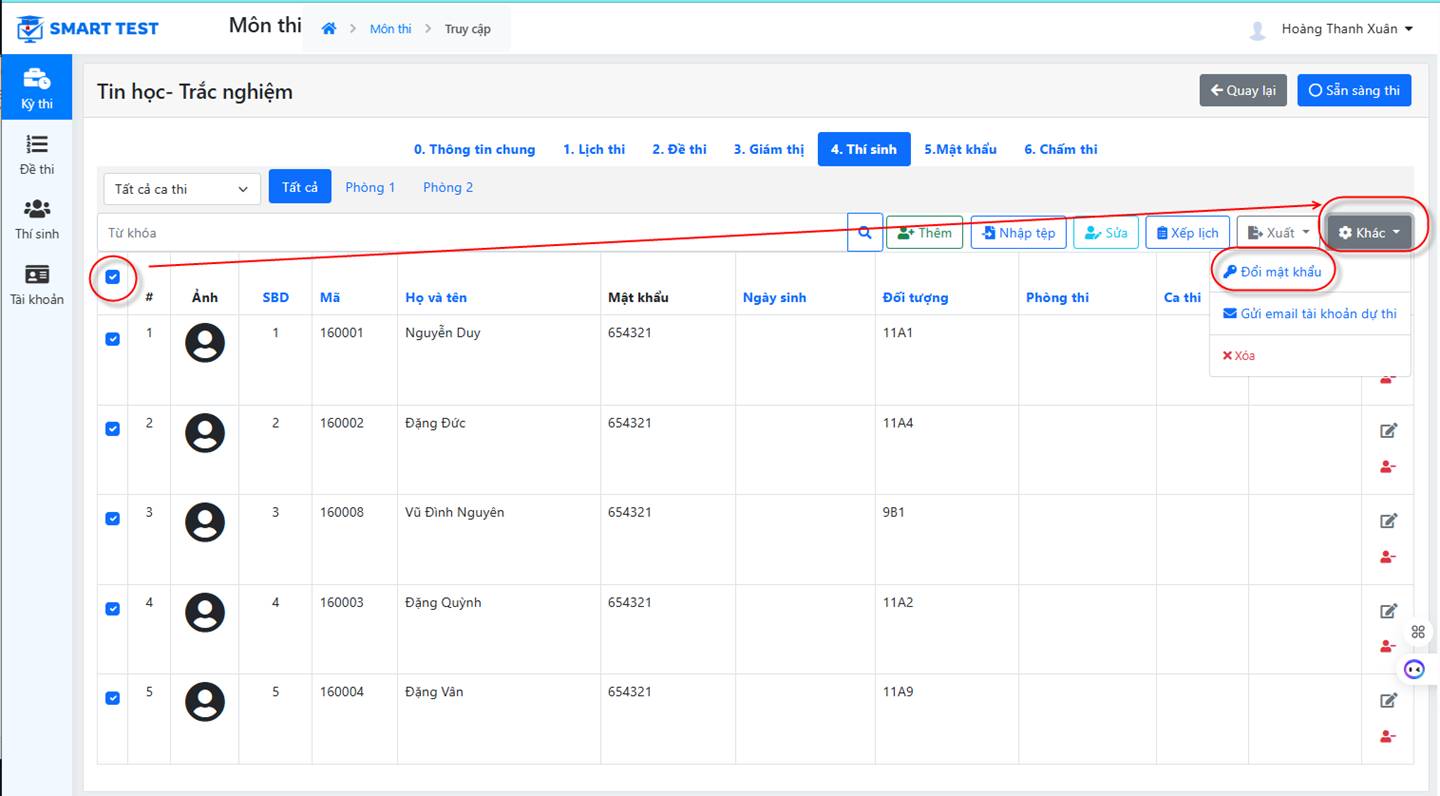
Next
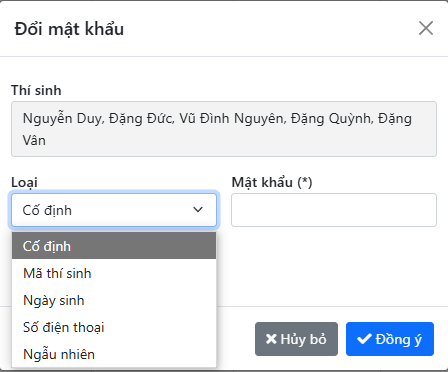
Edit or rearrange candidates' sessions and rooms
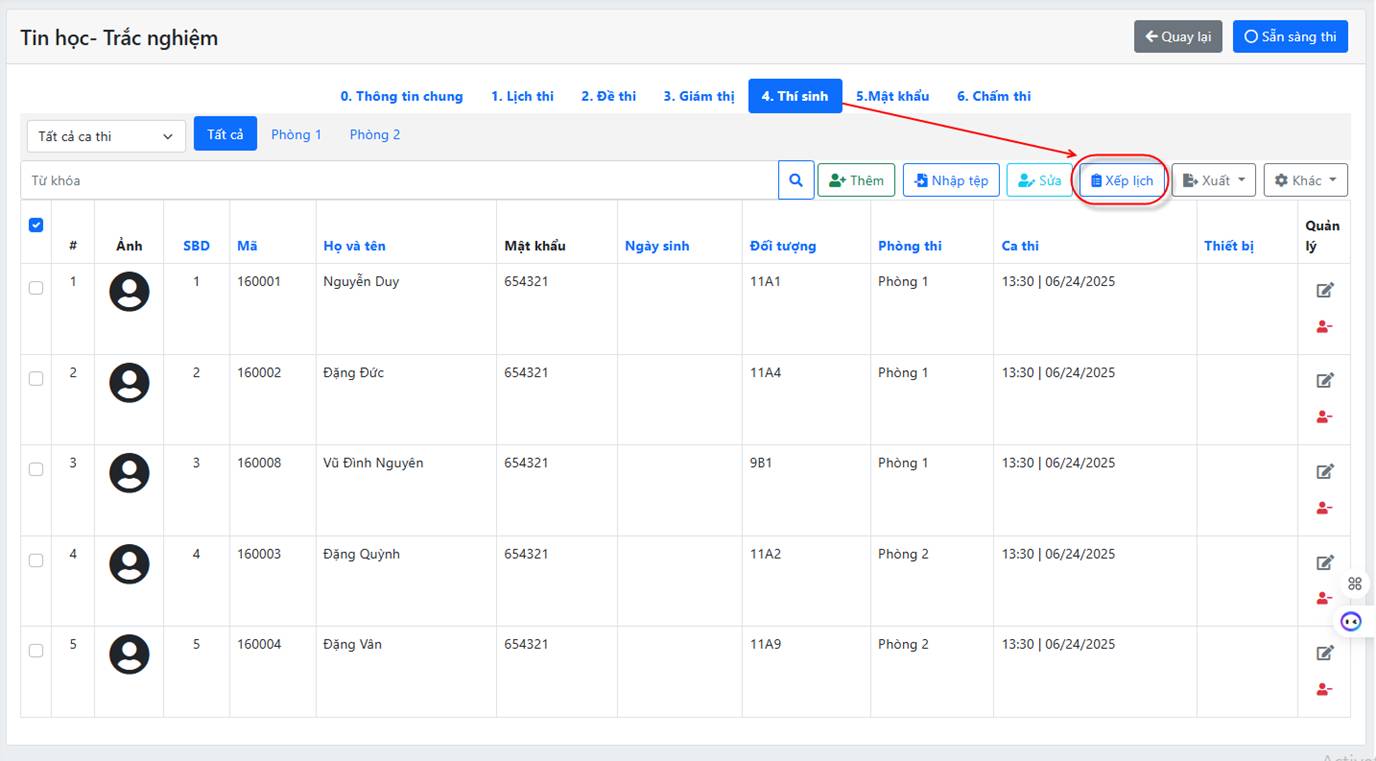
On the candidate list tab, click the Schedule button:
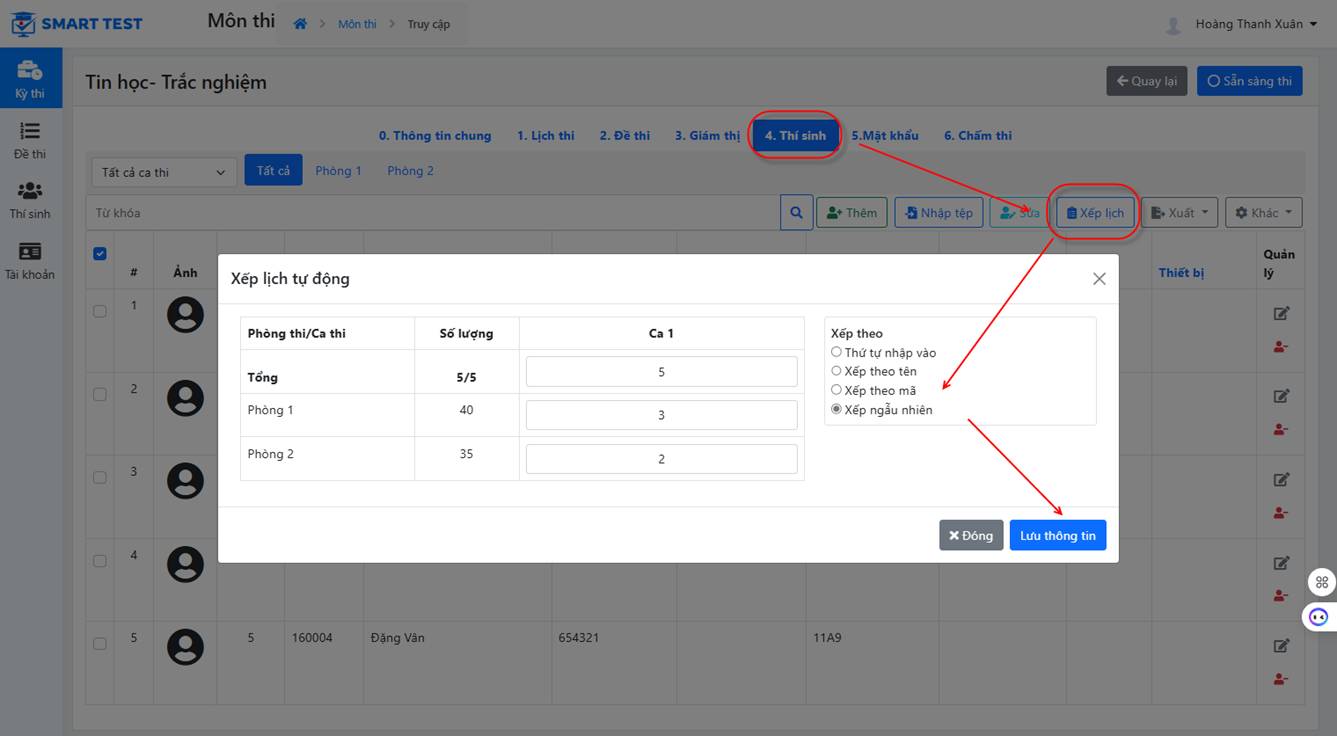
Edit or re-select the room and session for each candidate:
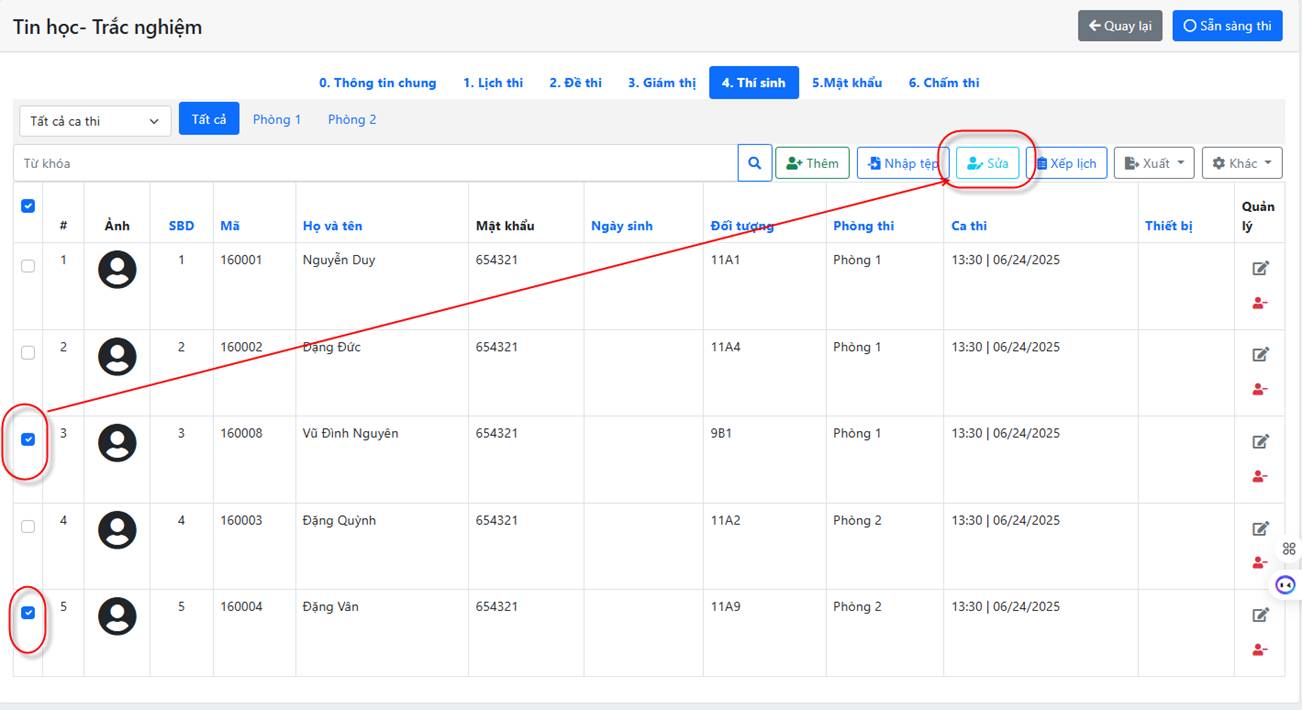
Select the candidates and click the  button to choose the session and room for the selected candidates.
Export the candidate list by room and session:
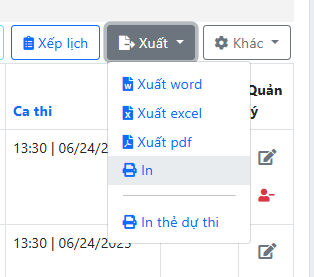
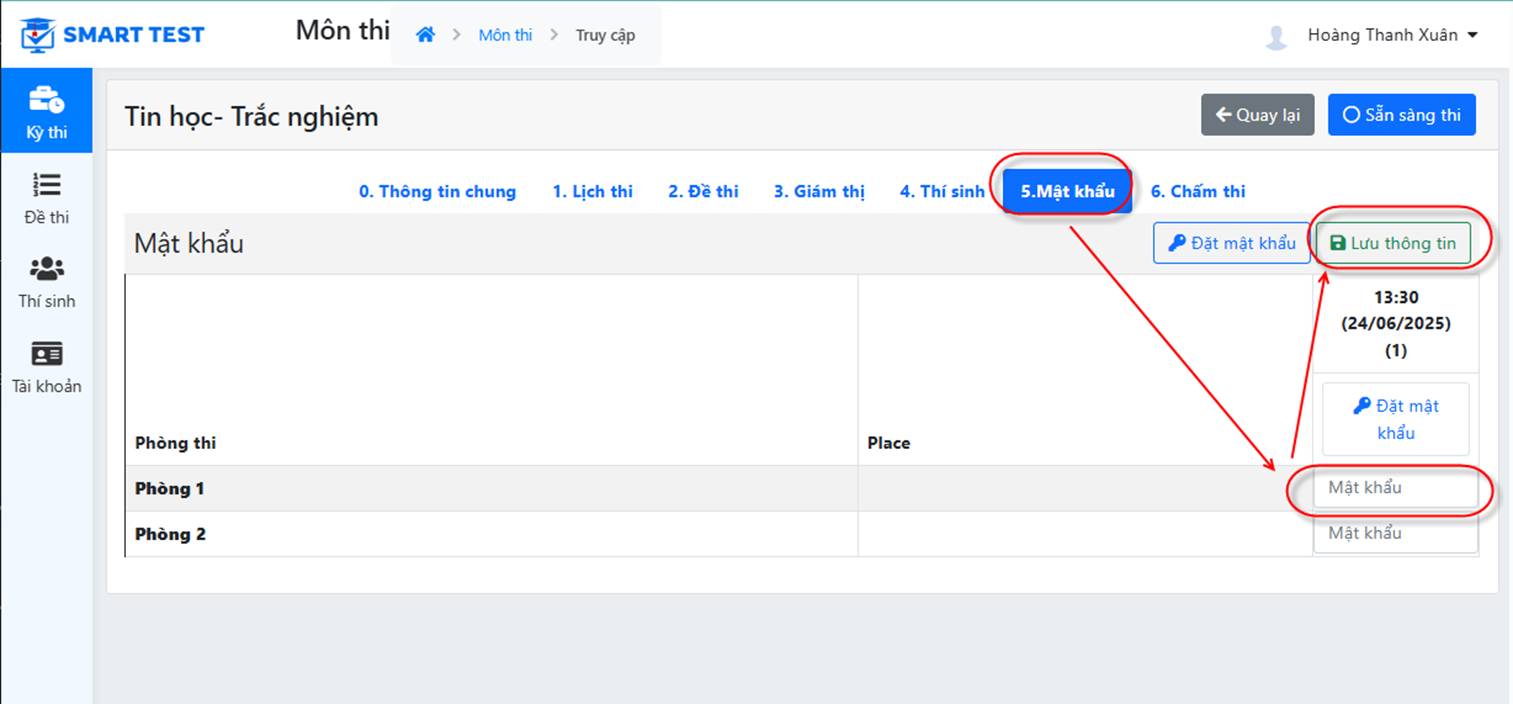
5. Room password (if needed)
- Choose the Password tab, then enter a password for the room. Candidates must enter this extra password to get into the room.
6. Exam management
• Check that everything is complete before running the exam: subject, schedule (sessions and rooms), rooms, candidate list, proctors and tests. To do this, choose Exam - Subject - click the Manage button - and check each tab.
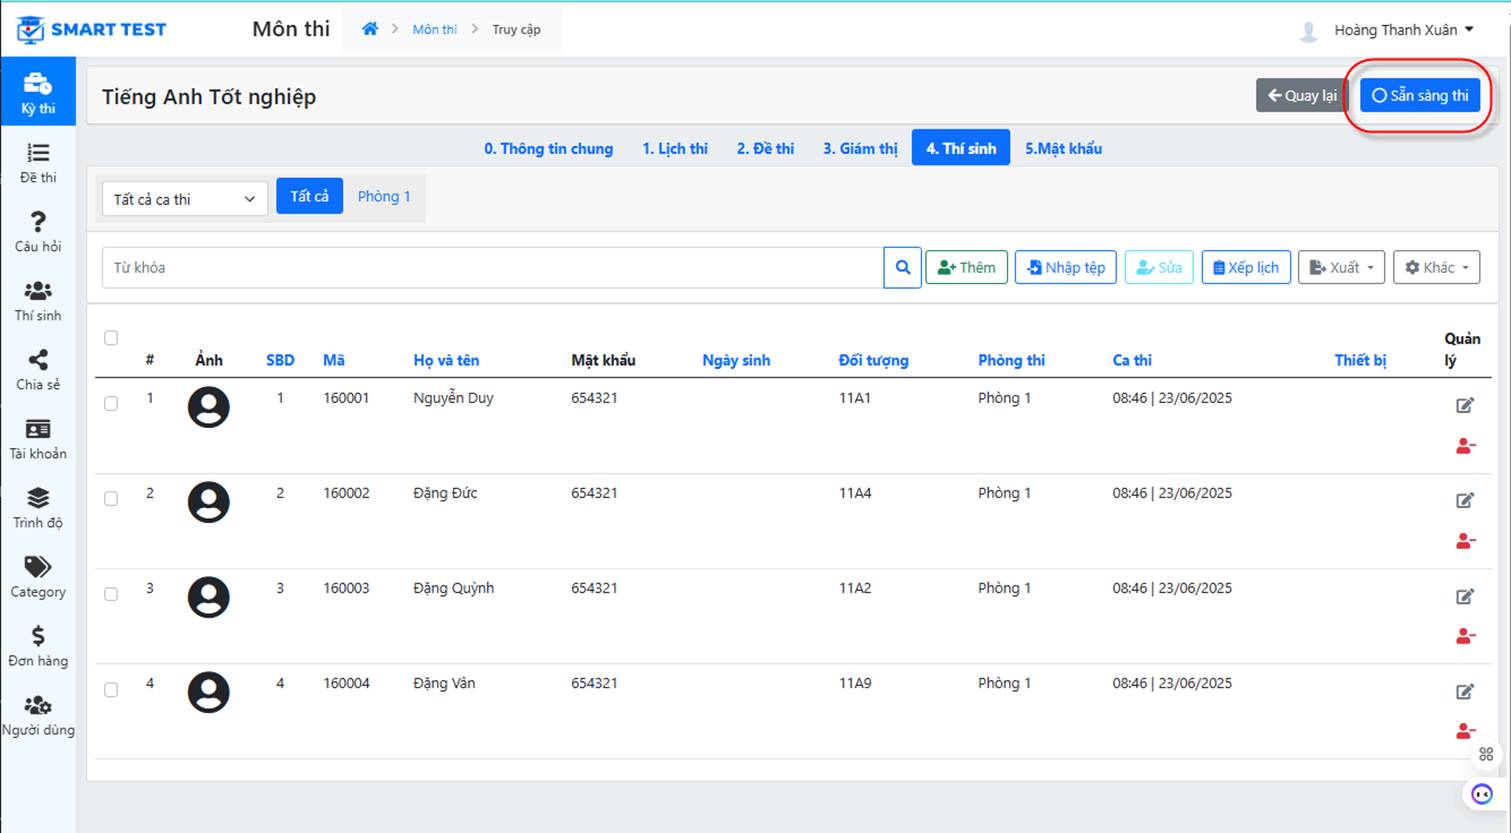
Overall subject management screen
On the overall subject management screen (covering all sessions and rooms organized for this subject), click the  button to activate the exam in the exam software.
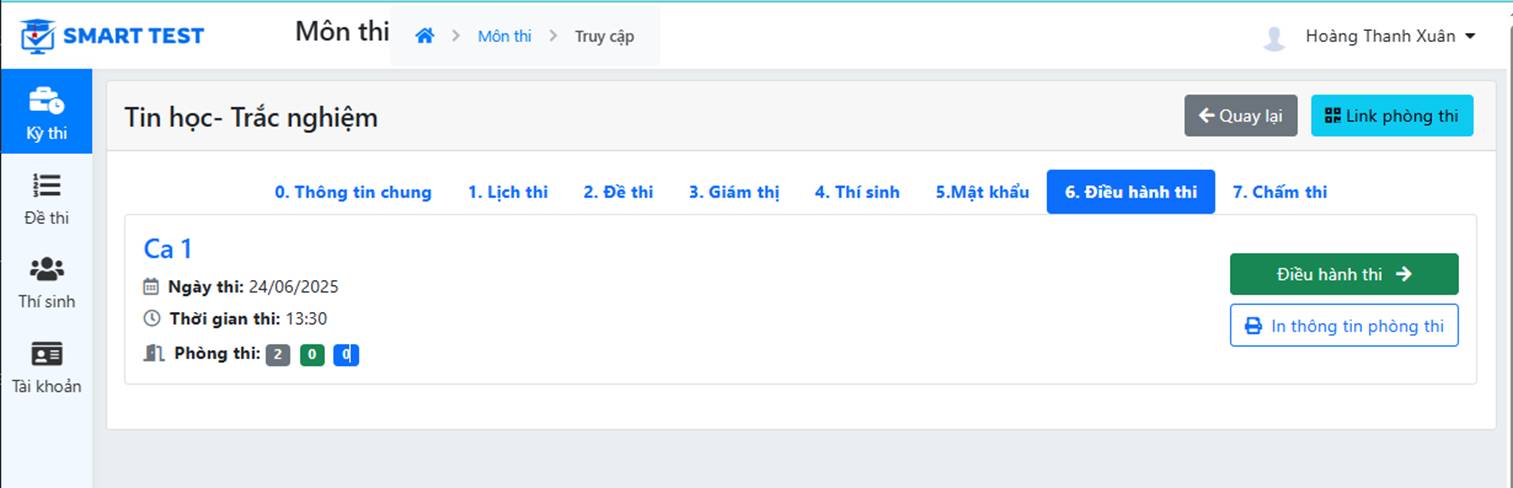
On the exam screen: after you click the Start button, the  tab appears. The organizer can click the
  button to switch to the exam running screen.
The exam running screen looks like this:
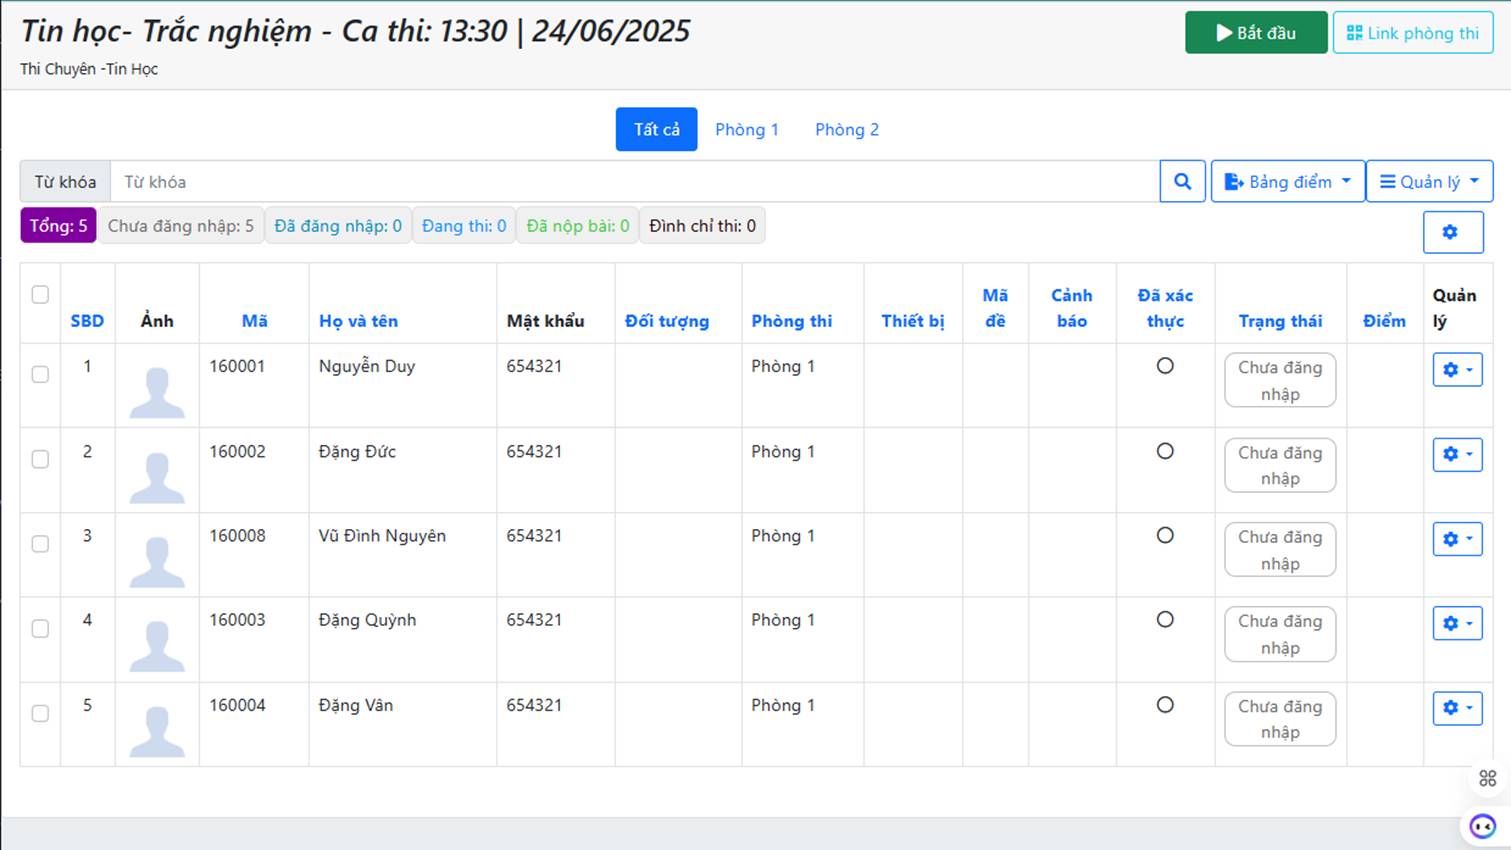
Detailed subject management screen by room and session
Click the  button to activate the subject so that candidates can enter the exam.
To get the exam link to send to candidates, click the  button
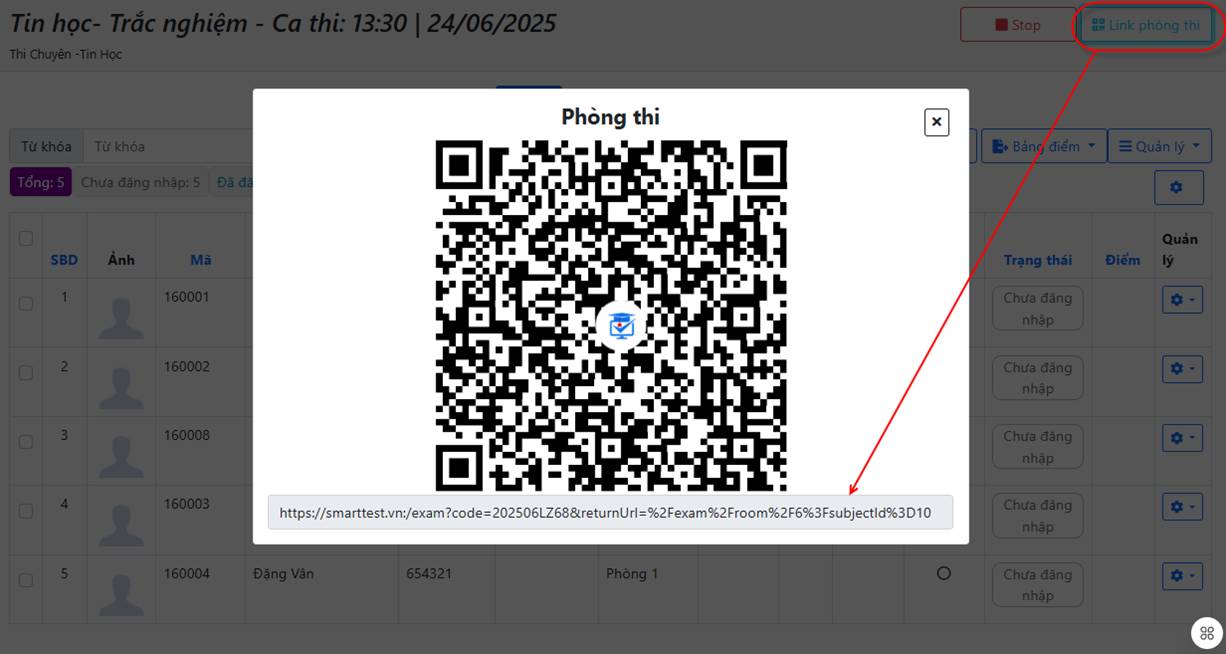
- On the exam management screen (the screen for one specific session/room), staff can also perform other actions such as:
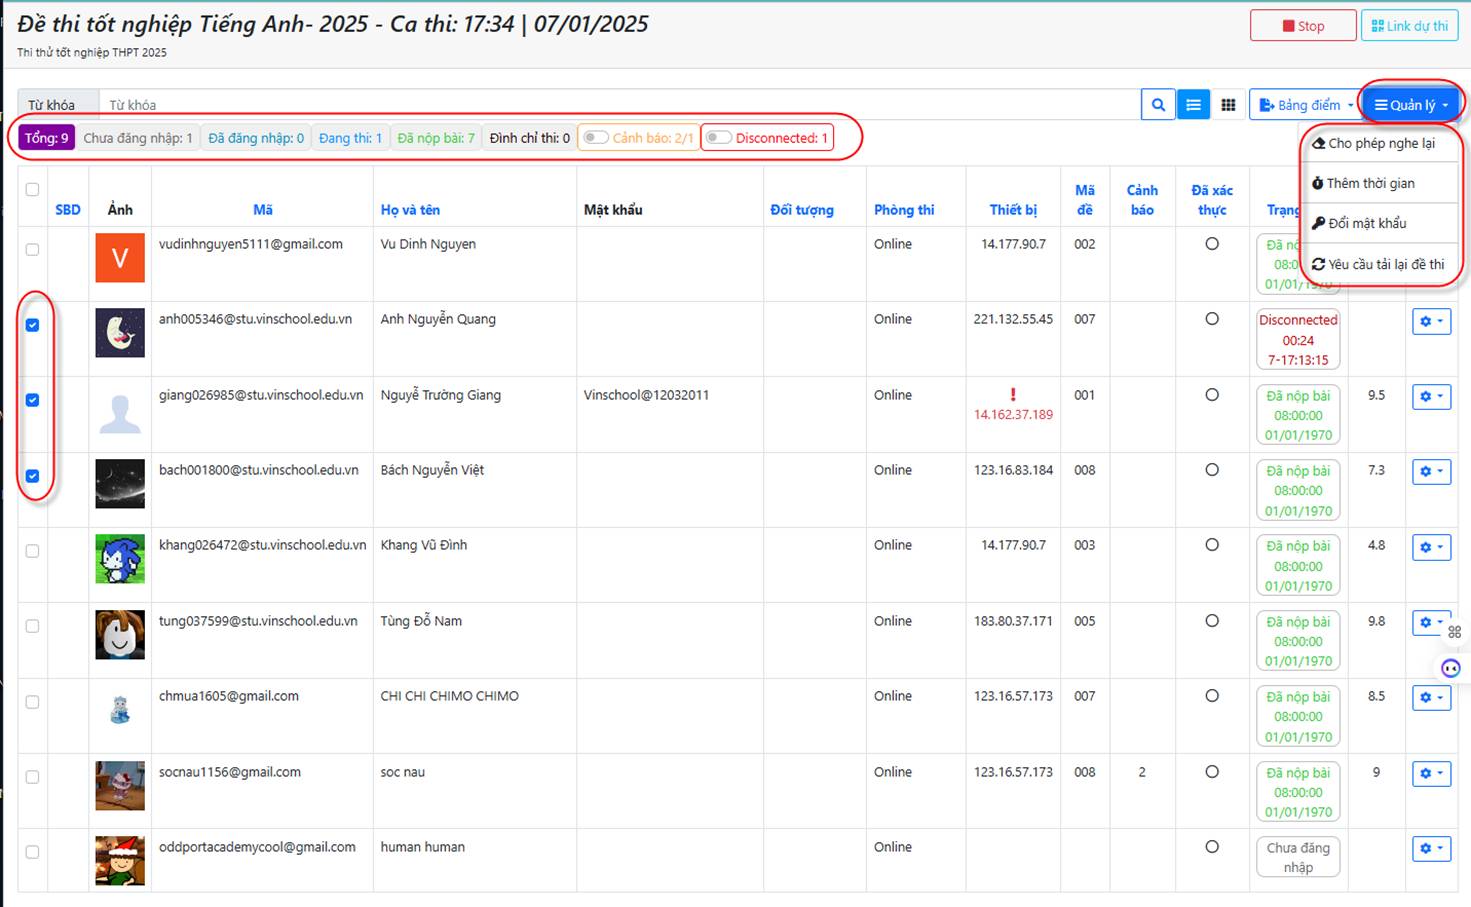
Select the candidates before performing these actions
- Allow replay: For tests with audio files, candidates can normally listen once. If they need to listen again or more times, the teacher can use this function.
- Add exam time: Select candidates and add extra exam time for them if needed.
- Change password: Select candidates, change their password and give them the new password if needed.
- Request test reload: If a test has an error, the teacher corrects the question and uses this function to ask candidates to reload the test while they are taking it, without affecting their progress.
Other features on the exam monitoring screen:
Filter candidates by status:
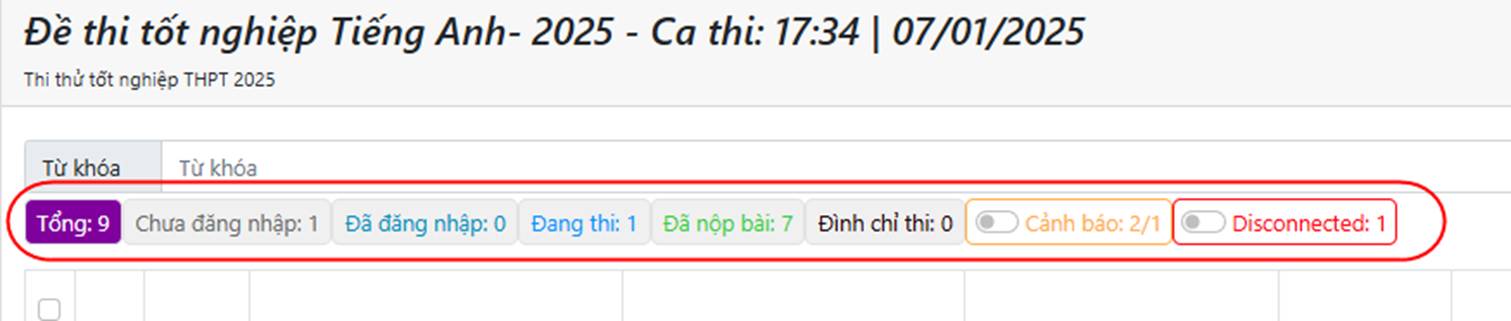
- Not signed in
- Signed in
- In progress
- Submitted
- Suspended
- Warning
- Disconnected
In addition, exam managers and proctors can let a candidate enter late: select the candidate and click the button shown below
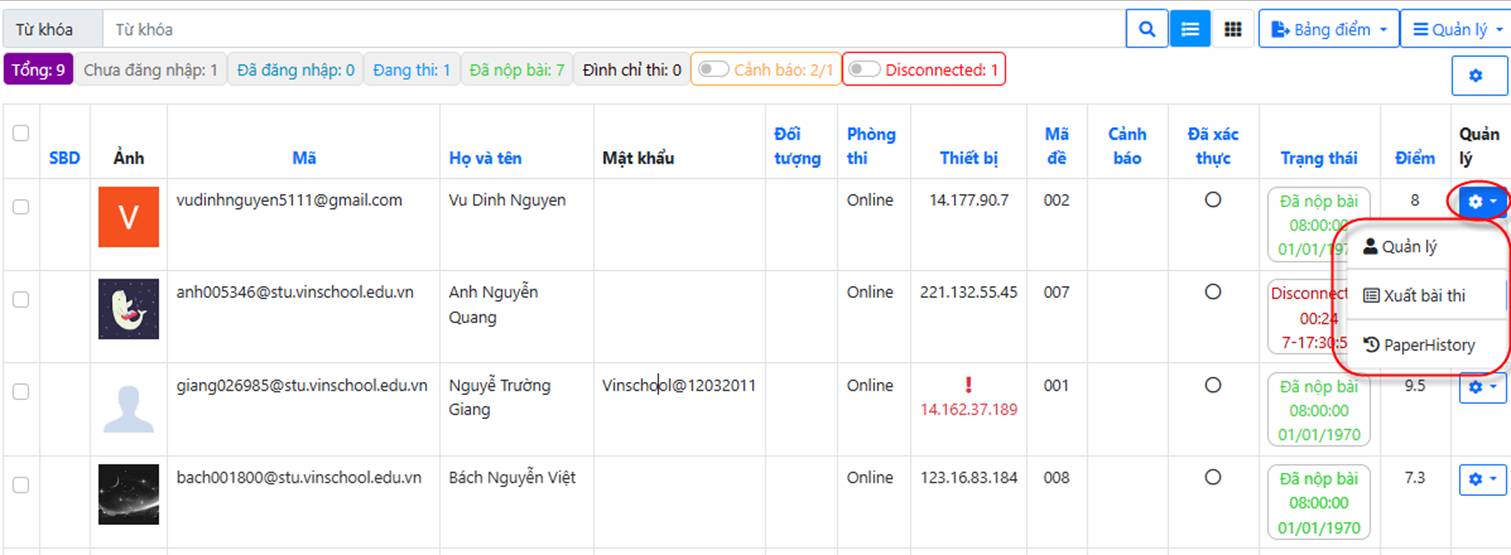
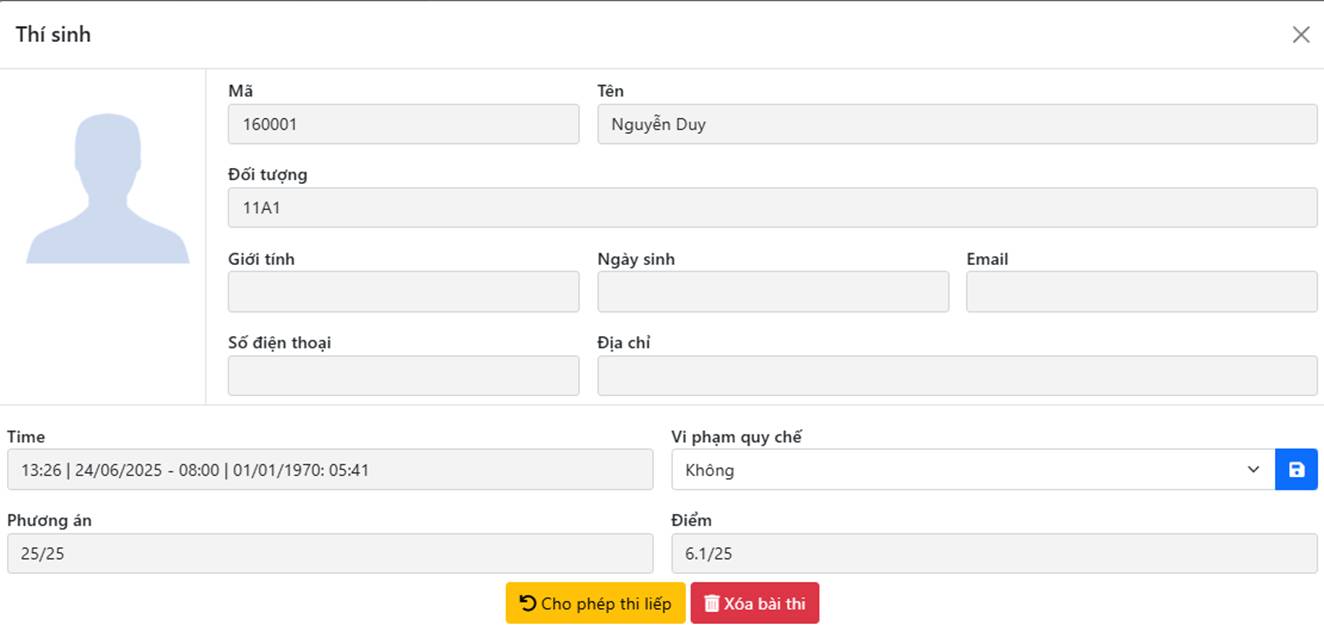
If you choose Manage: the exam manager can allow a late entry, let a candidate continue, or delete the candidate's attempt
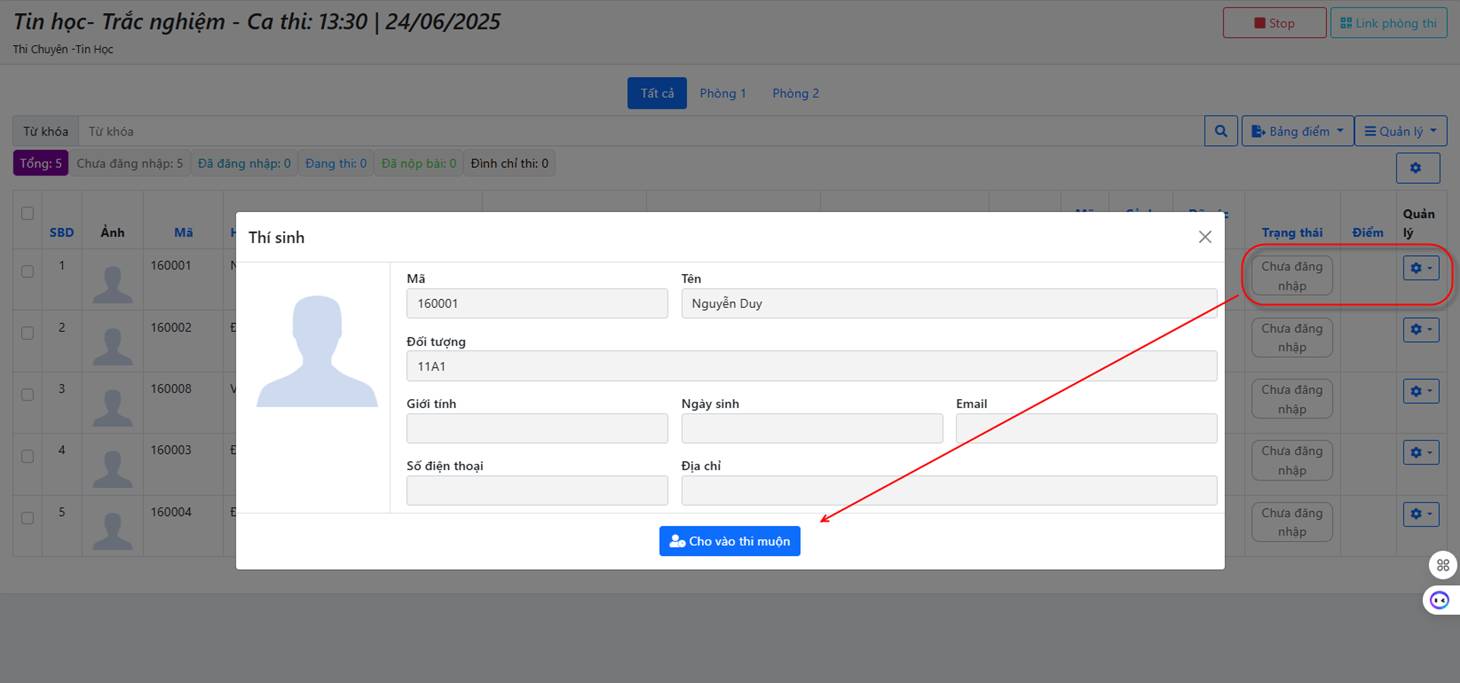
If a candidate is taking or has taken the exam, the screen lets you allow them to continue or delete their attempt.
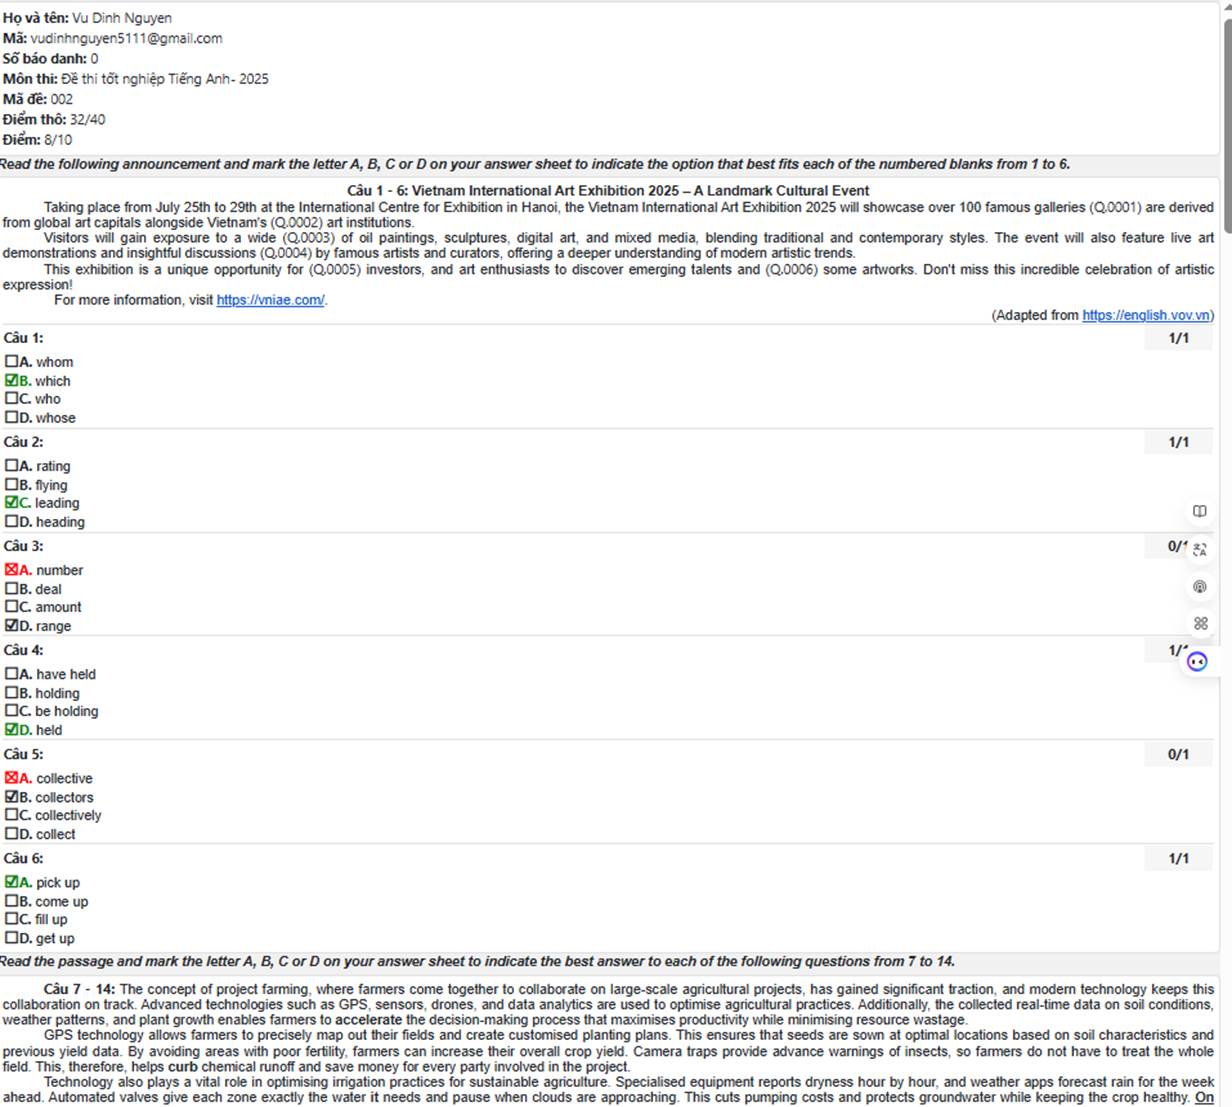
If you choose Export paper: staff can print the candidate's detailed answers:
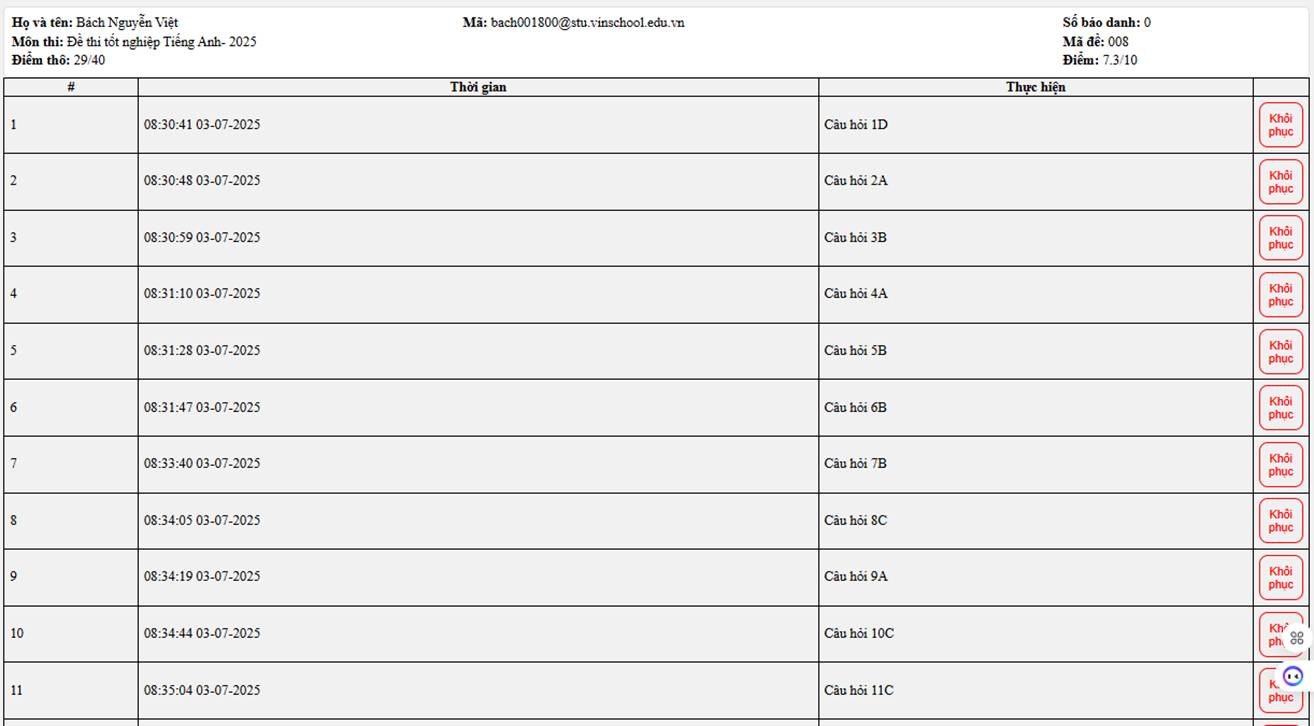
If you choose Paper History: staff can view the candidate's attempt history:
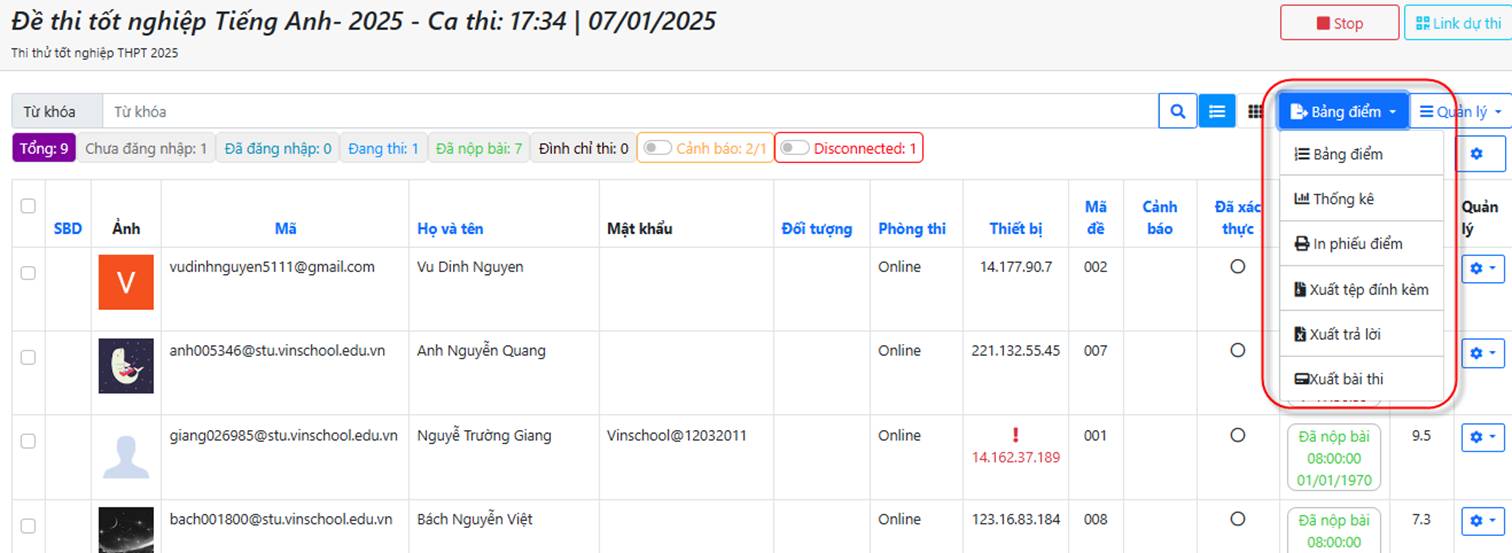
Export results
On the proctor's monitoring screen, after the exam ends, proctors can:
- Export the score sheet
- View statistics
- Print score sheets
- Export attachments
- Export candidates' answers
- Export submissions: for essay subjects where candidates attach files to their work, the system exports the files for saving.
End the exam
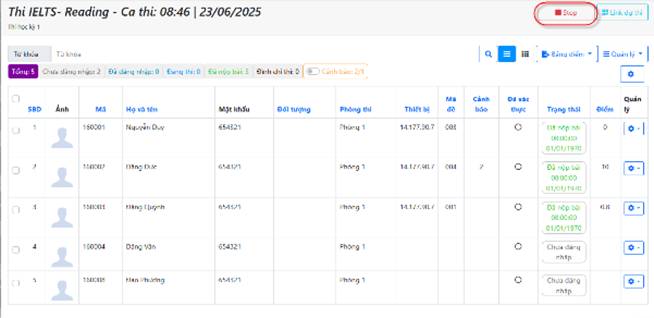
When candidates have finished, a proctor can click the  button on the detailed monitoring screen to end their session. After all proctors of all sessions have ended theirs, the subject manager clicks the button on the overall subject management screen. (The subject must be ended before it can be passed on to teachers for marking.)
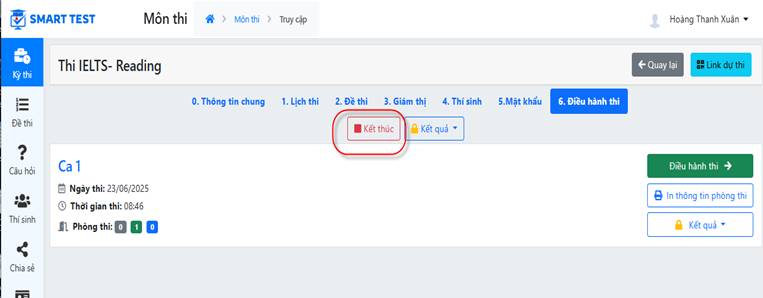
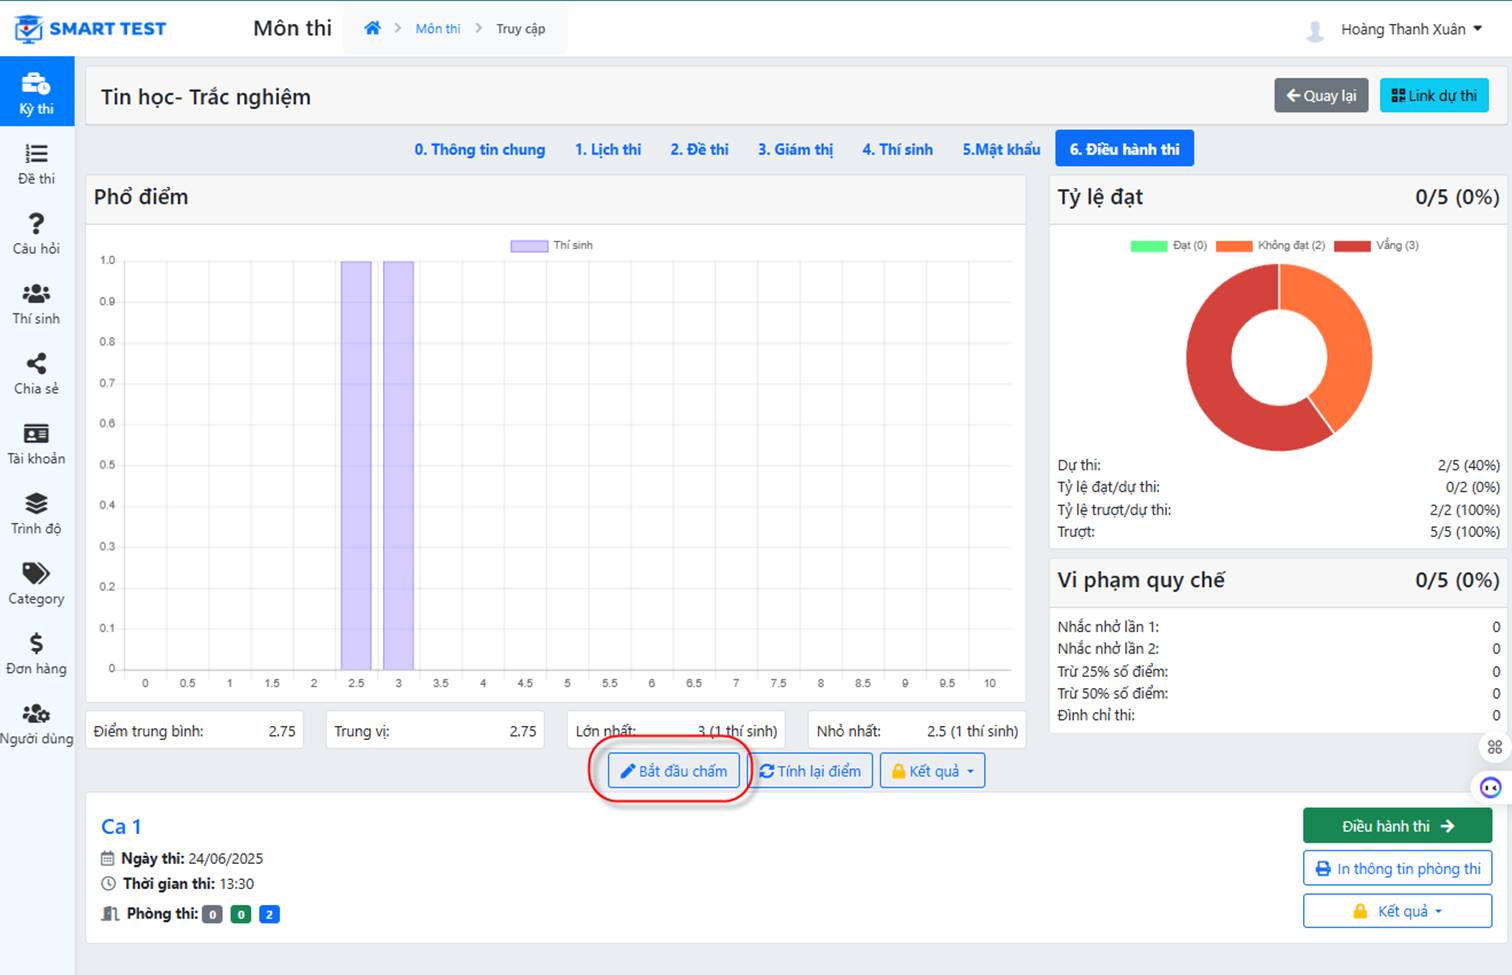
The end screen shows:
- Start marking: configure the marking round
- Recalculate scores: if an answer key is corrected (because an error was found) after candidates have finished and received automatic scores, staff must click this button to recalculate the candidates' scores.
- Results:
- Export the score sheet
- View statistics
- Print score sheets
- Export attachments
- Export candidates' answers
- Export submissions: for essay subjects where candidates attach files to their work, the system exports the files for saving.
Subject ended successfully: on the subject management screen, the subject status shows as completed, as below:
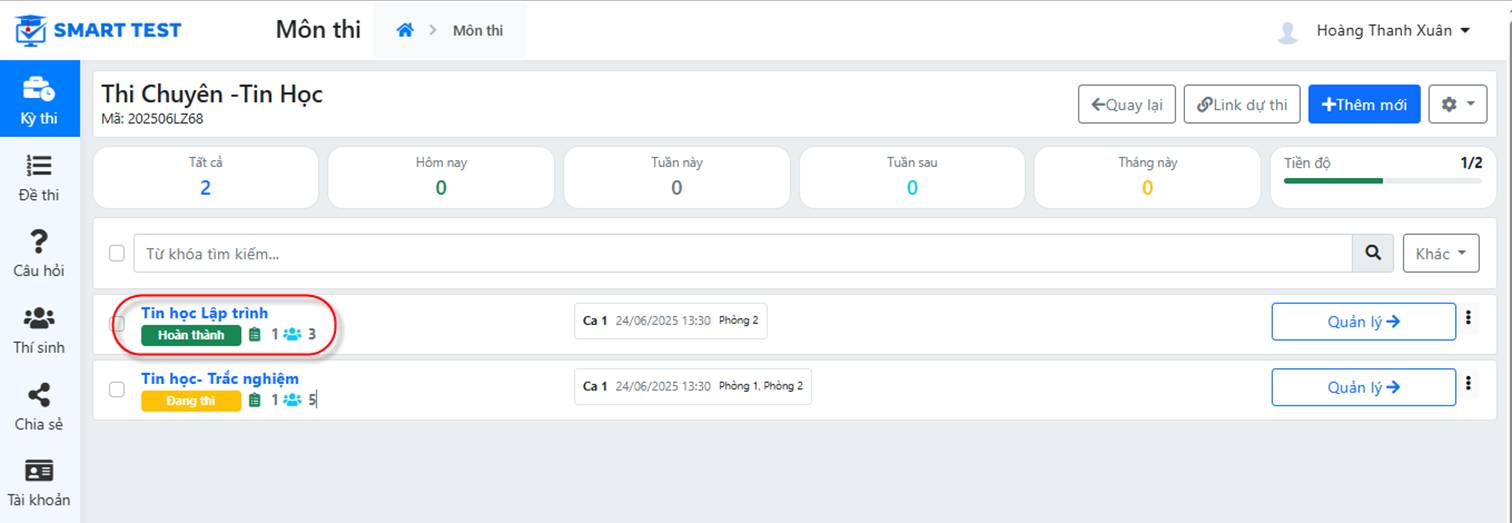
7. Enter markers (under revision)
From the exam screen, staff can see which subjects are in the marking status
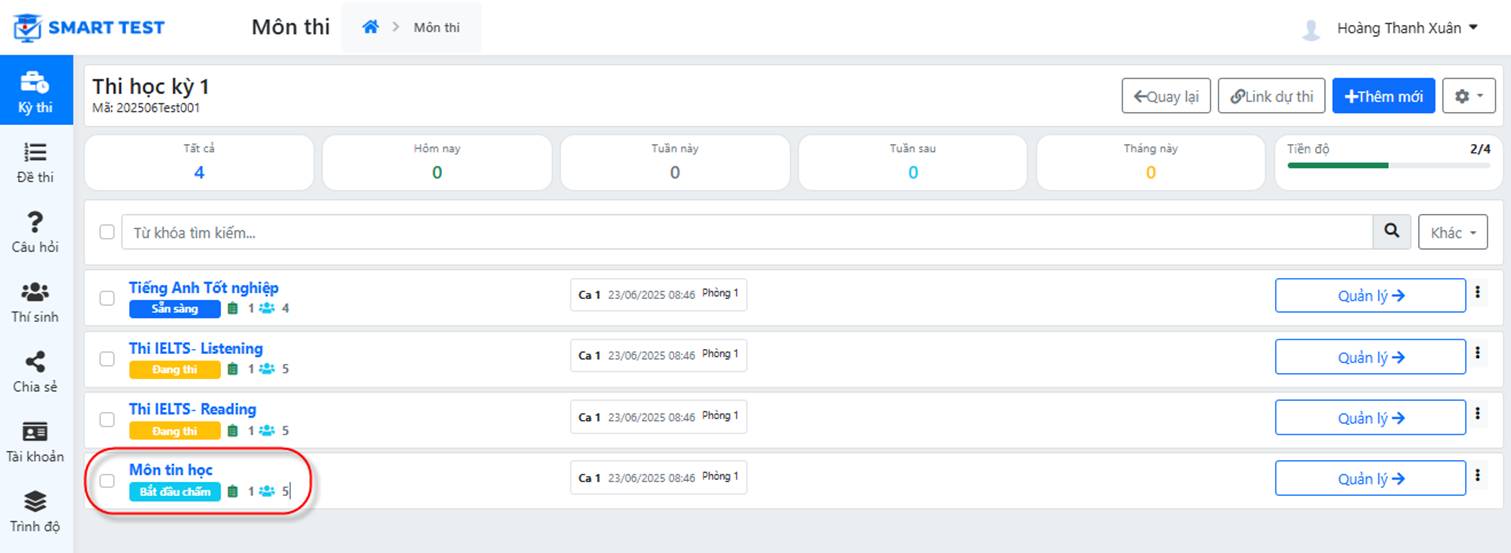
MARKING PROCESS:
a. Step 1: End the subject, switch to the marking status and configure marking
End the subject on the subject management screen. On the Exam management tab, the system lets you assign and send marking information to the designated teachers (only essay subjects need this marking feature).
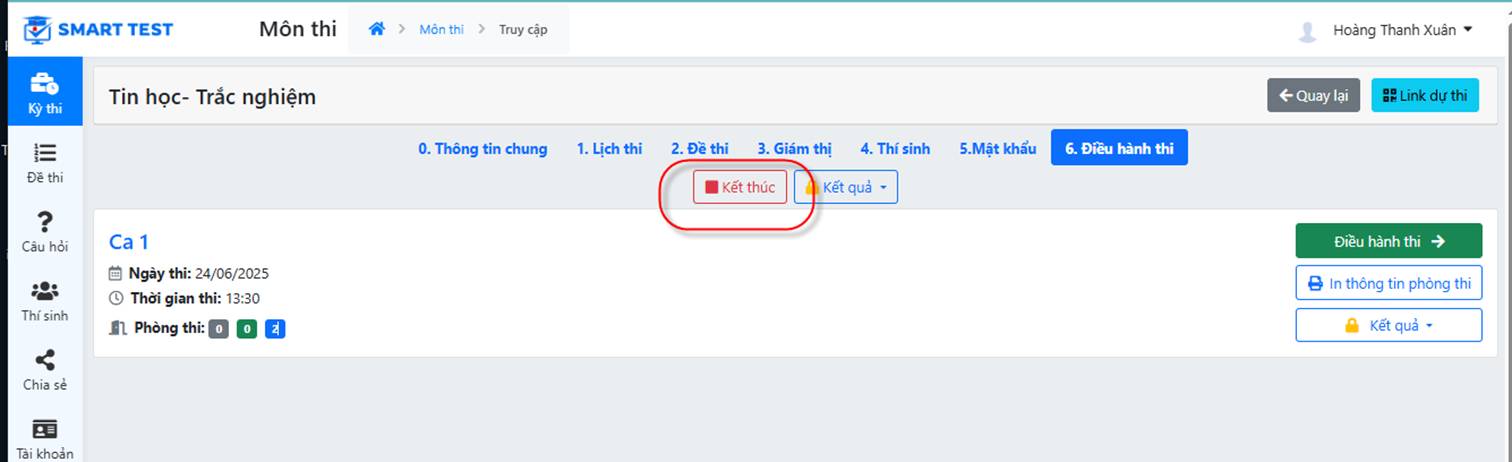
Subject management screen
Click the Start marking button as shown below:
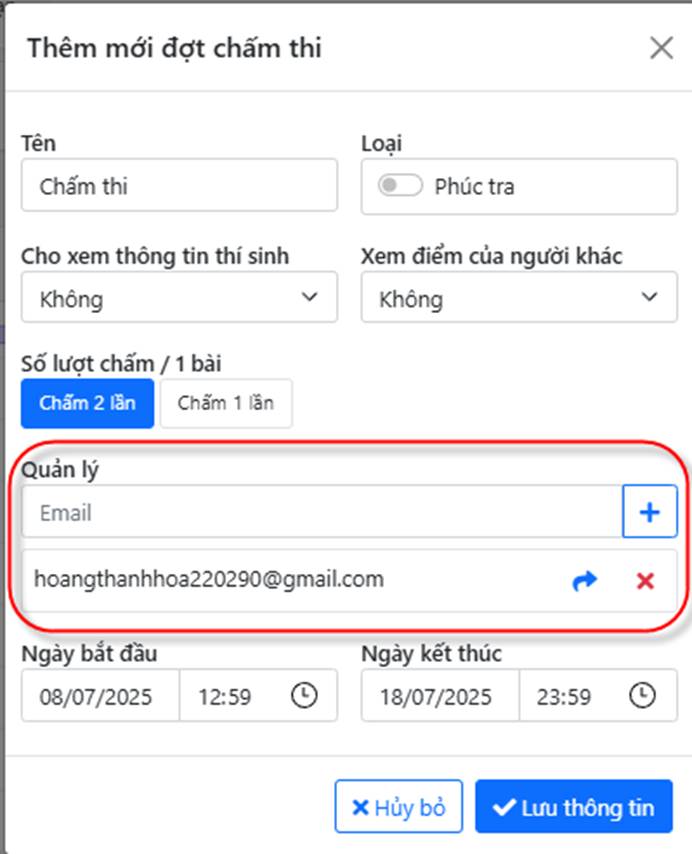
The system displays the marking settings:
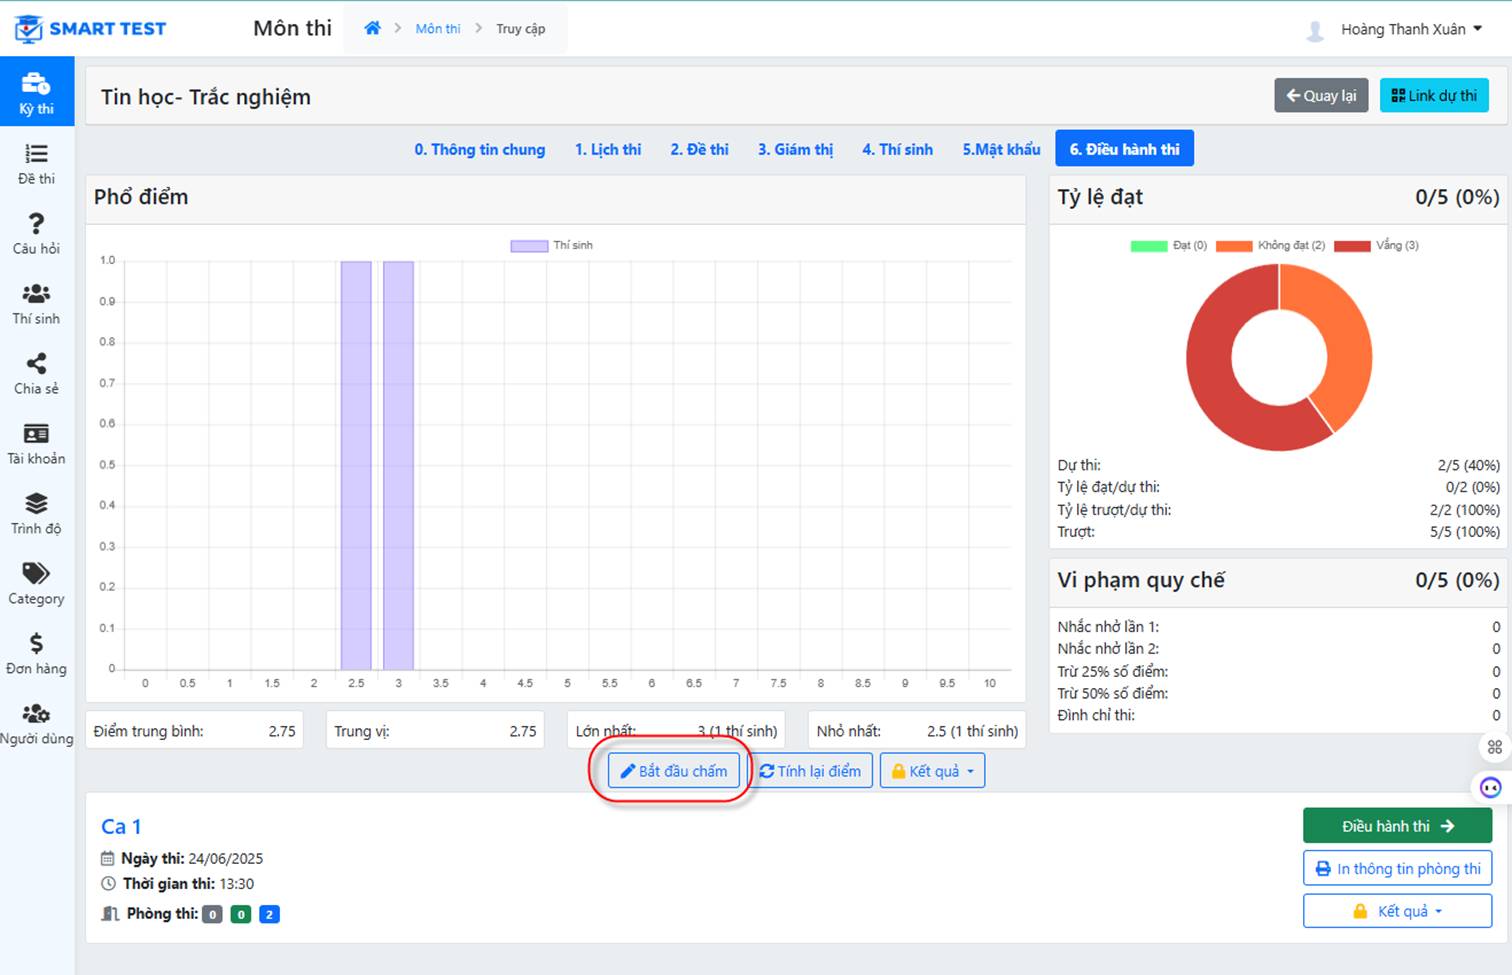
- Marking round name
- Type: leave the default; enable it if this is a re-mark (appeal review)
- Show candidate information:
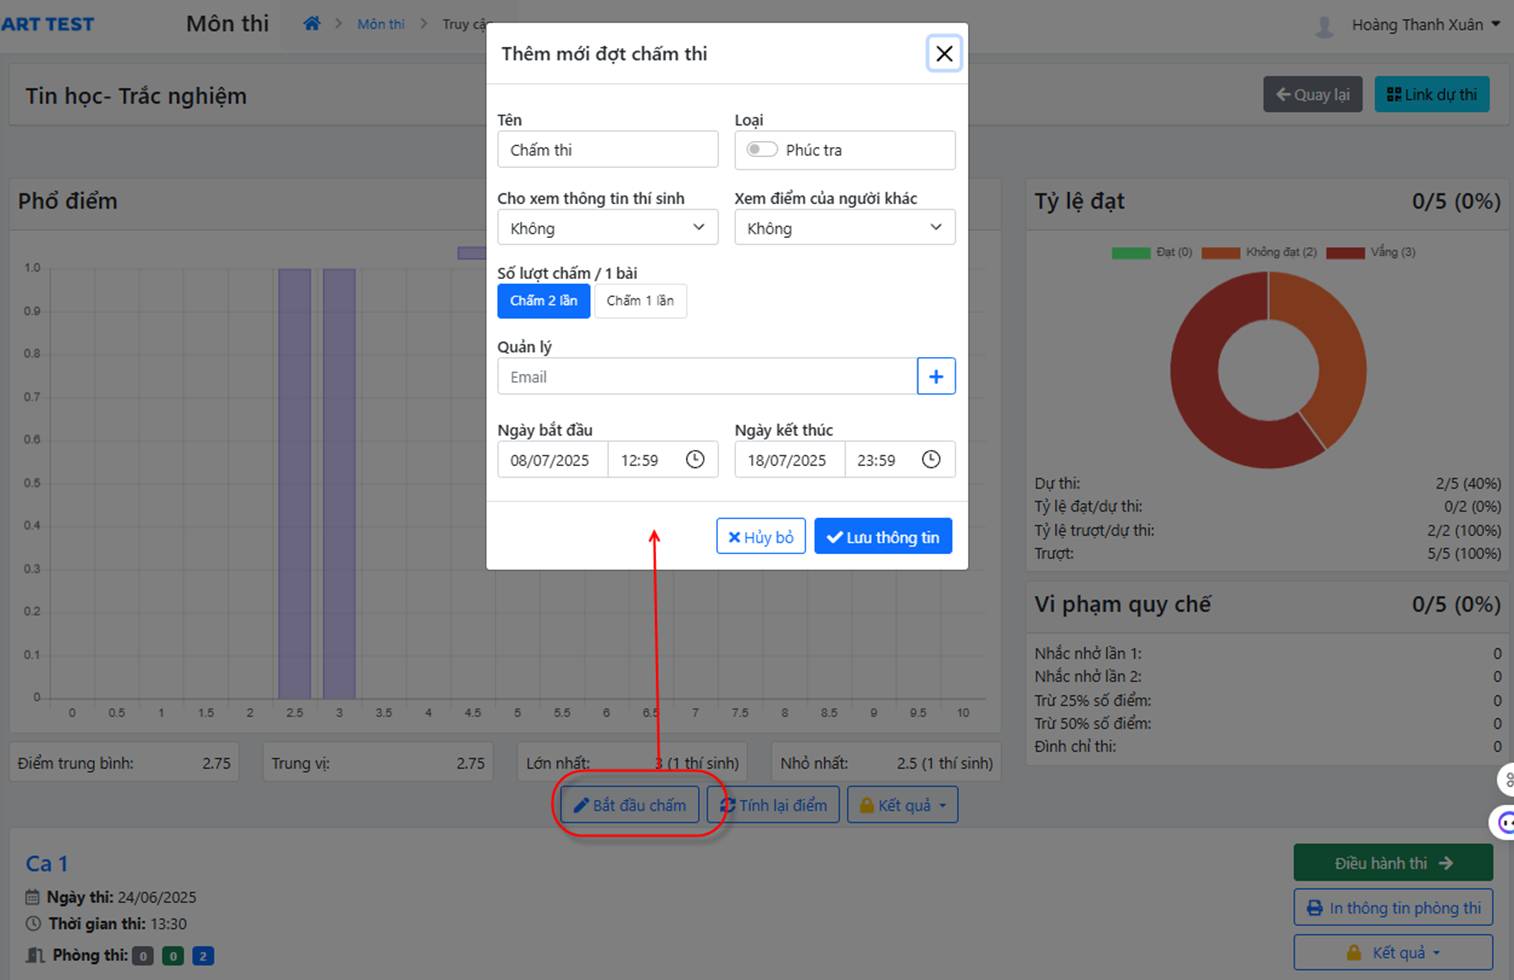
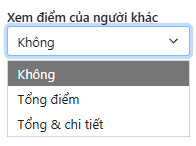
- View other markers' scores: when two teachers mark, this setting controls whether a teacher can see the other's scores and at what level (total or detailed)
- Markings per paper: marked twice or once
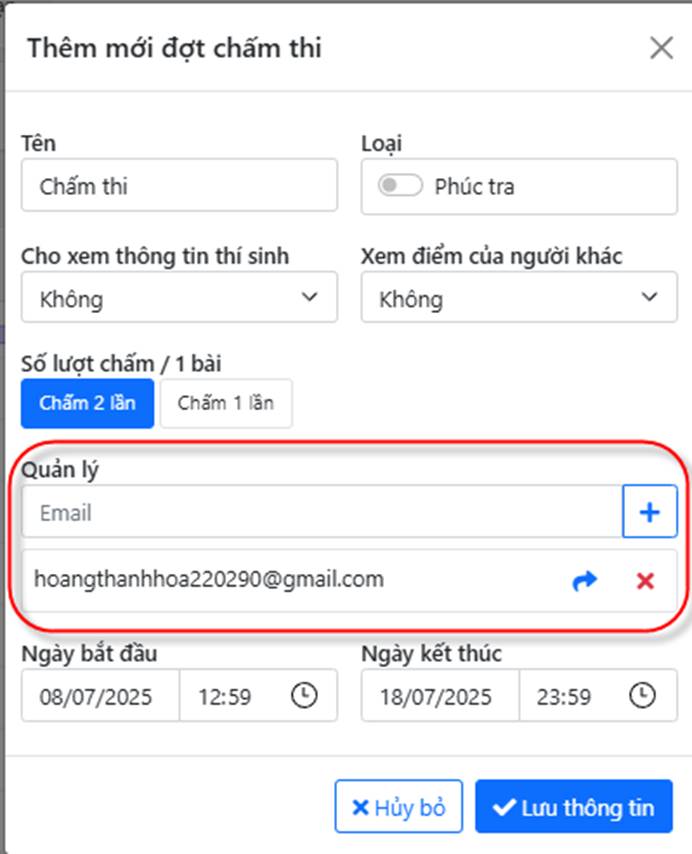
- Manager: enter the email of the marking manager (the information is sent to that email; the manager signs in and assigns the marking to teachers)
- Marking start and end dates;
Click Save. The marking monitoring screen appears:
Choose Marking admin to open the detailed marking management screen:
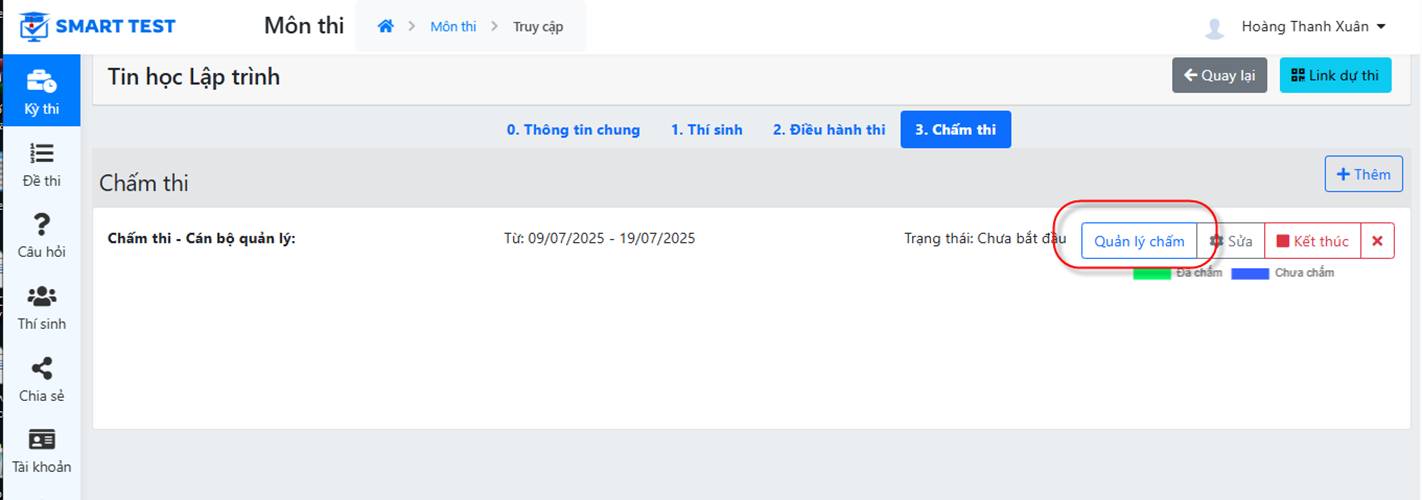
The screen shows:
- The list of candidates, with anonymous script codes assigned automatically
- The scores from the first marker and the second marker (if two markings are required)
- Approved score: the final score of the two markings (if an approver marks and decides the final score). It is averaged automatically, but the manager can adjust it to get the final result of the marking. If the marking manager is also the marking teacher, the paper's score appears only in the approved score column.
- Agreed score: the average of the two markings, or the approved score if the approver marked.
- Multiple-choice score: Available right after the candidate finishes if the test has both a multiple-choice part and an essay part.
- Deductions:
- Final total score: converted to the scale set for the subject (on the General information tab)
After teachers mark, the screen shows the results so the marking manager can follow progress
The  button: assigns markers to specific script codes
The  button: activates marking for the set period
The  button: exports the marking results

The marking button 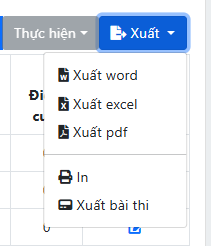 lets the marking manager mark this paper directly without assigning it to a teacher.
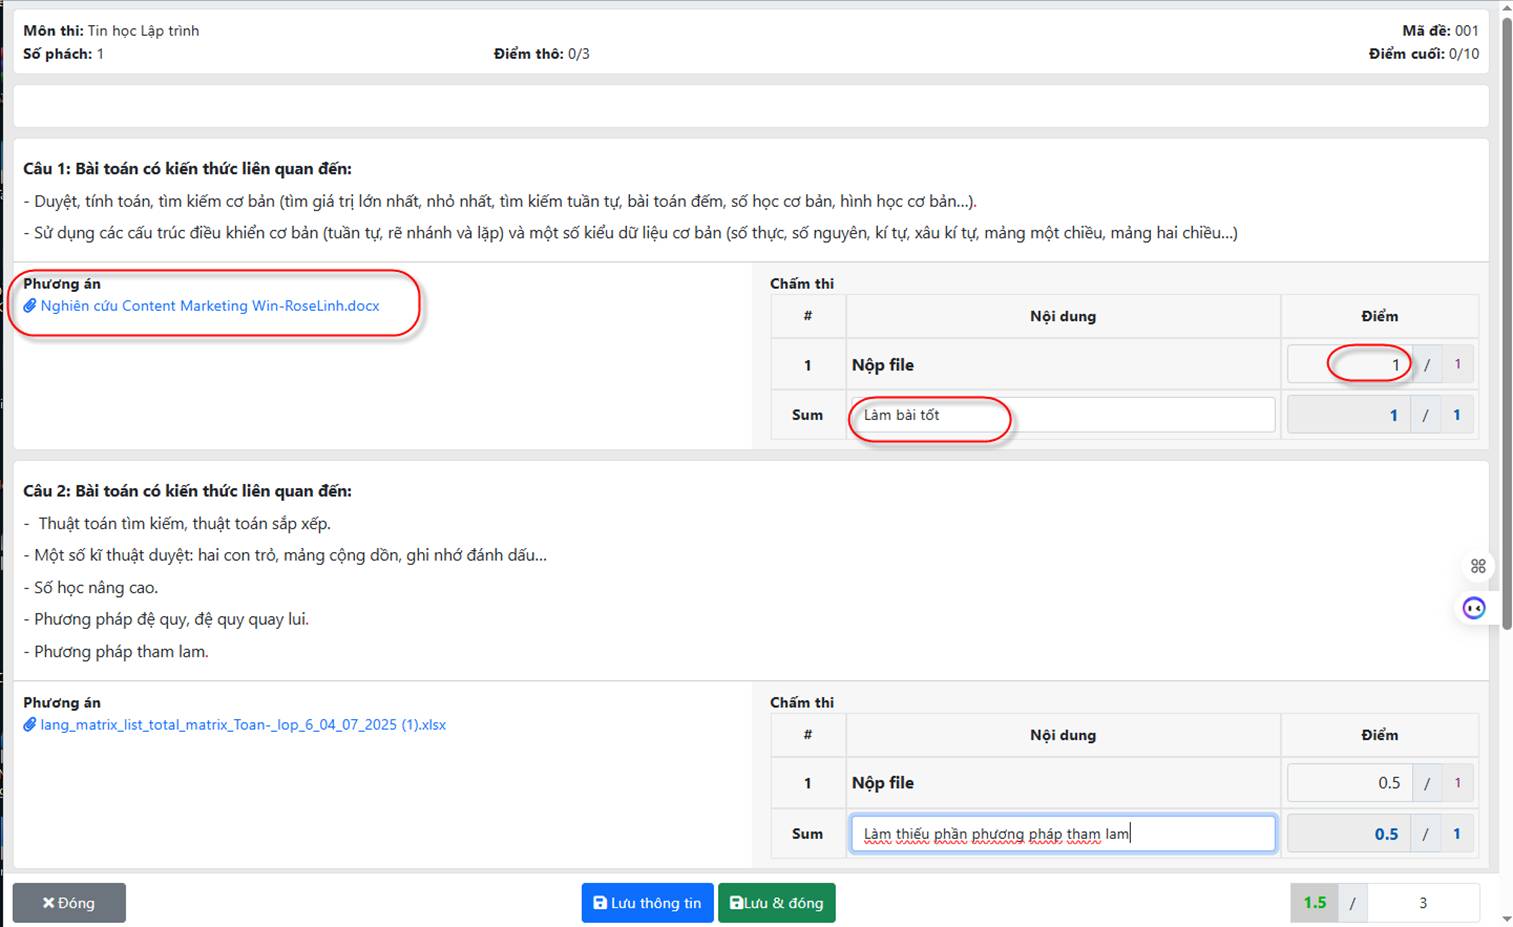
Select a script code and click . The candidate's paper appears. The teacher can view the candidate's work, including the content and attachments, then enter the score and click Save.
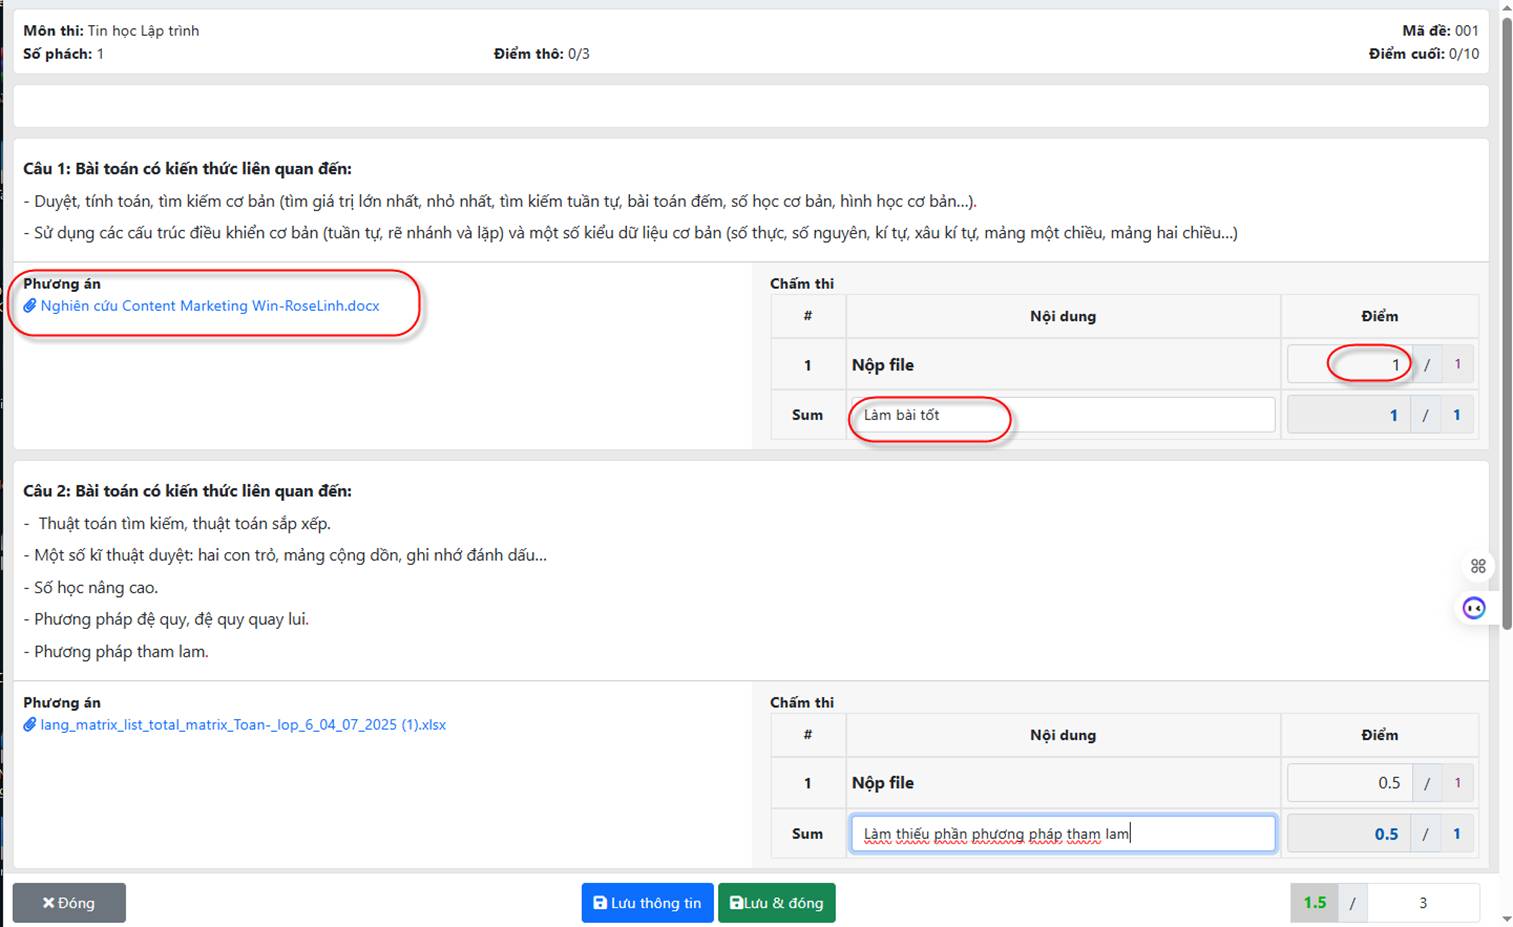
b. Step 2: Assign teachers to mark
Click the button to assign markers to specific script codes
Assignment steps:
- Enter a teacher's email and click the
 button to add them to the marking list
 - You can click the button to remove a teacher's email from the list
- Enter the number of papers each teacher must mark. The system distributes the papers to teachers automatically.
- After you click Save, the system shows the statuses: Pending, New
c. Step 2 (advanced): Assign teachers to mark
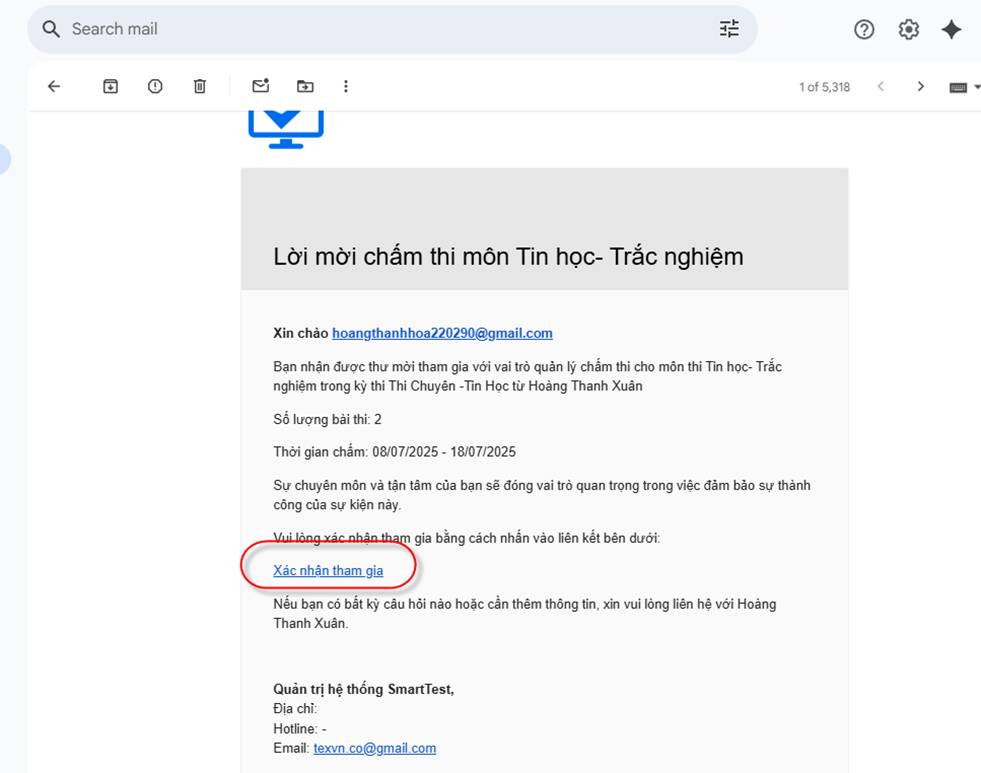
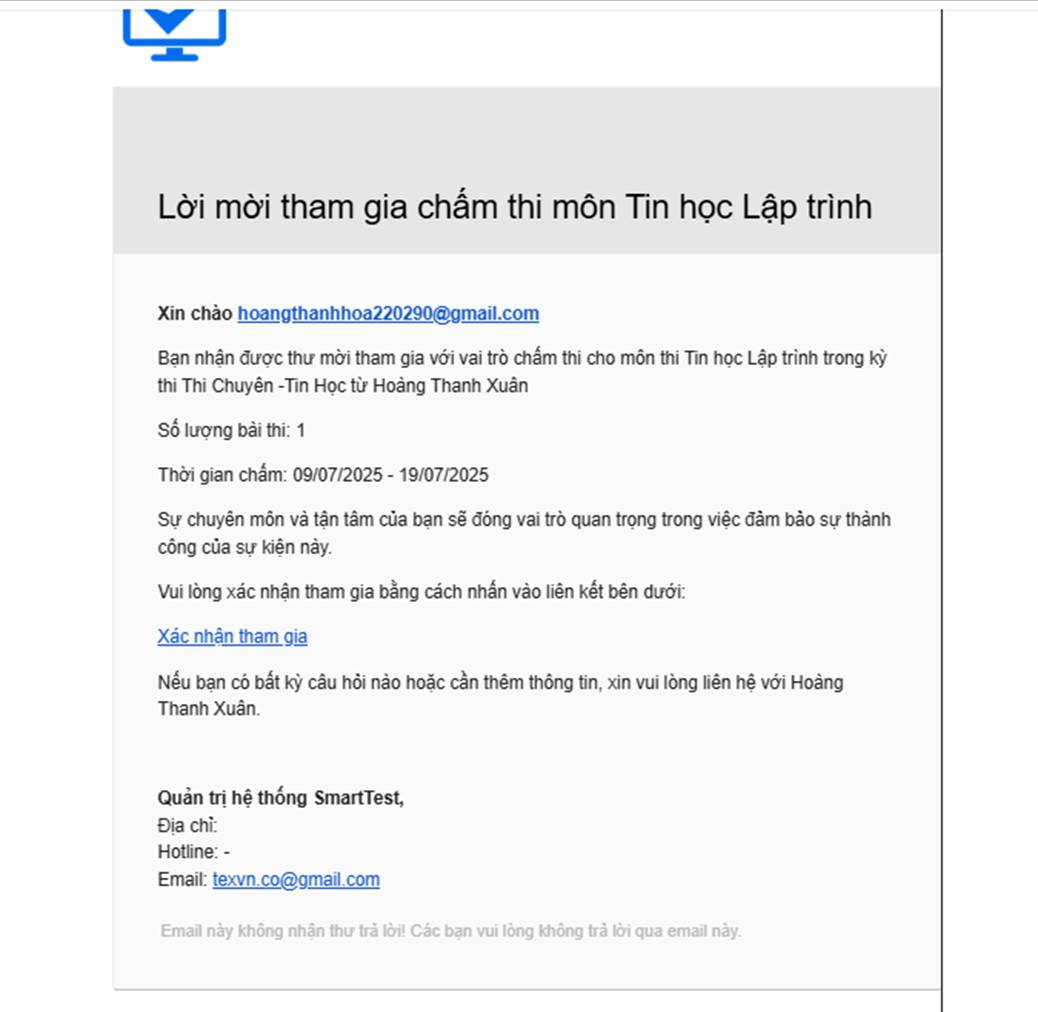
- The person assigned to manage the marking receives an email and clicks Confirm participation in it
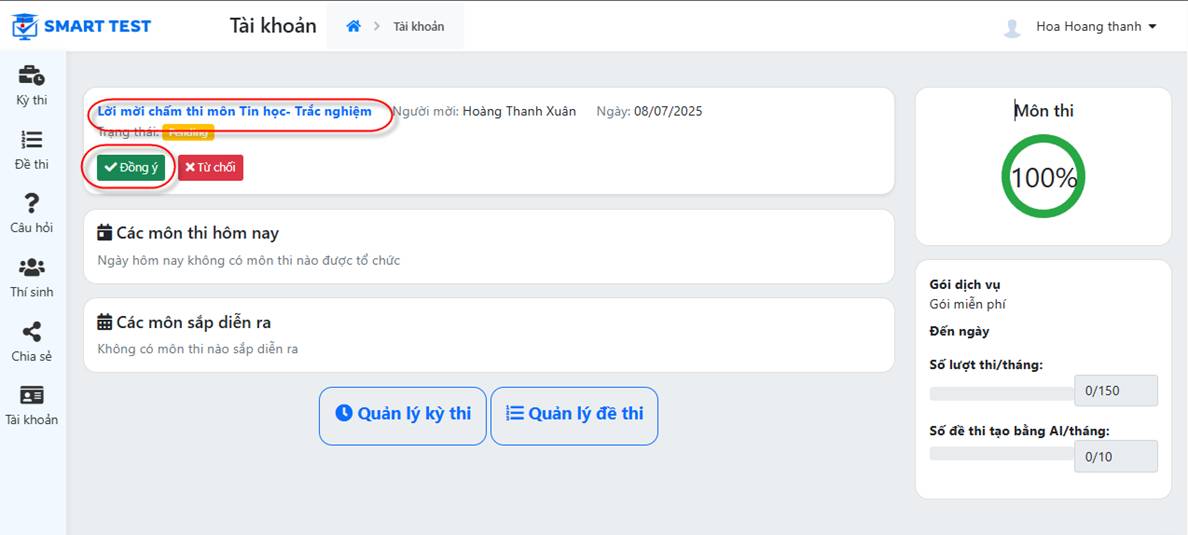
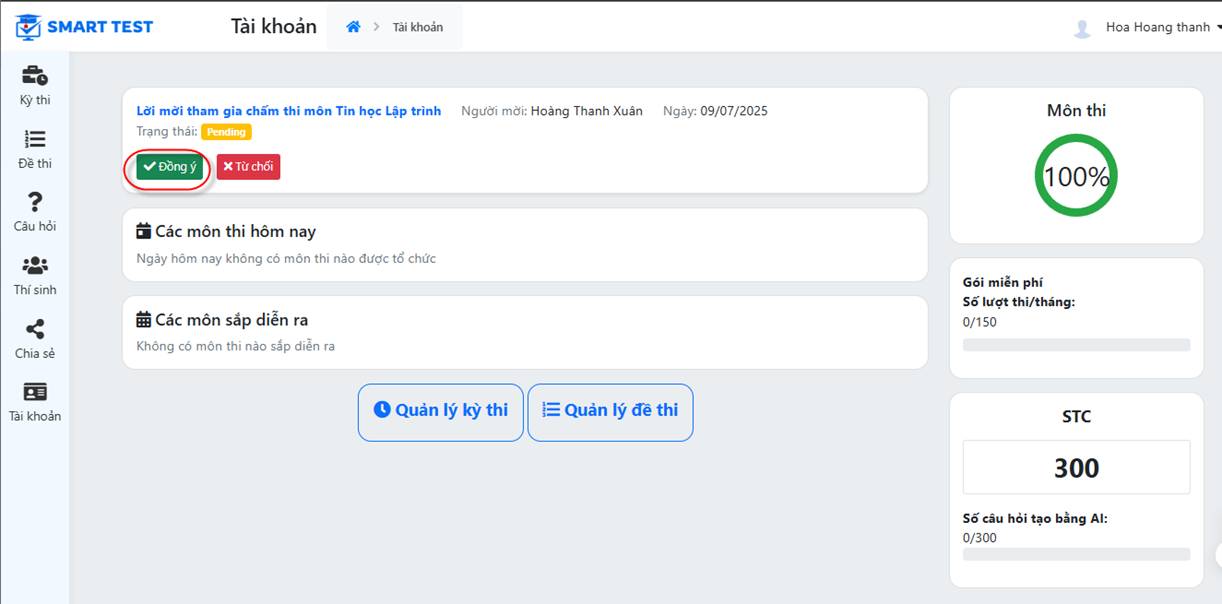
The teacher signs in and accepts:
- The teacher goes to the menu Exam, chooses a subject in the Start marking status and carries out the request.
Click the  button to open the assignment screen:
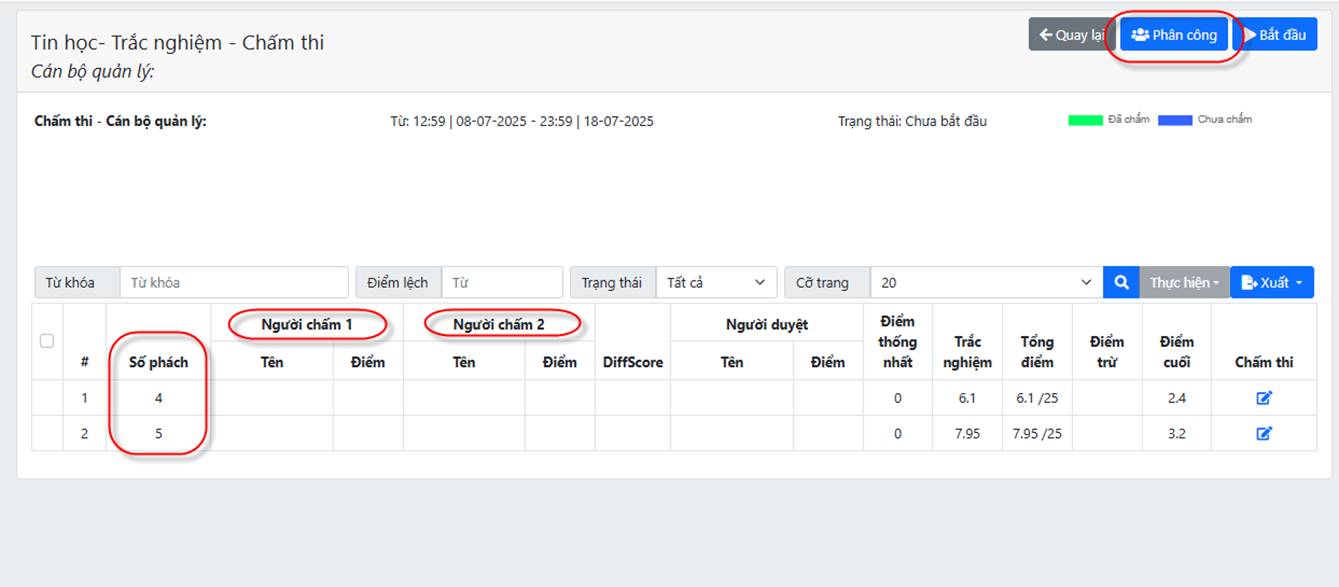
The screen shows:
- The list of candidates, with anonymous script codes assigned automatically
- The scores from the first marker and the second marker (if two markings are required)
- Approved score: the final score of the two markings (if an approver marks and decides the final score). It is averaged automatically, but the manager can adjust it to get the final result of the marking. If the marking manager is also the marking teacher, the paper's score appears only in the approved score column.
- Agreed score: the average of the two markings, or the approved score if the approver marked.
- Multiple-choice score: Available right after the candidate finishes if the test has both a multiple-choice part and an essay part.
- Deductions:
- Final total score: converted to the scale set for the subject (on the General information tab)
Click the  button to assign papers to teachers
d. Step 3: Teachers mark as assigned
- Teachers receive an email inviting them to mark; they only need to confirm participation to start marking.
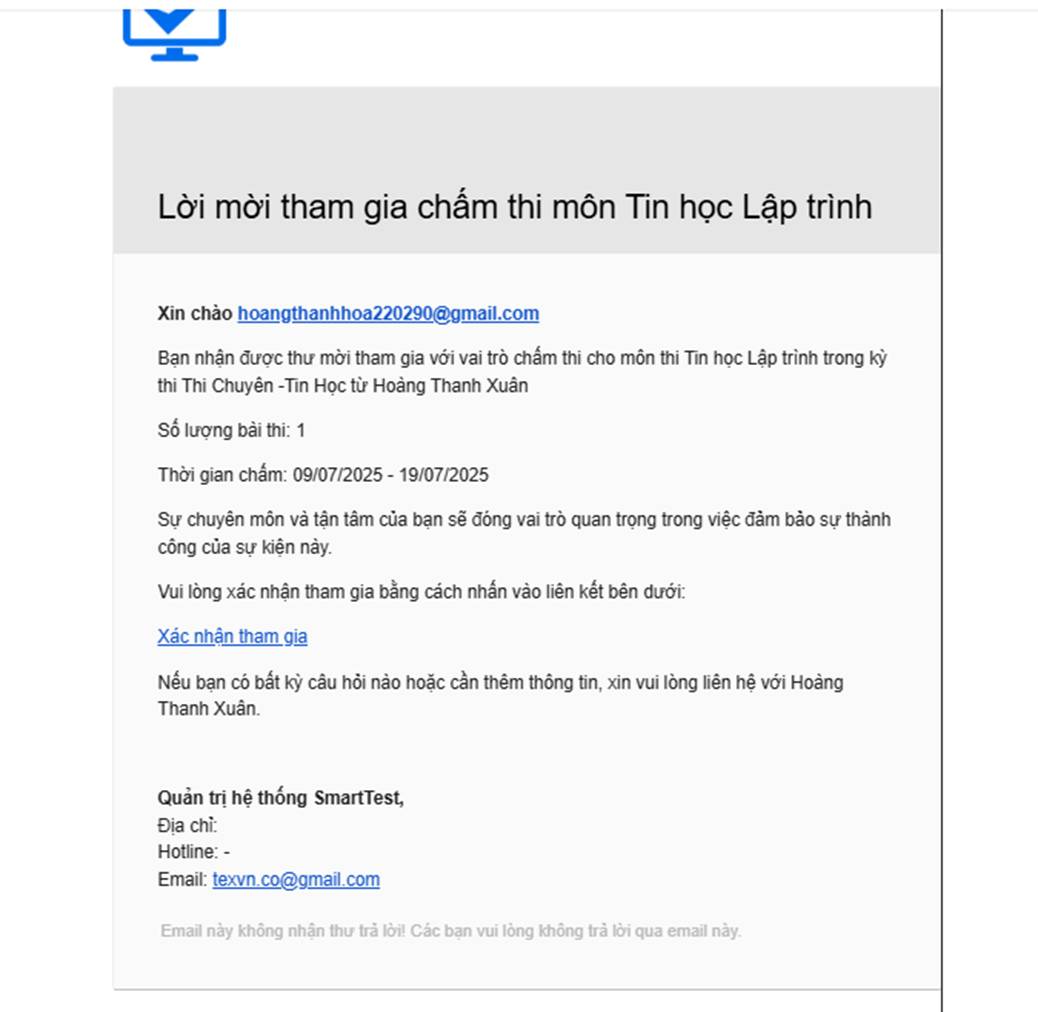
The teacher signs in with their Google account to mark
The teacher clicks the  button to start marking
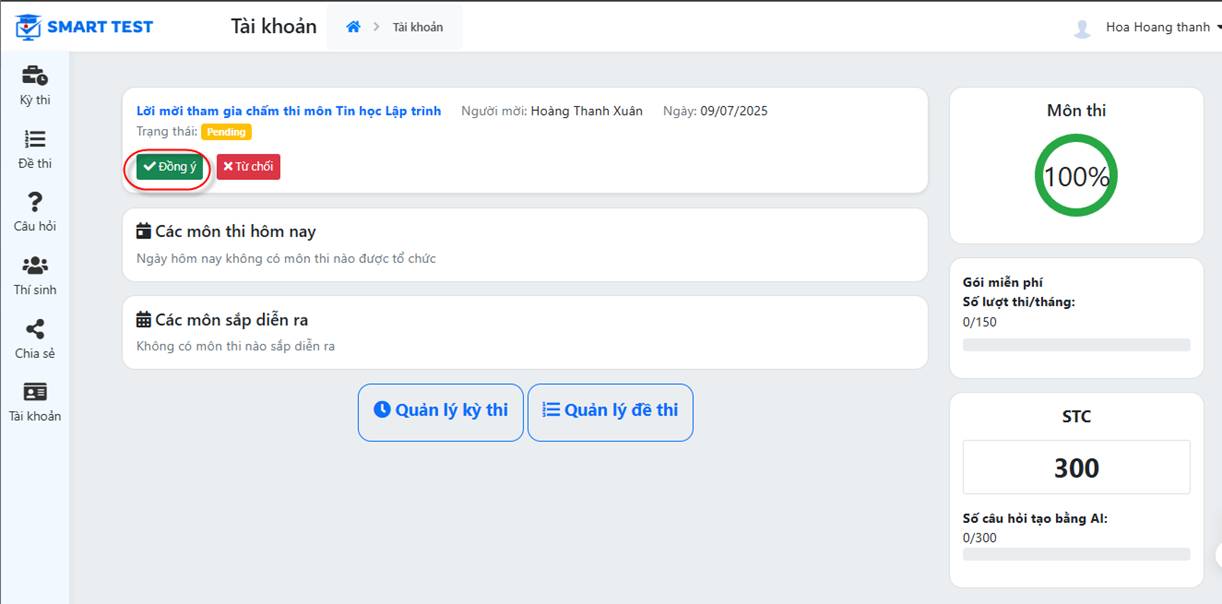
- The teacher goes to the menu Exam, chooses a subject in the marking status and carries out the request.
Choose a subject in the Start marking status by clicking the 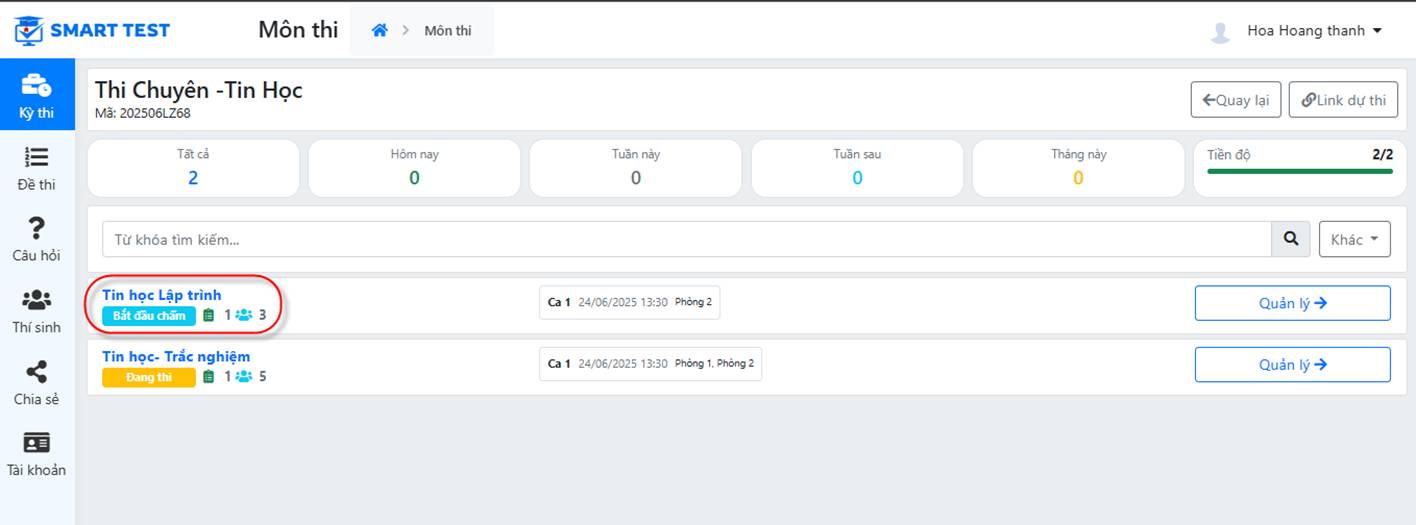 button
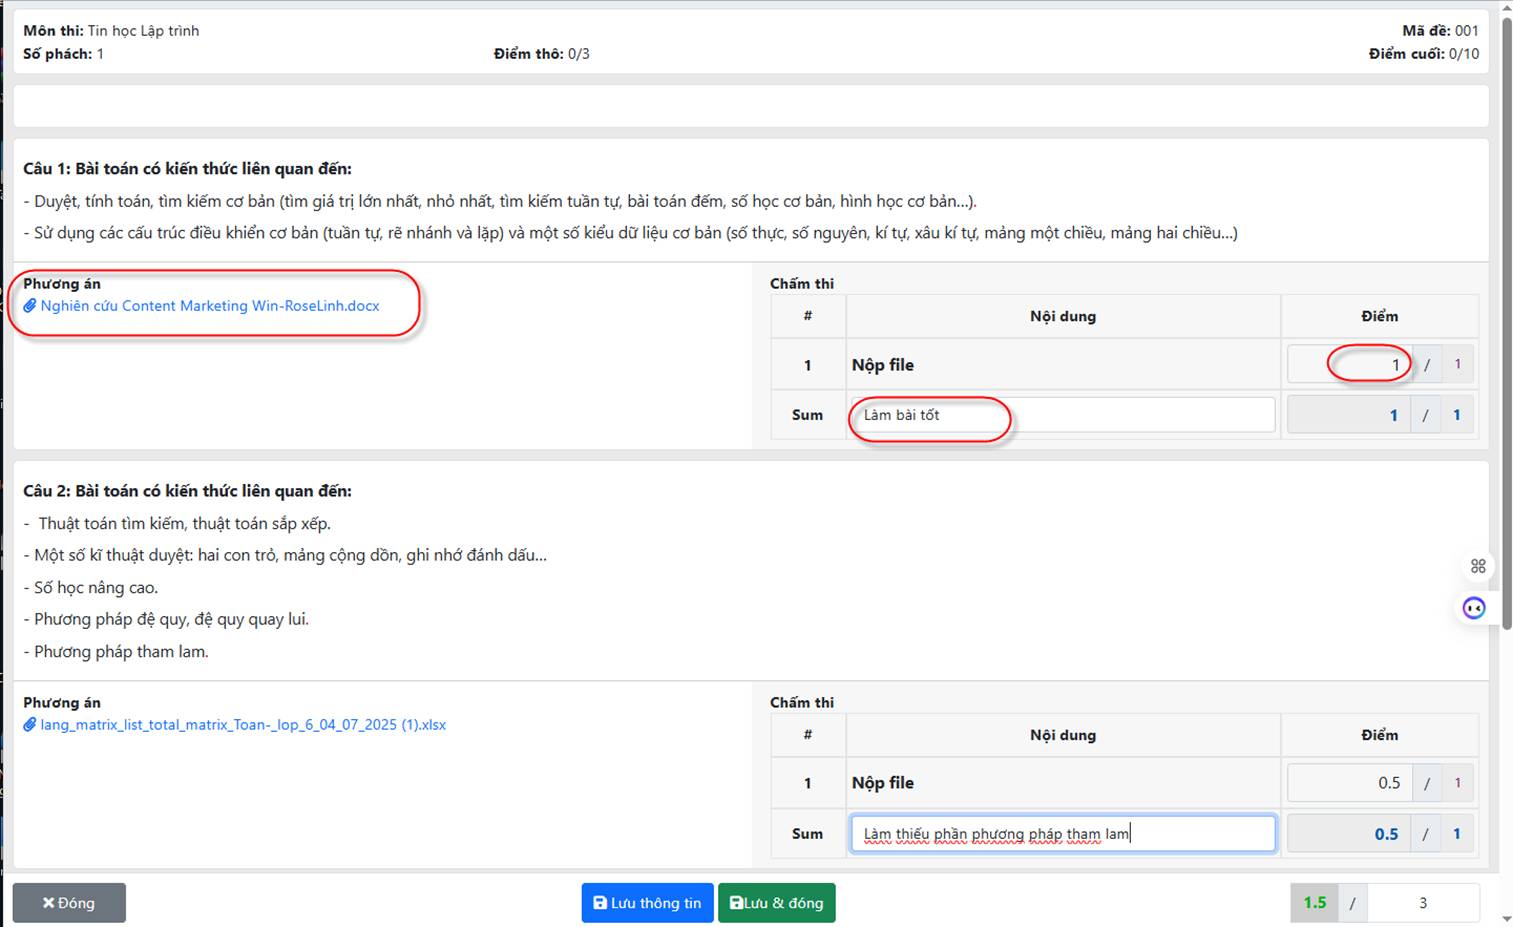
Select a script code (the paper to mark) and click . The candidate's paper appears. The teacher can view the candidate's work, including the content and attachments, then enter the score and click the 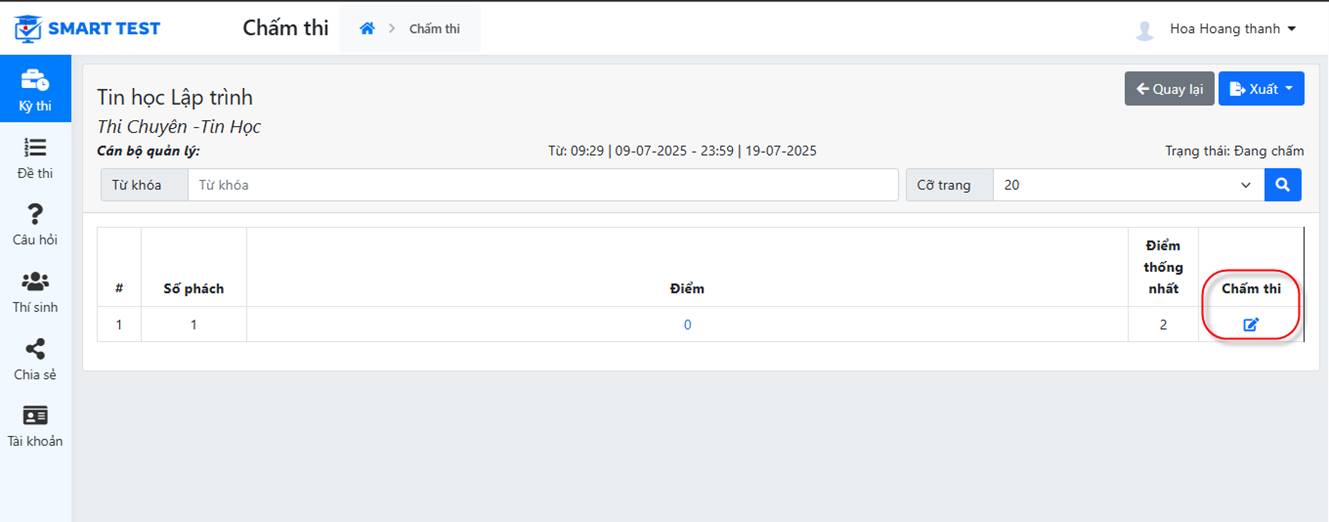 button
II. Candidates taking the exam
Candidates receive the exam link sent by the teacher.
Then they open a browser and sign in to the exam room with the candidate code and password they were given.
Or they can sign in with their email, as shown below (if the teacher allows self-registration for the subject).
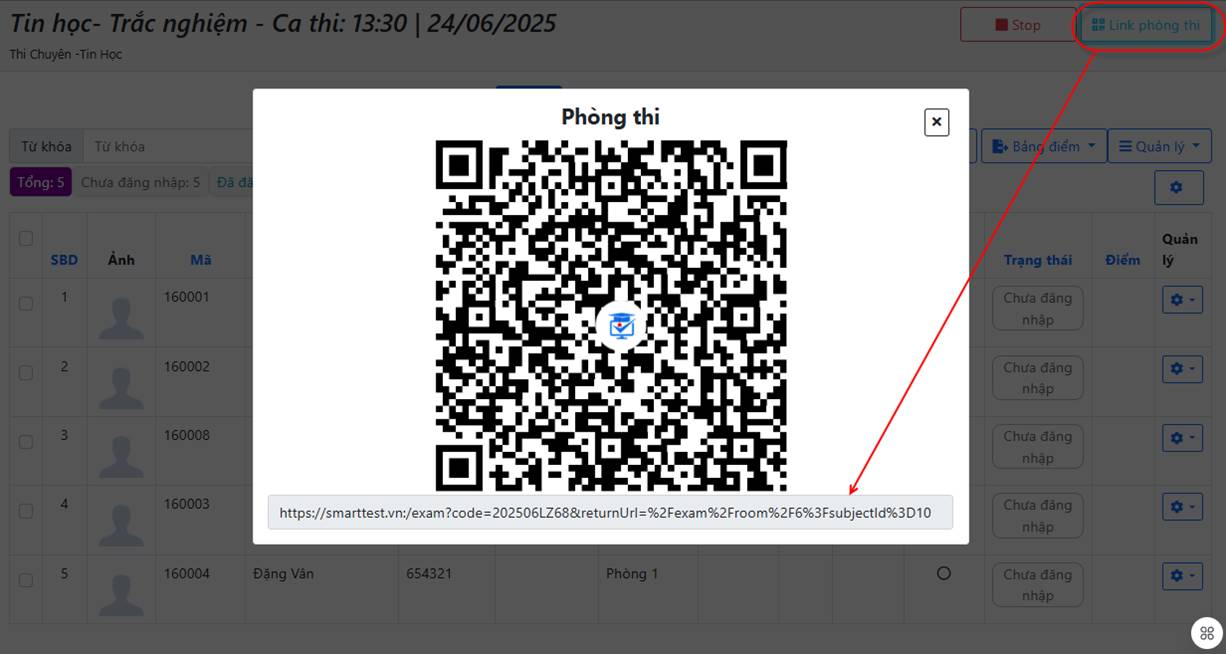
Candidates may change their password or keep it, then continue to the next step.
Choose the subject and click Join exam: 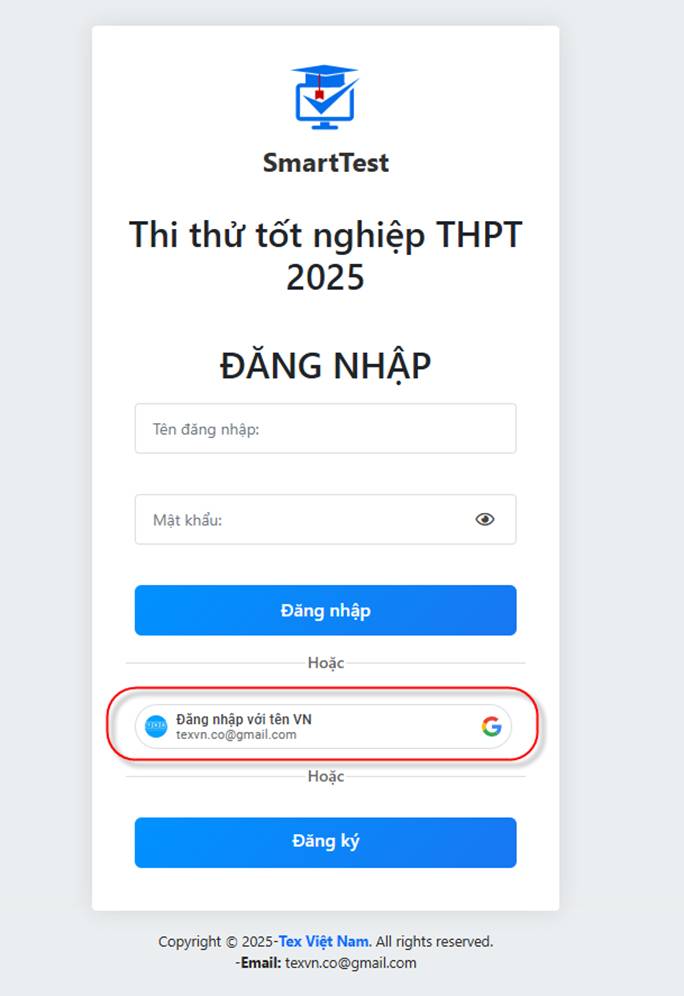
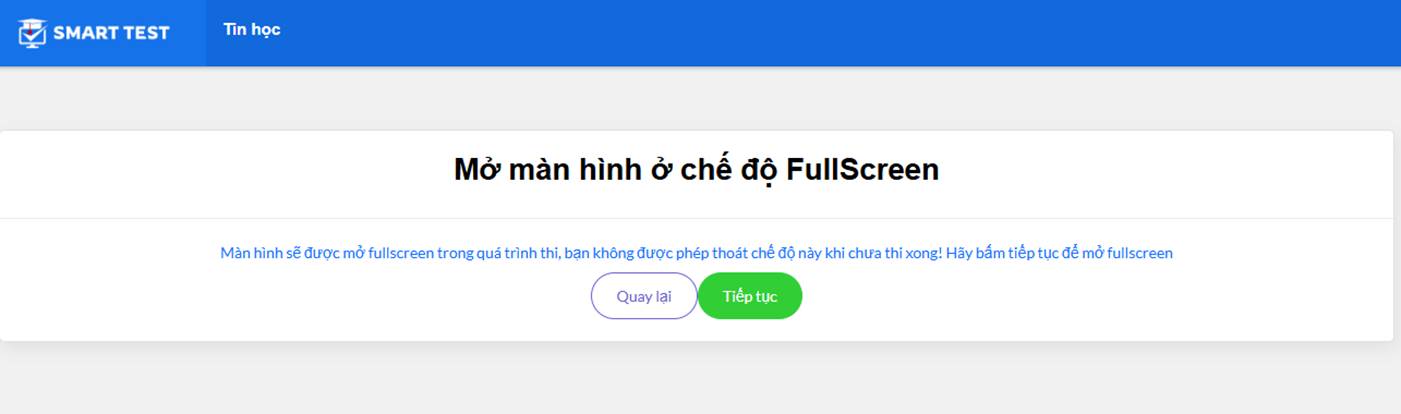
For multiple-choice subjects, candidates must click Continue to open the exam in fullscreen mode:
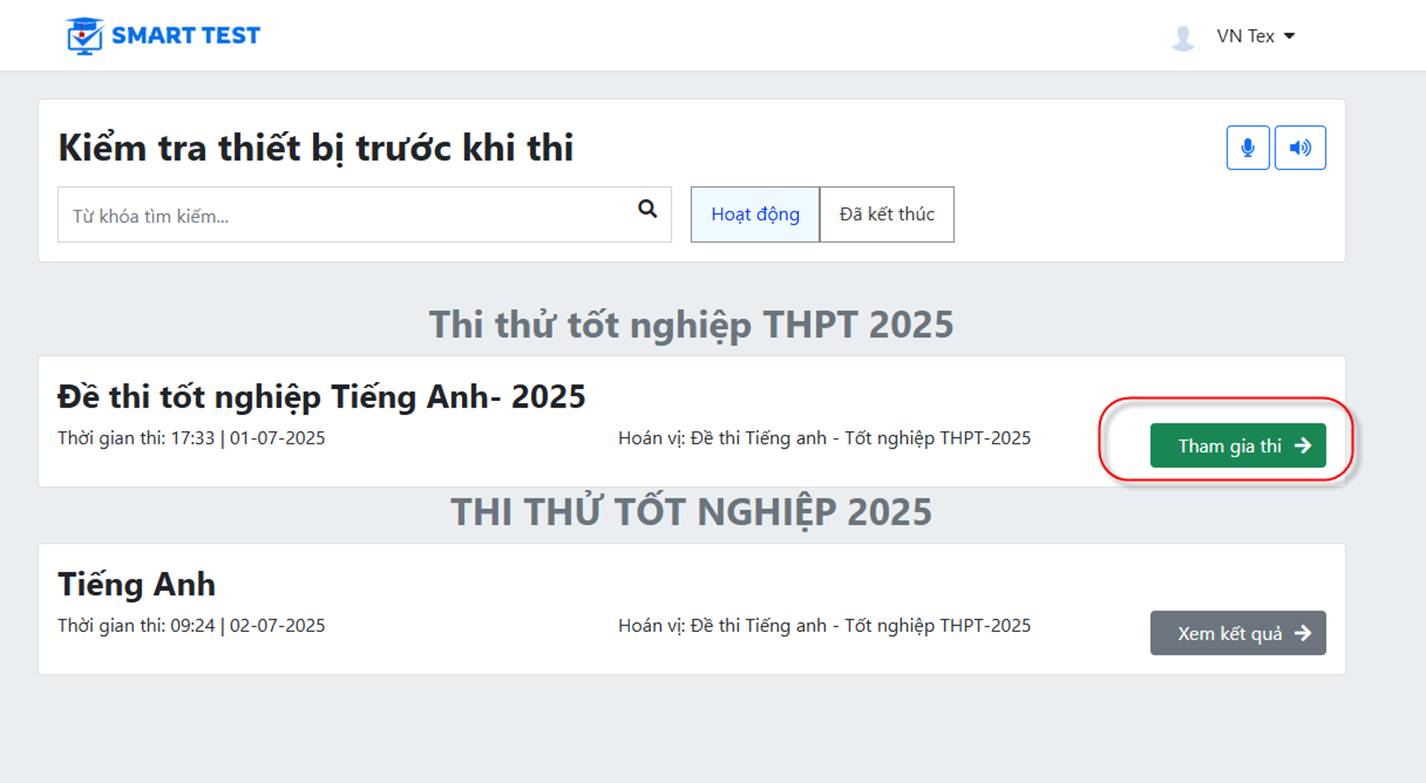
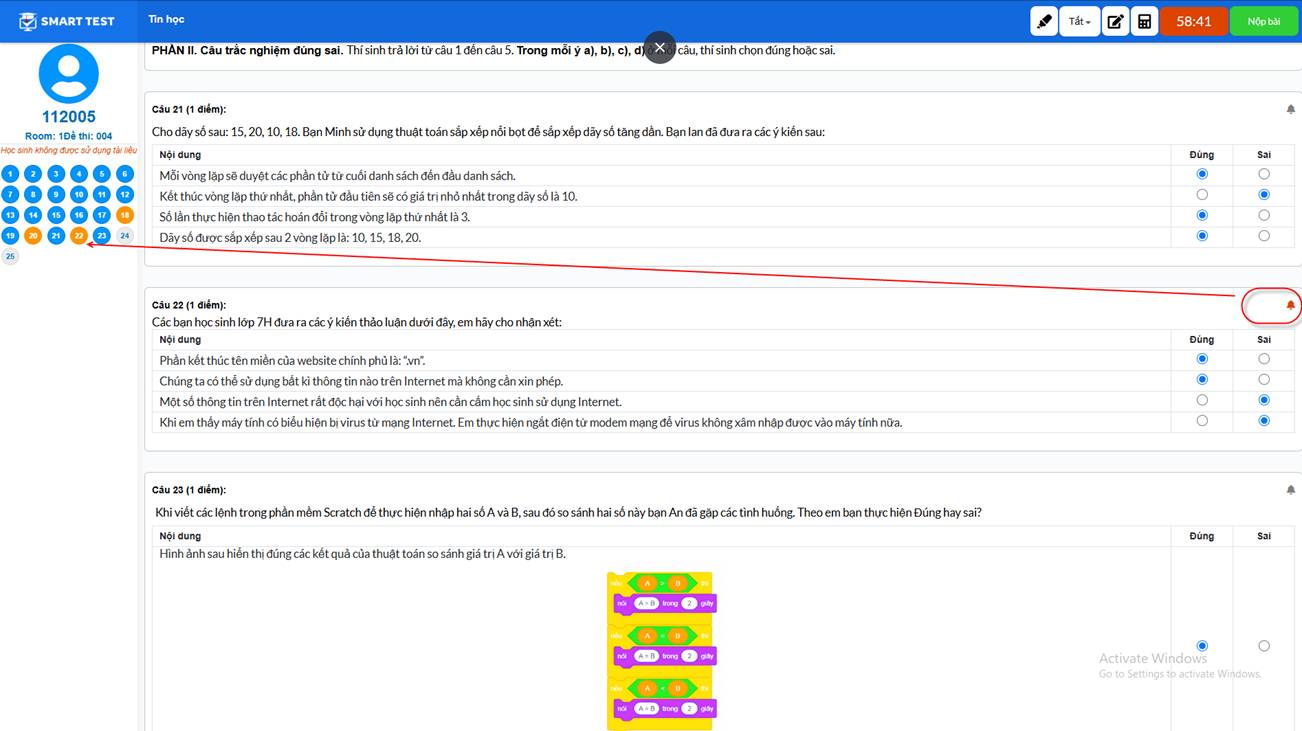
• The candidate starts the exam and answers as shown below. If a candidate is unsure about an answer, they can click the bell icon; the question is marked in yellow so they remember to come back and check it.
Online exam screen
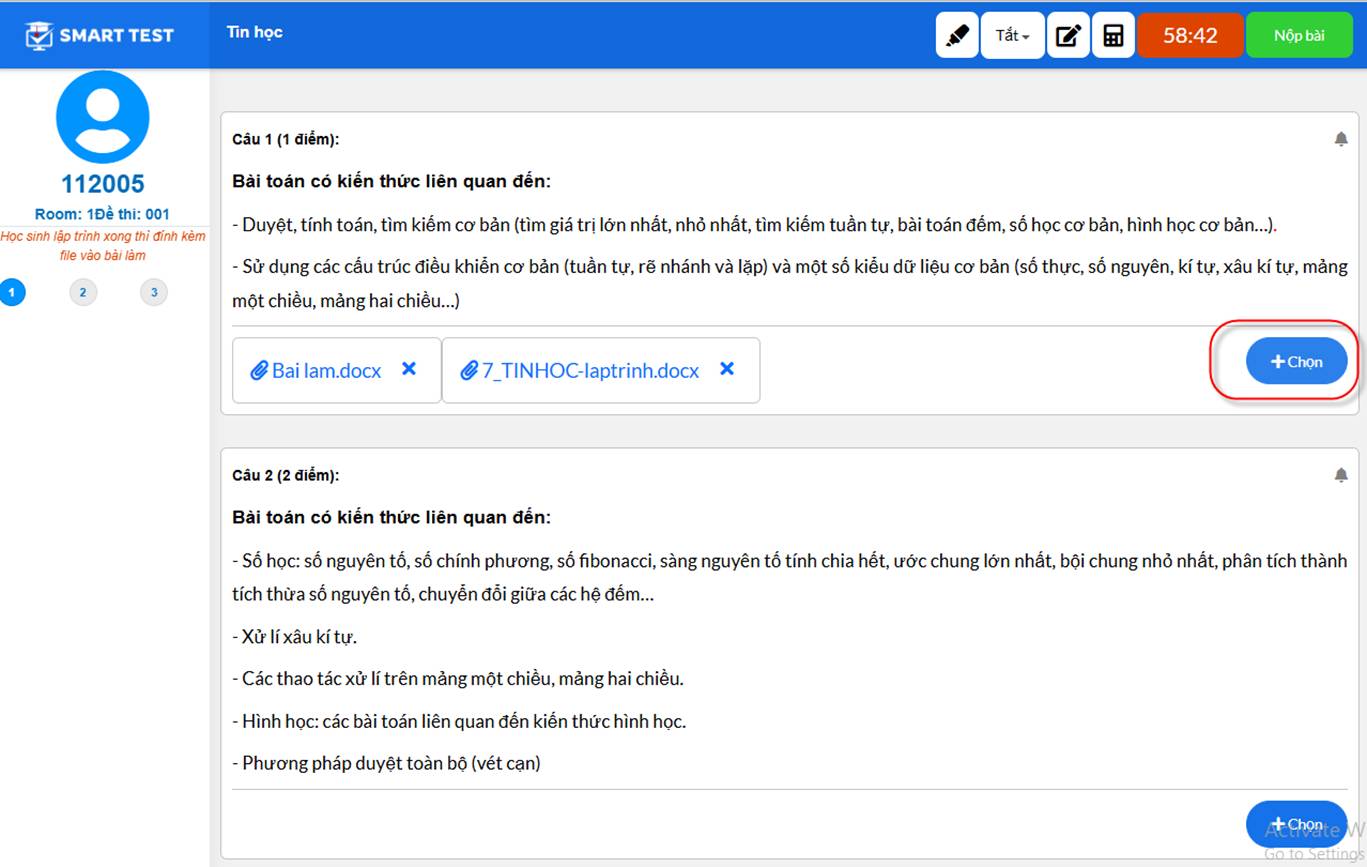
• For practical or essay tests, candidates do the work outside the browser, then choose the subject, join the exam and attach the programming file as shown below:
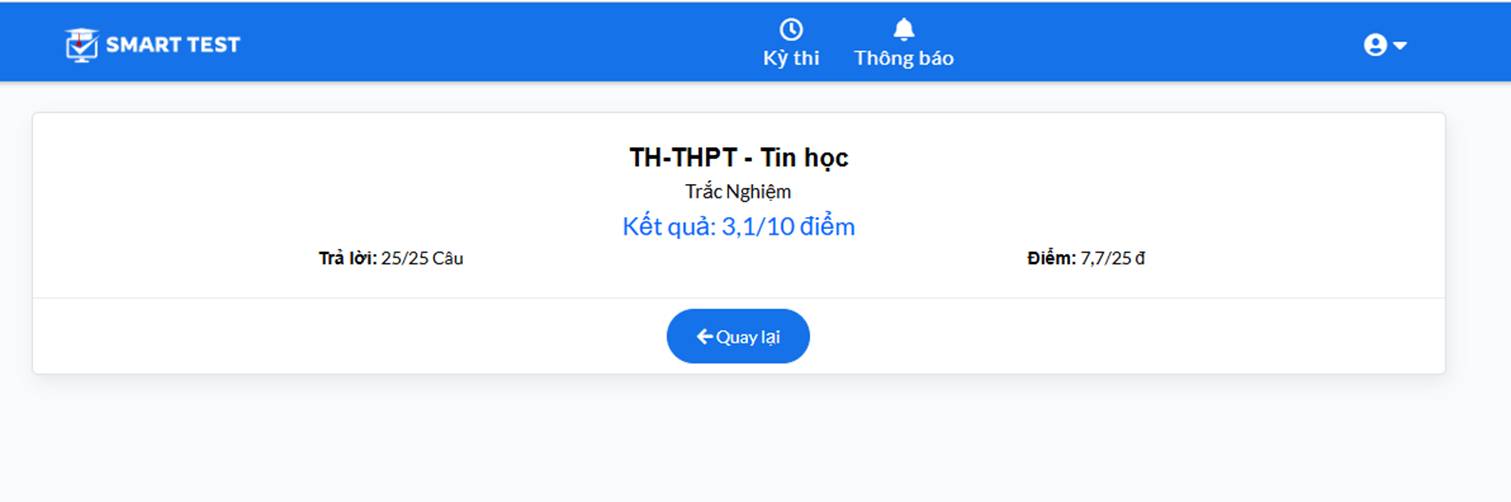
• When finished, the candidate clicks Submit. Depending on the exam organizer's settings, the system can show the result to the candidate immediately.
III. Proctors running the exam
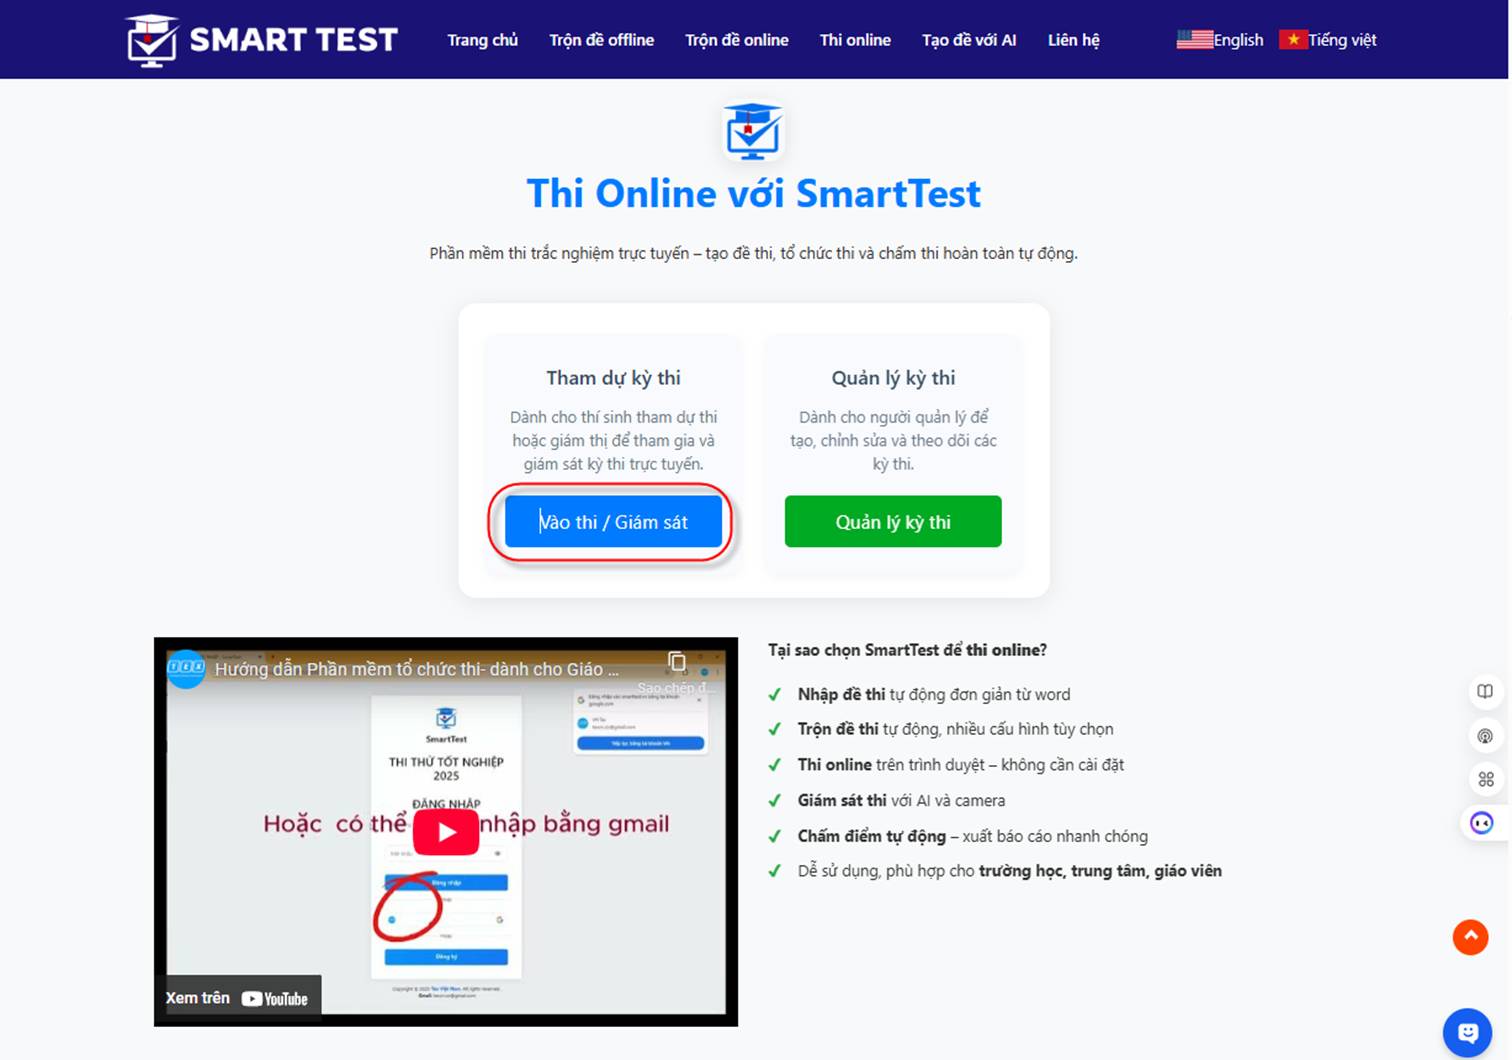
Sign in to the software at: ExamQR - Multiple-choice test shuffling software:
https://examqr.com/. Then choose “Online exam”
Choose Manage exams - sign in automatically with your Google account, as shown below
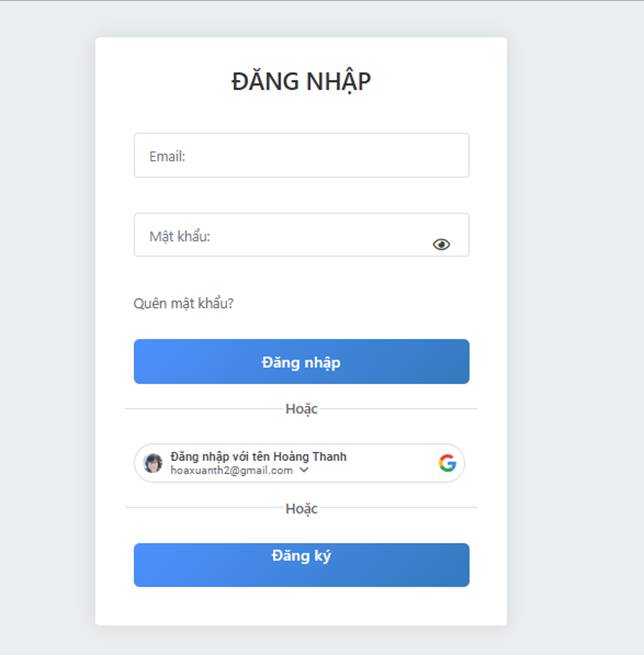
• The proctor signs in with the account provided:
Choose the menu Run exam - on the Exam screen - click the Manage button
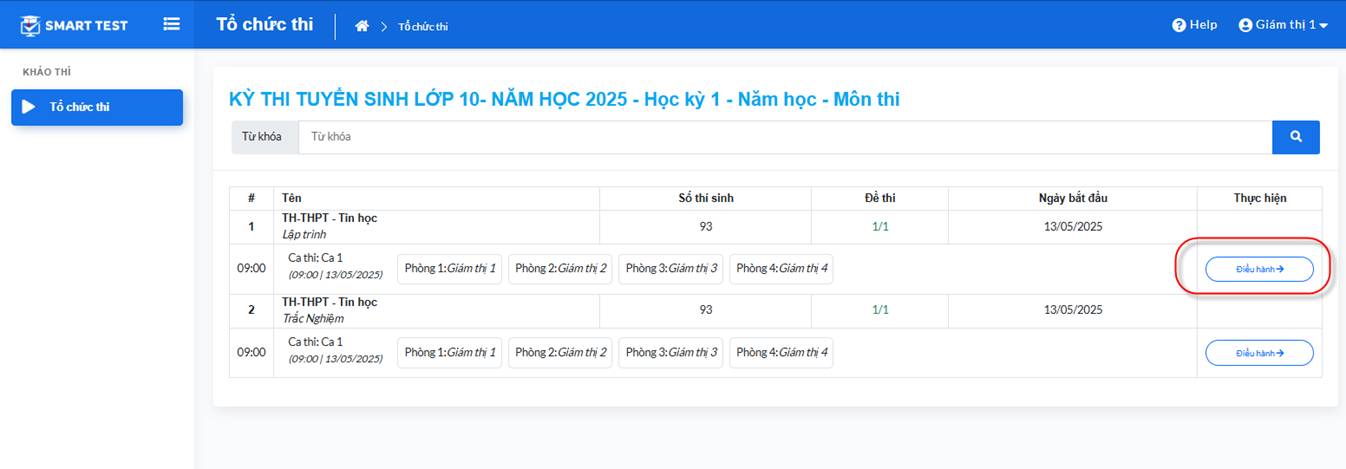
• The list of subjects organized in this exam appears. The proctor can click the Operate button to open the candidate monitoring screen.
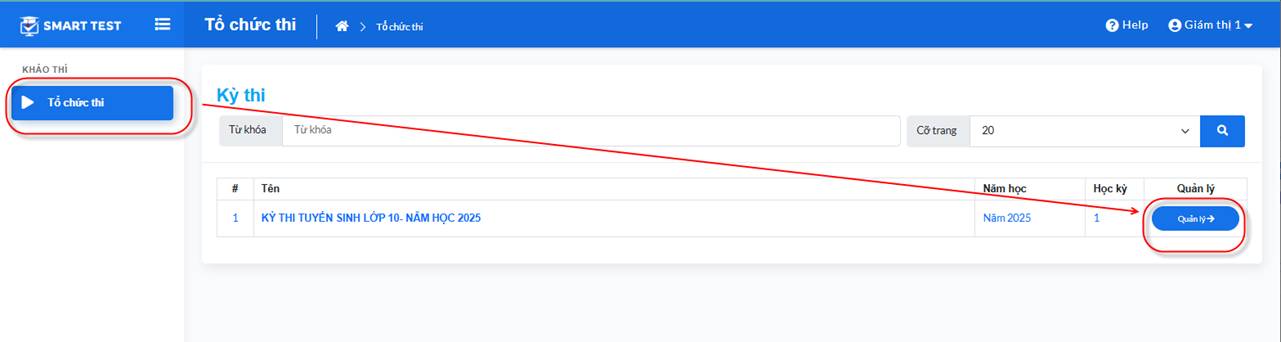
Subject list screen
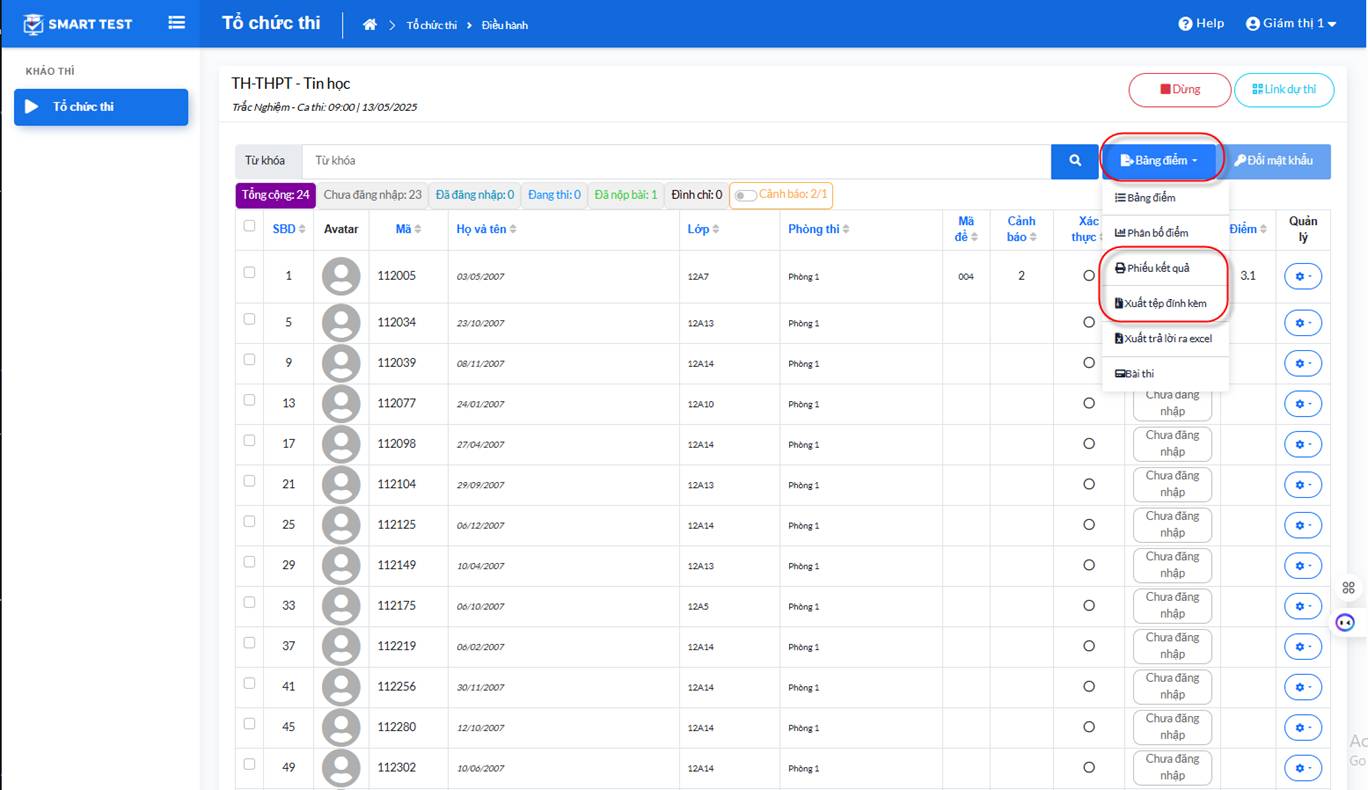
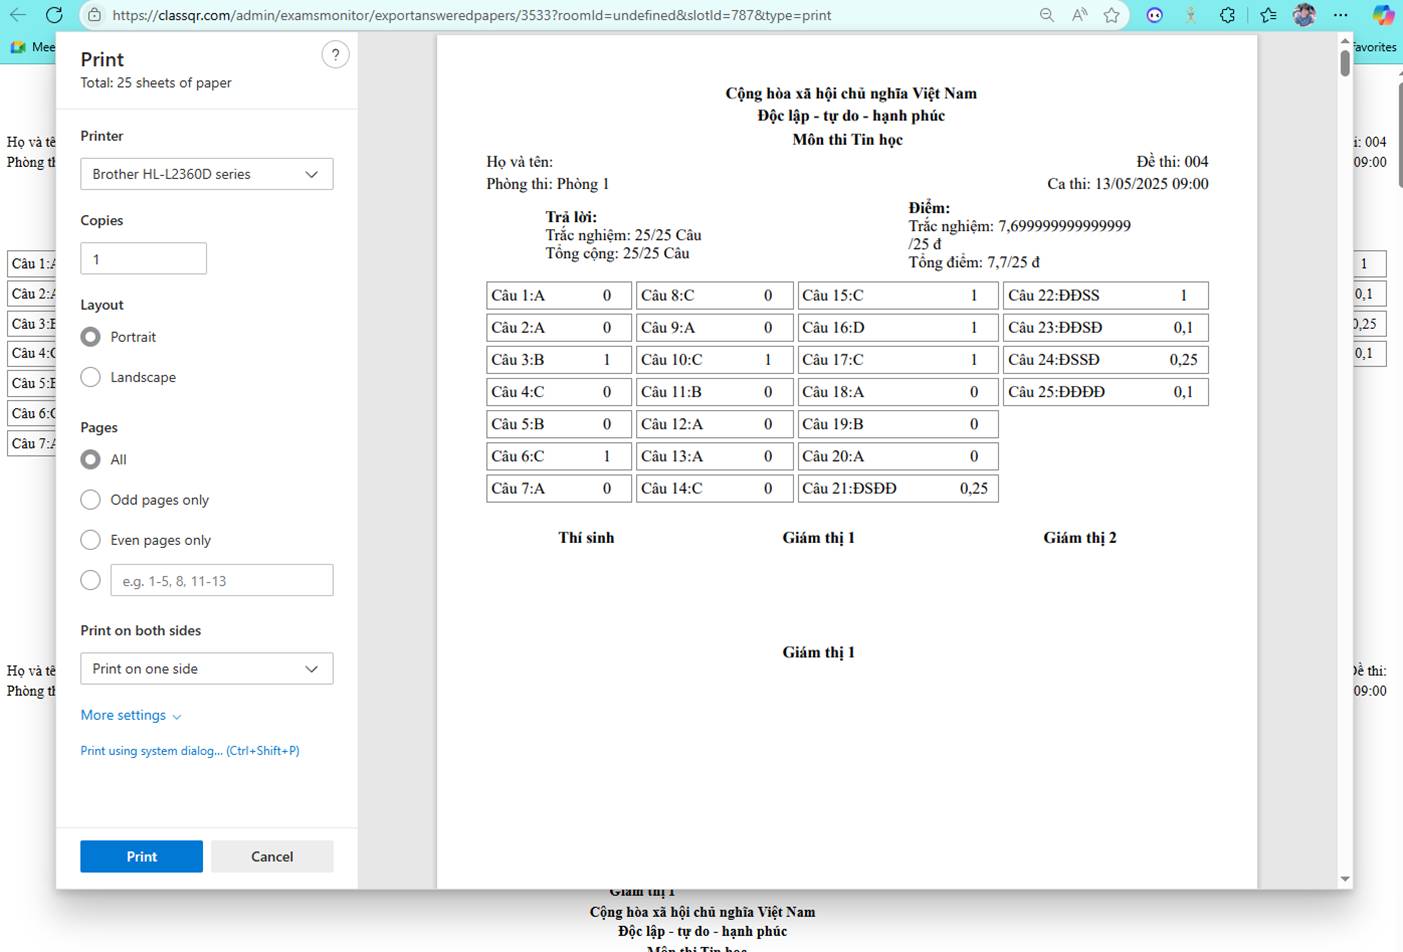
• Proctors can monitor their assigned candidates: whether they have entered the exam and whether they have submitted. They can print the result sheet for multiple-choice exams or export the candidate's work file for practical programming exams.
• Print sheet screen:
• Export work file screen:
IV. Importing a Word test into the system
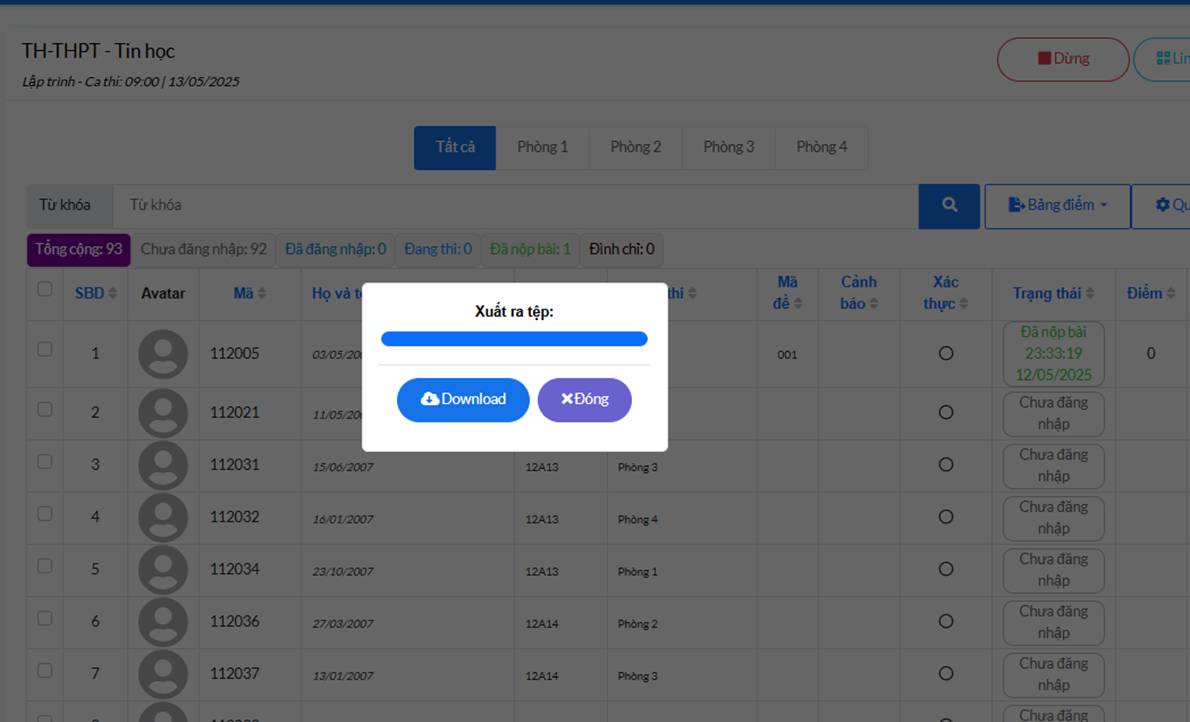
Choose the Tests menu. The test list screen appears:
- Click the
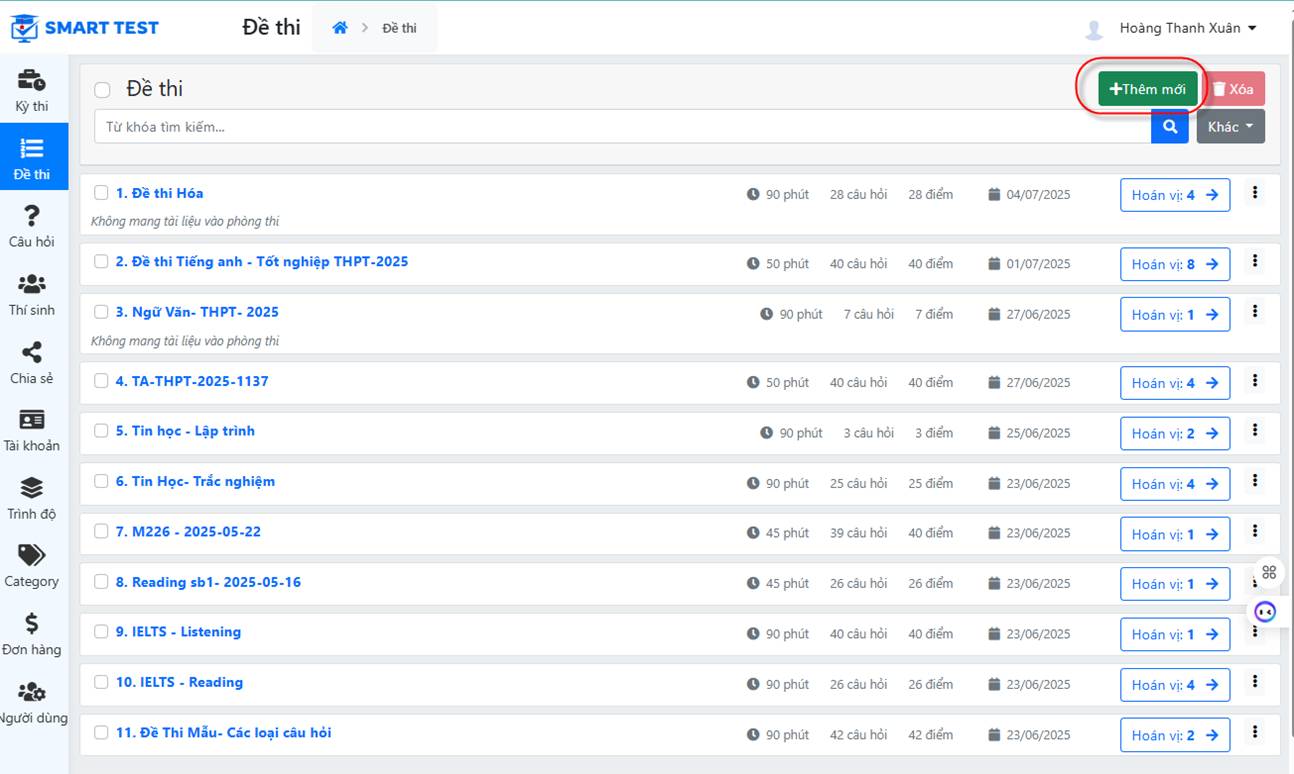 button to create a test:
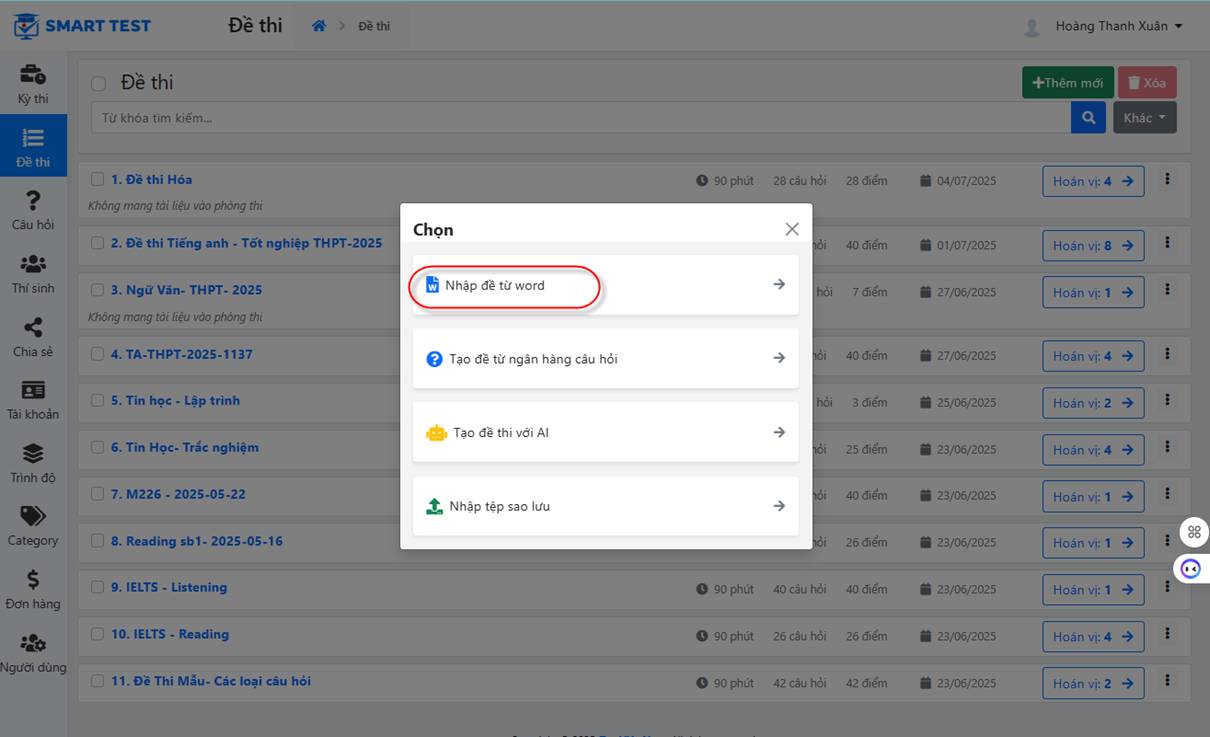
- Choose to import the test from Word. The screen lets you pick the question file you prepared on your computer (see the section on preparing the test file).
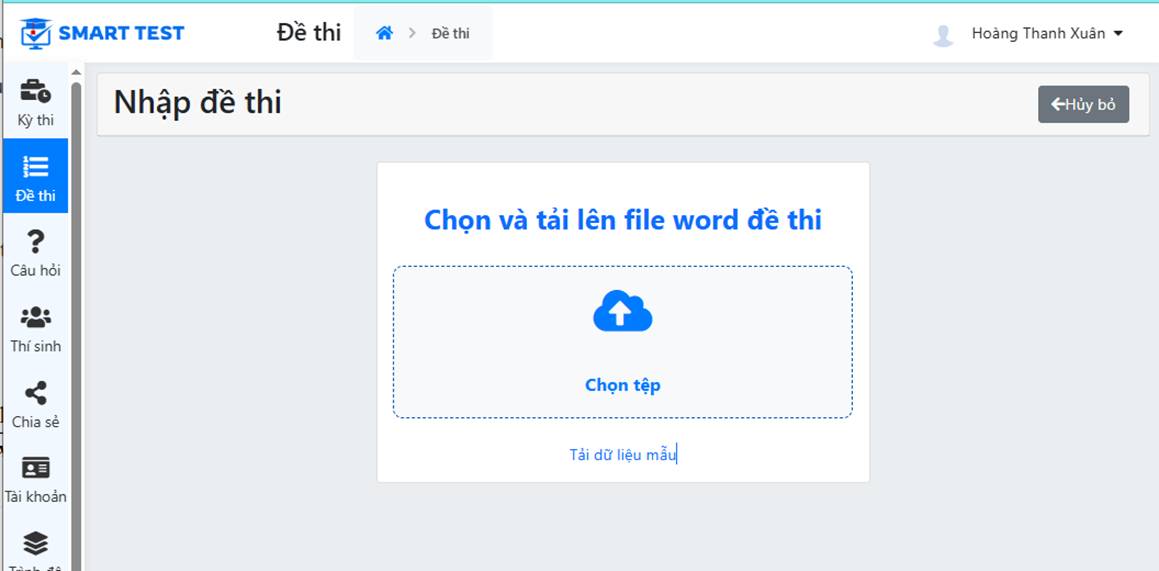
- Step 4: Continue. The screen appears as below:
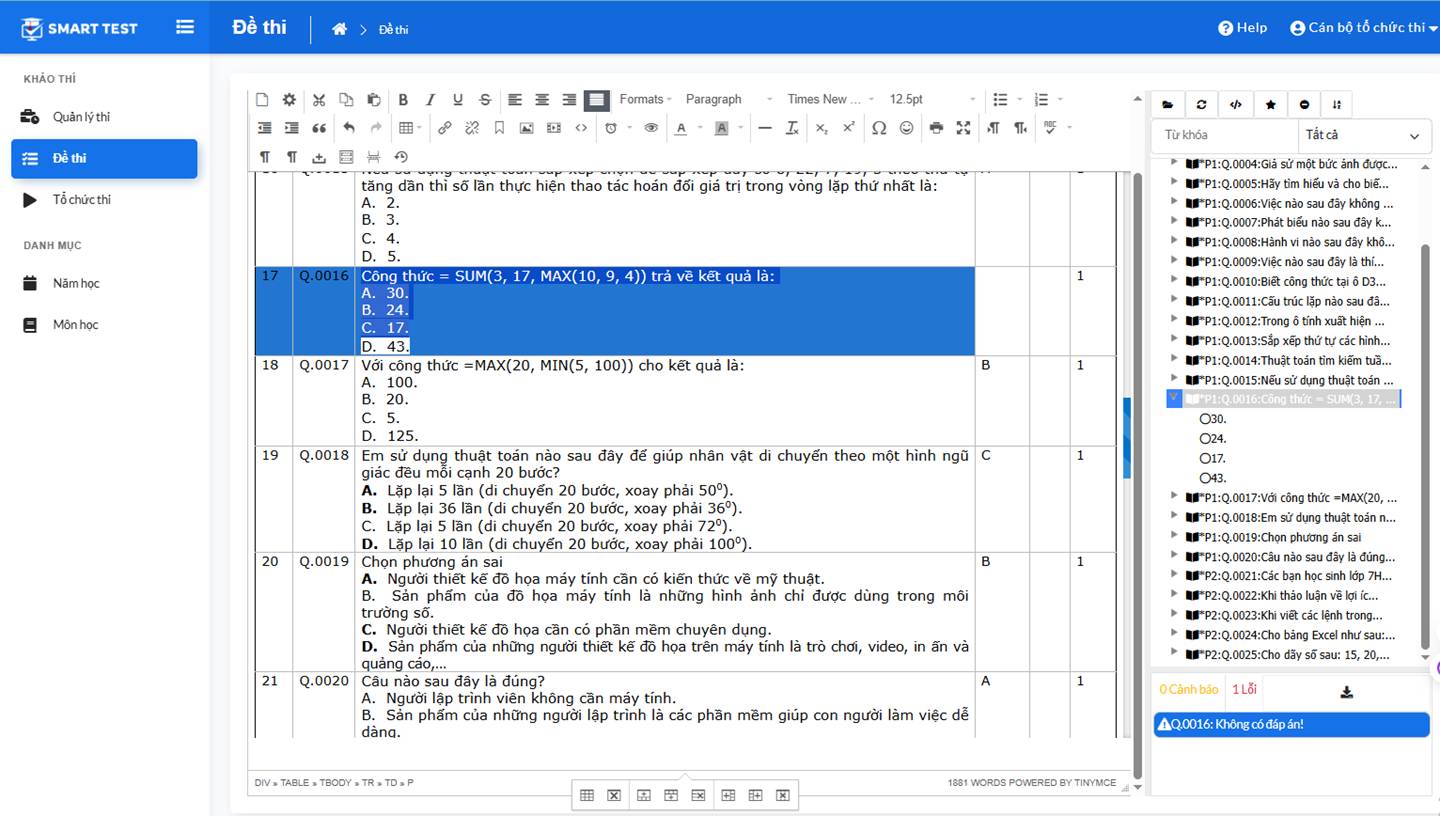
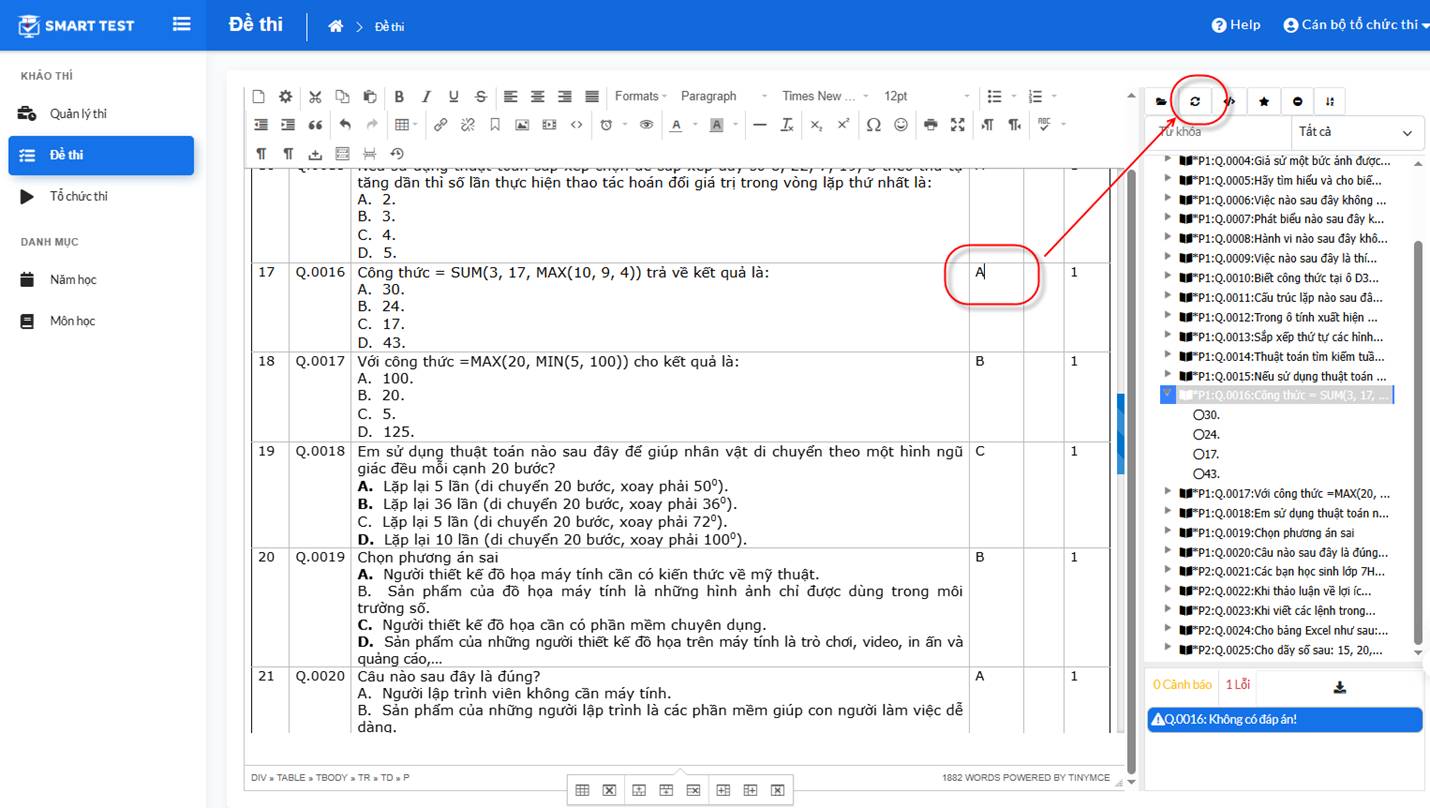
Note: pay attention to the red error messages, as on the screen below. These are questions that have no correct answer.
You need to correct them and enter the correct answer, then click the sync button as shown below.
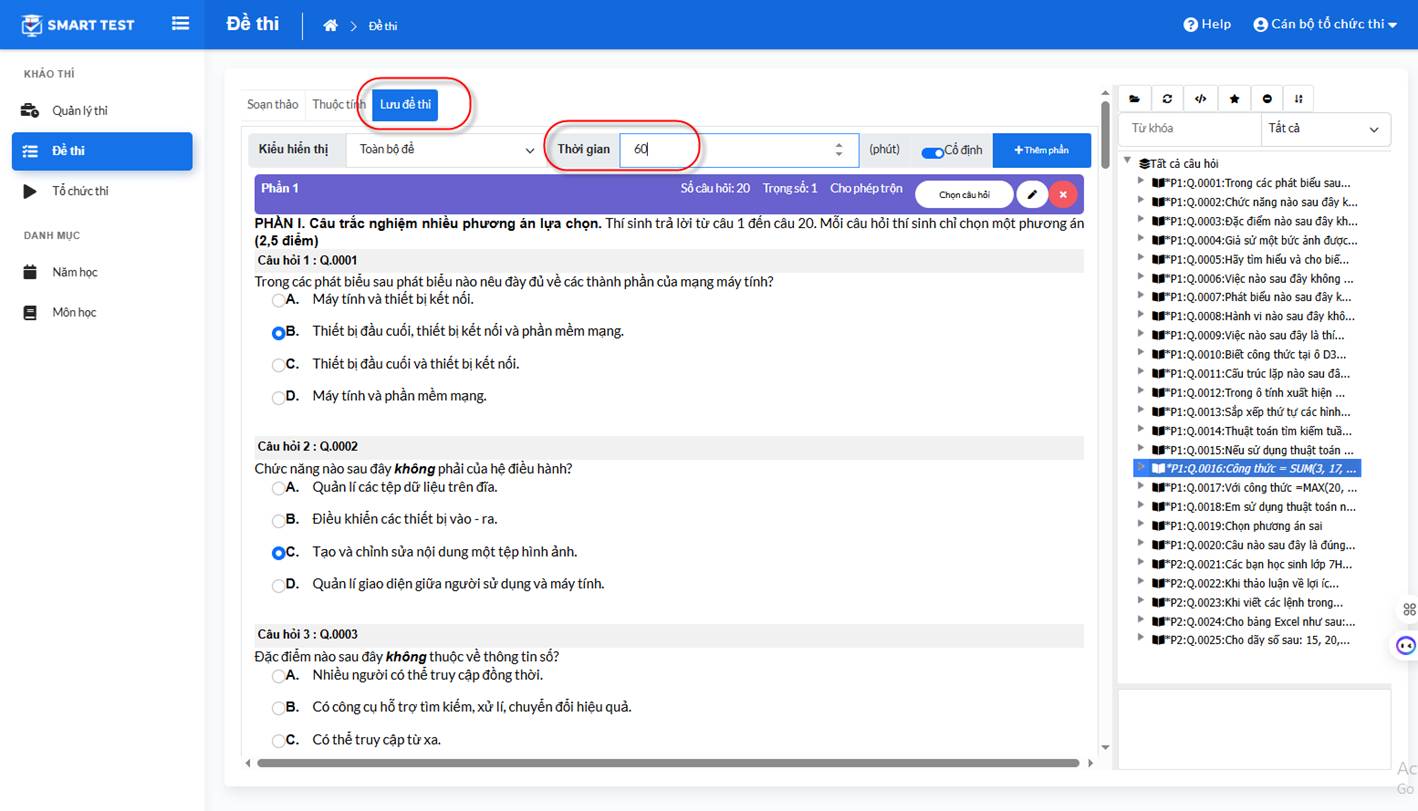
- Step 5: Continue: after you have checked that the test and questions were uploaded correctly, the exam organizer chooses the Save test tab and enters the exam time
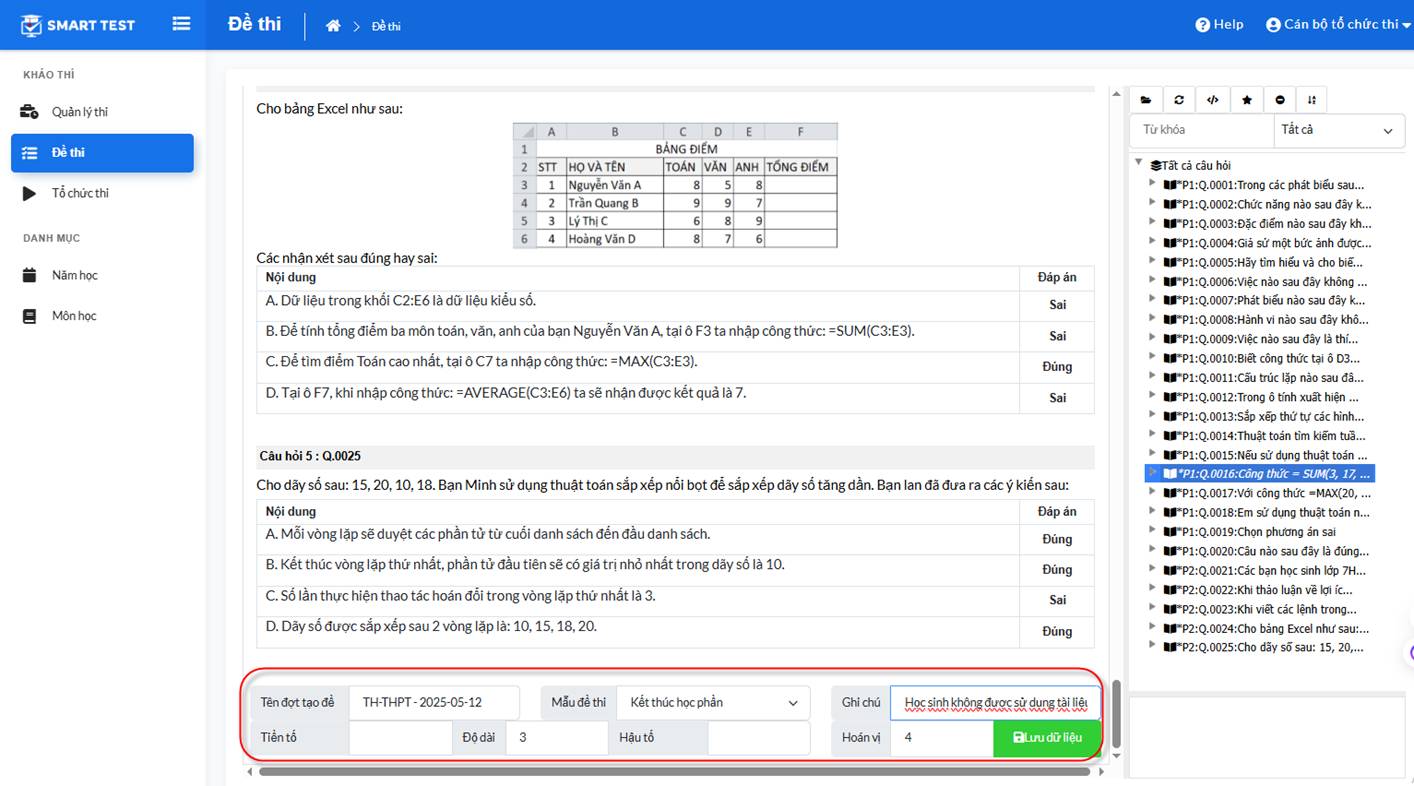
- Scroll down and enter the following settings:
- Test generation batch name
- Test template
- Notes
- Prefix
- Test code length
- Suffix
- Permutations: the number of shuffled tests generated from the imported original test
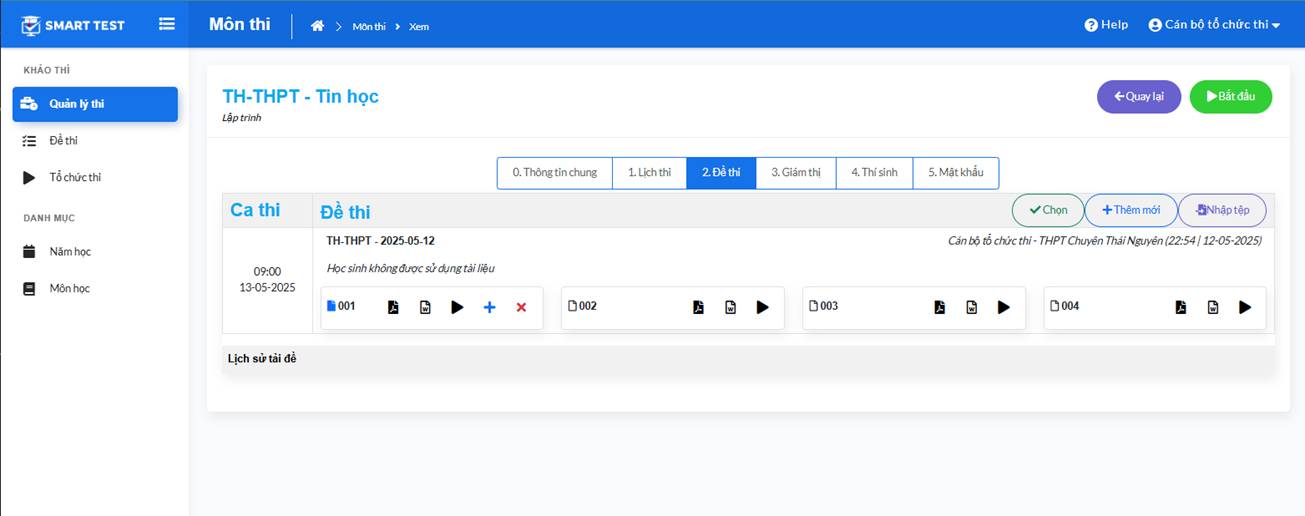
- Step 6: Continue: after you click Save, the screen shows the number of tests for this subject:
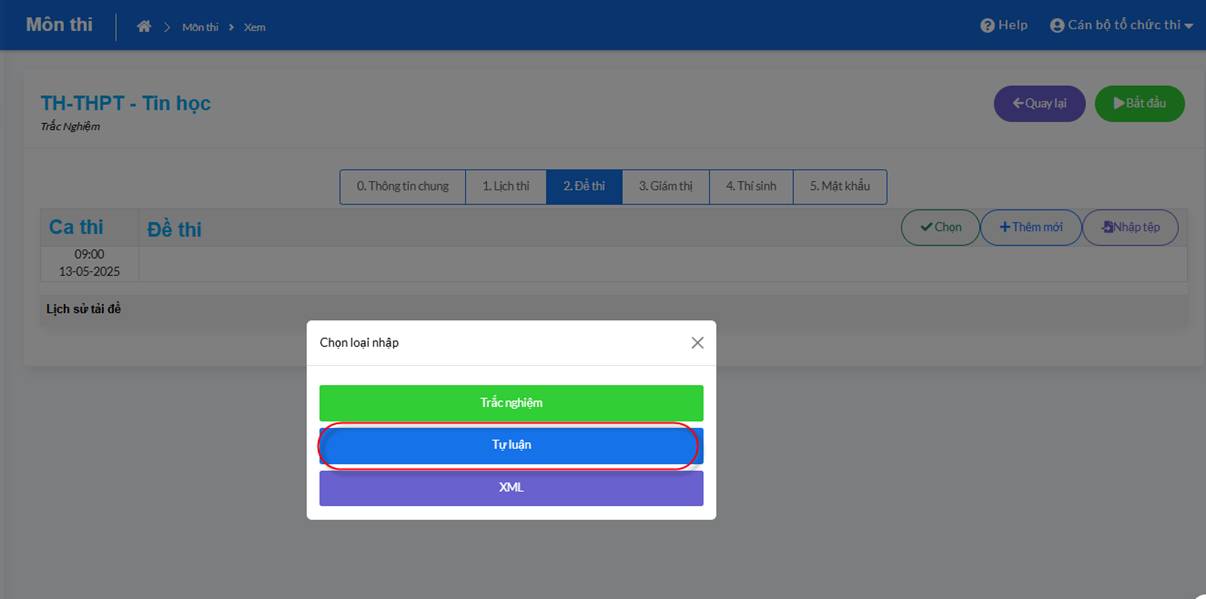
Importing a practical programming test:
The steps are the same as for importing a multiple-choice test, except for the following steps:
Step 2: choose Essay instead of multiple choice
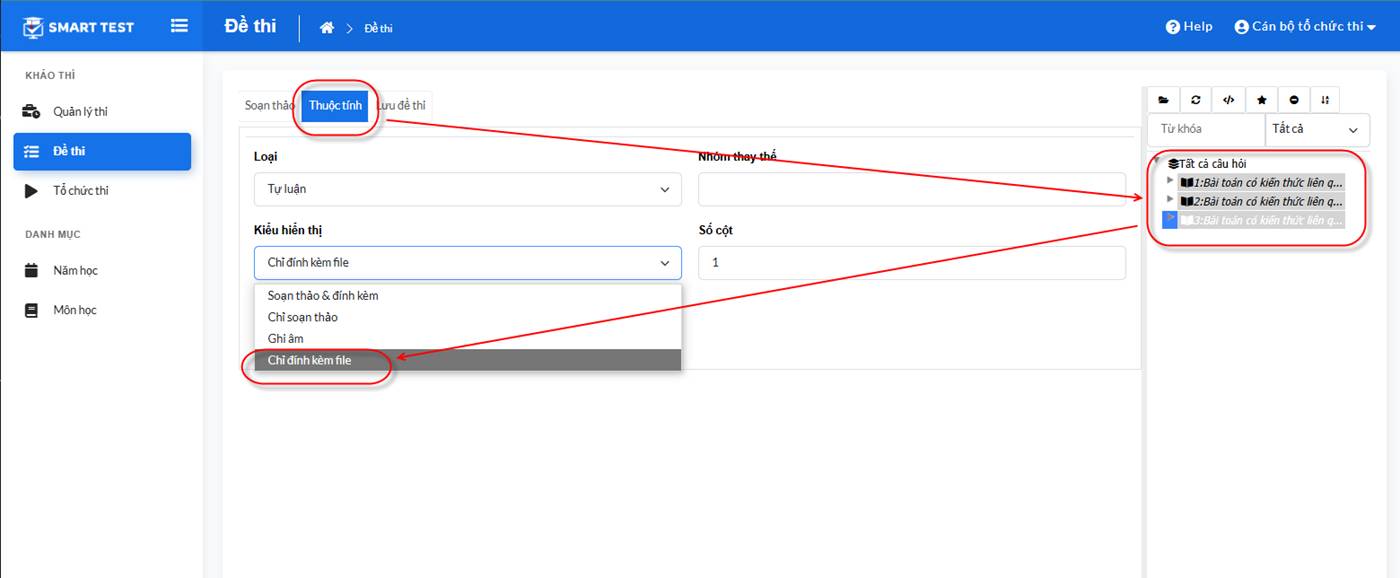
Step 4: Choose the Properties tab - choose the exam questions and select File attachment only
With this setting, when candidates take the exam they must attach the practical file they made on their computer to their test.
The remaining steps are the same as for importing a multiple-choice test.
V. Creating a question bank
VI. Creating a test from the question bank
VII. Preparing the test file to import into the system
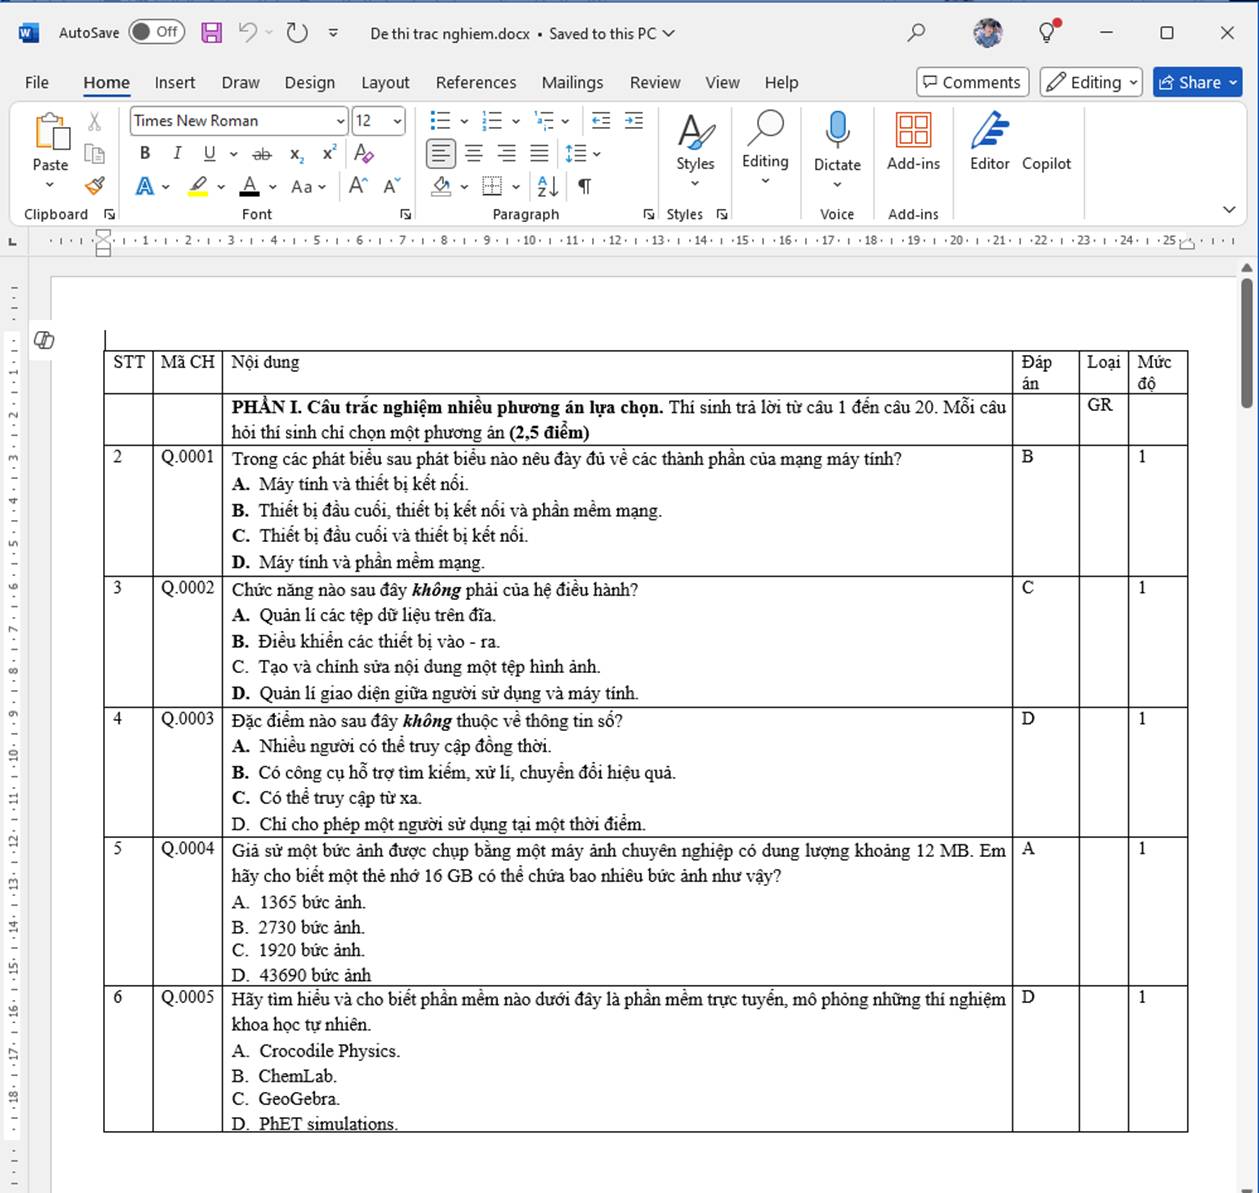
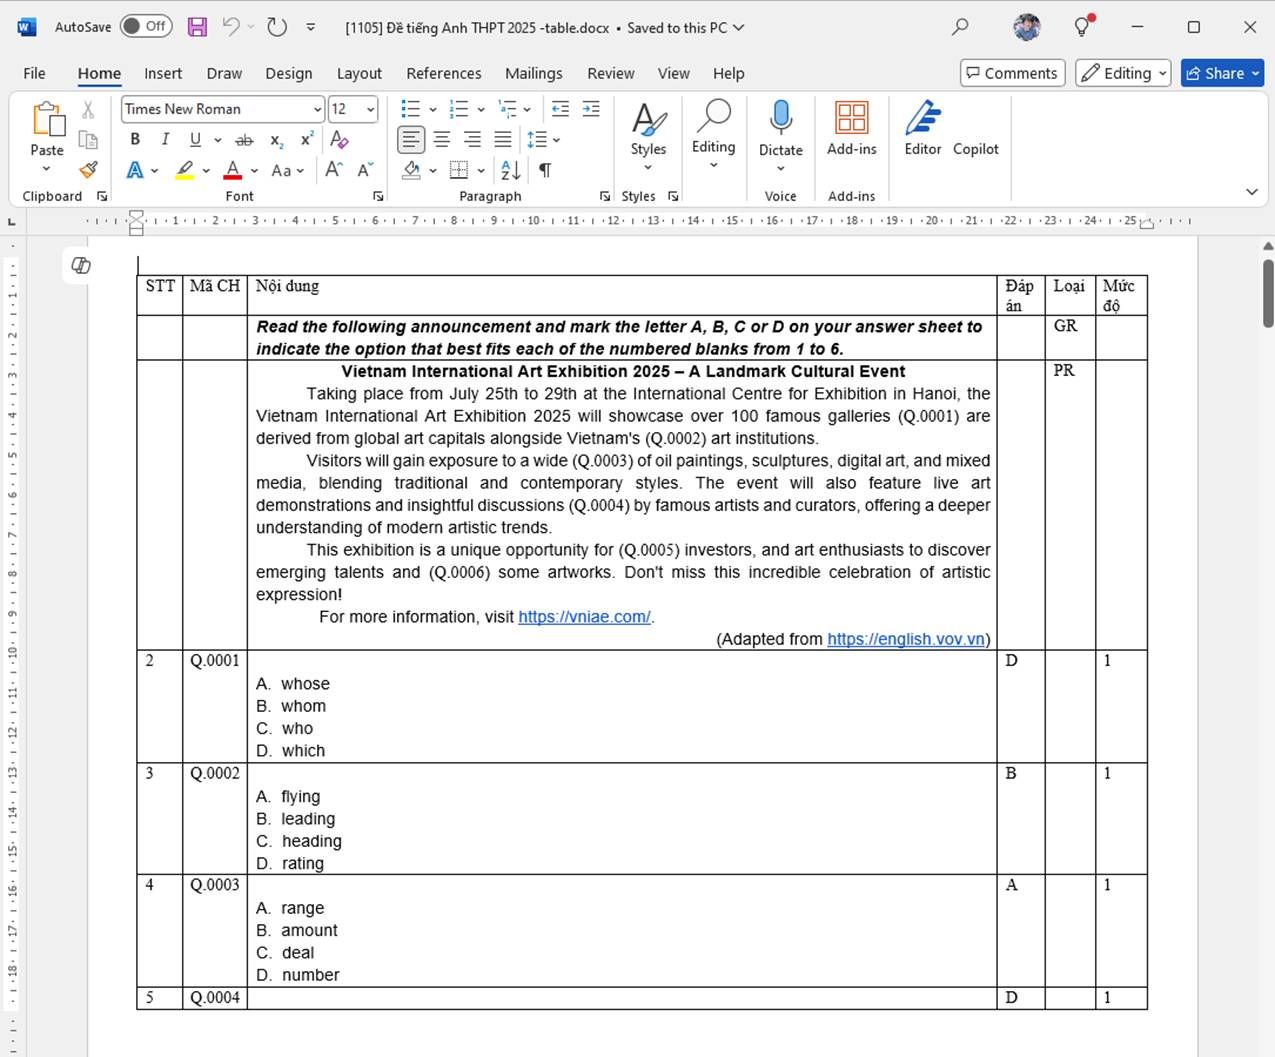
• The exam organizer must prepare the test as a table with the structure shown below, in a Word file:
a. Structure for multiple-choice tests with situational and passage-based questions:
The question table must have 6 columns:
- No.,
- Question code: required
- Question content: the question and its answer options
- Answer: the correct answer to the question
- Question type (leave empty for ordinary A, B, C, D multiple choice). The code GR defines a question group (used for reading-comprehension passages and the multiple-choice questions that follow them). The code PR means the questions in the passage keep their order and only the answer options are shuffled when the teacher mixes the test into several versions.
- Level (the question's difficulty code)
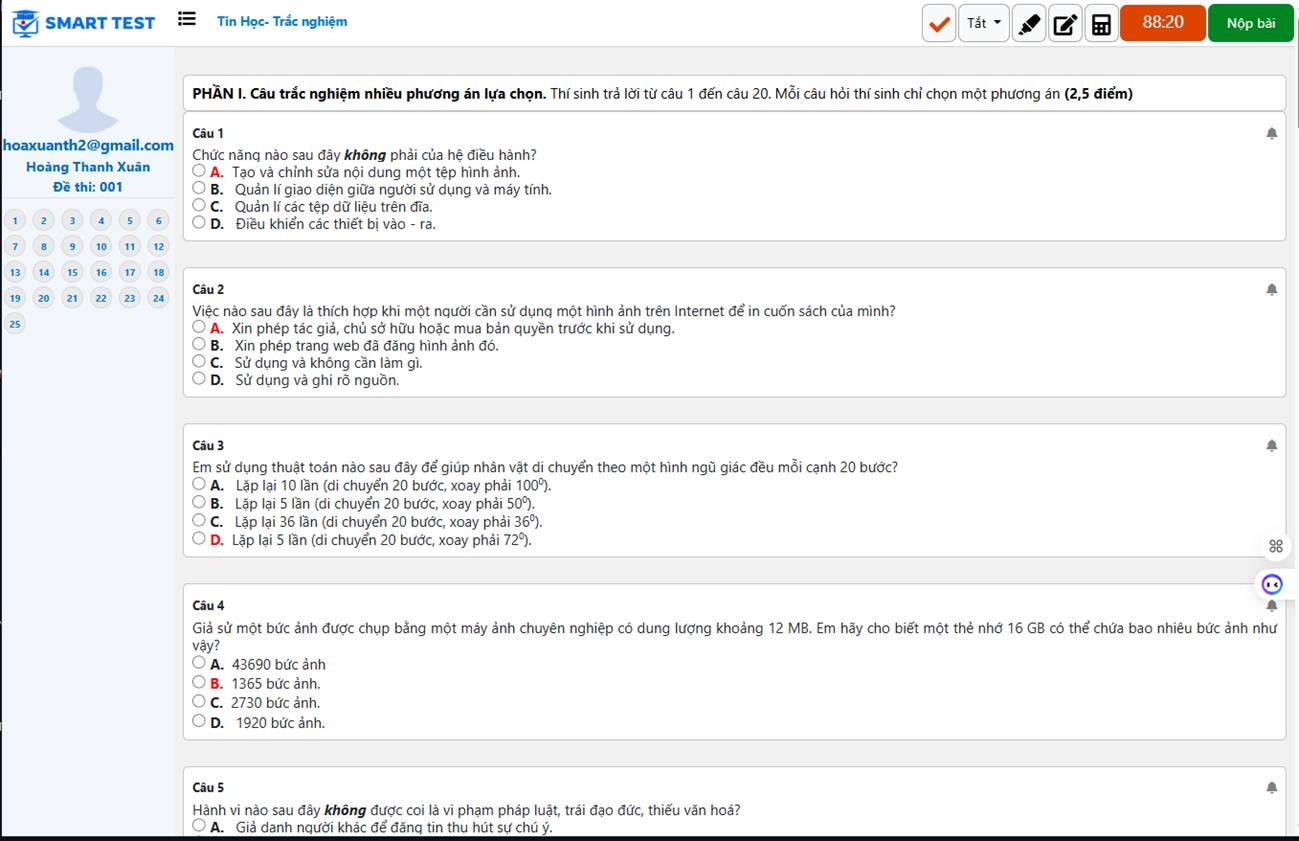
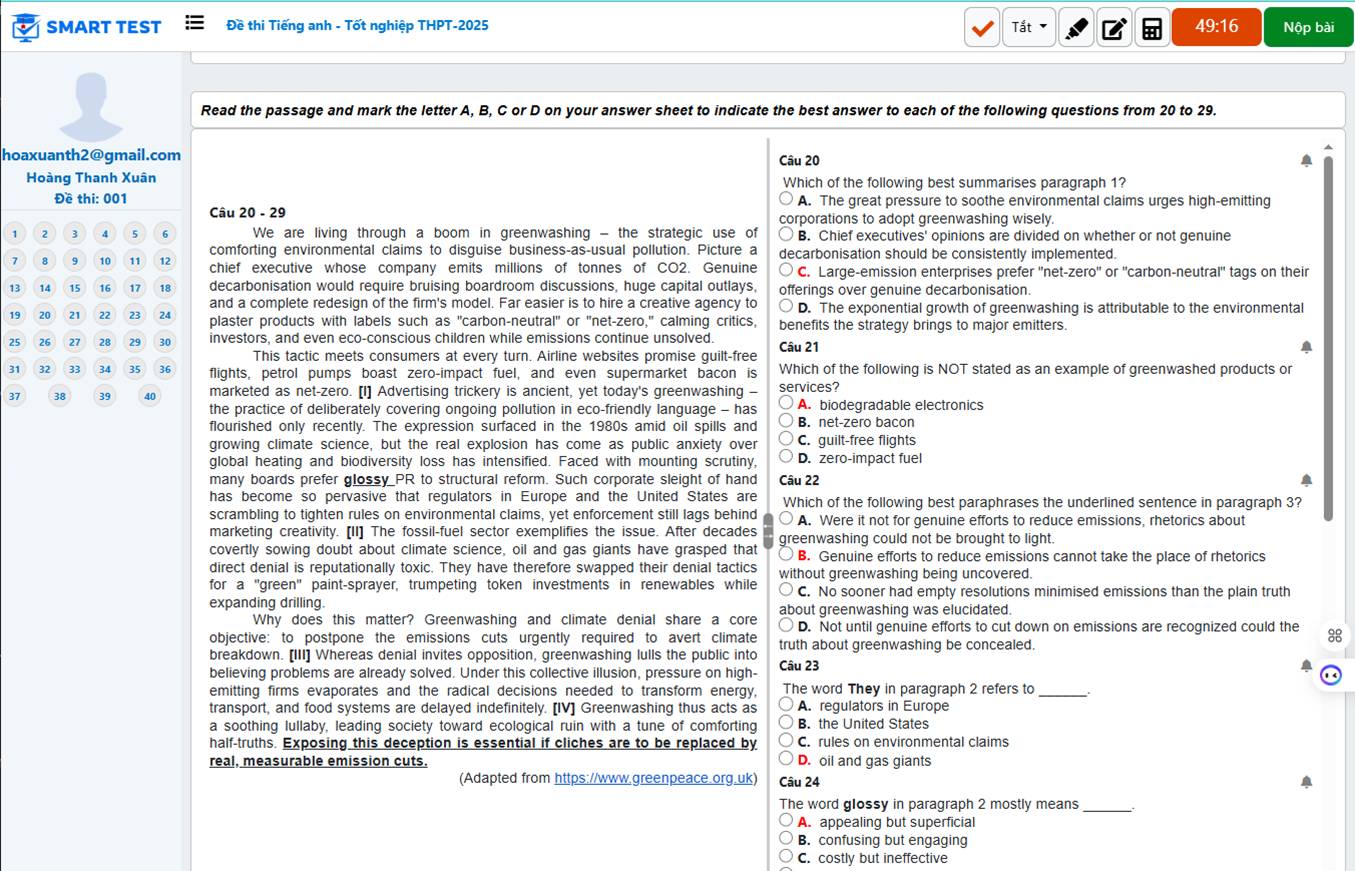
The screen shows:
Or
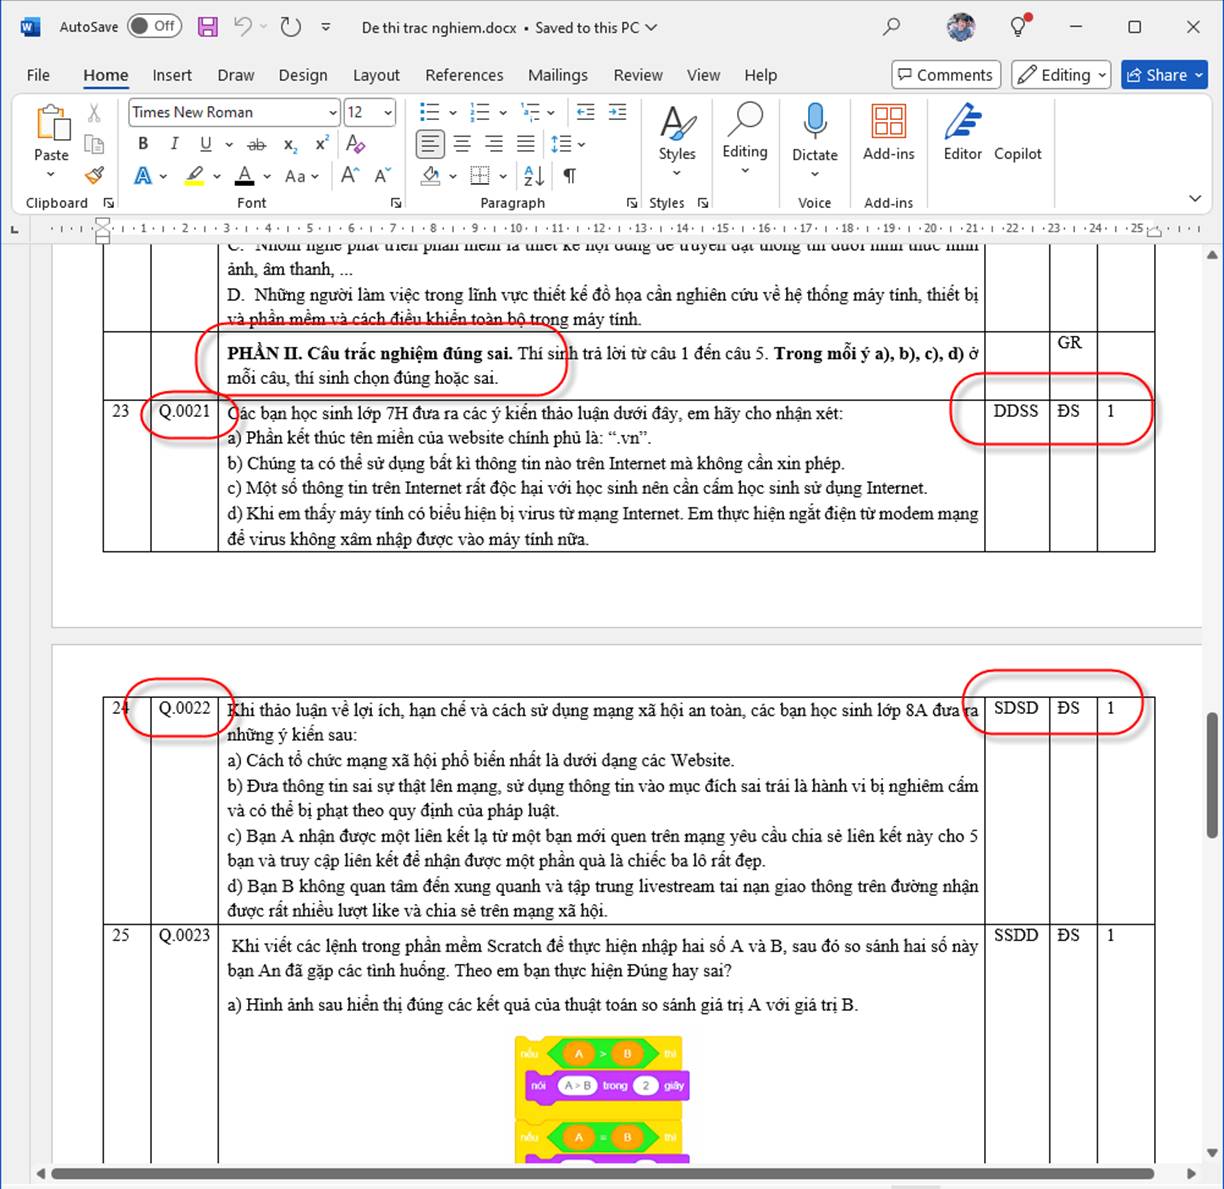
b. Table structure for true/false questions:
The question table must have 6 columns:
- No.:
- Question code: required
- Question content: the question and its answer options
- Answer: the correct answer for each true/false statement, for example: TFTF (T = true, F = false)
- Question type: TF
- Level (the question's difficulty code)
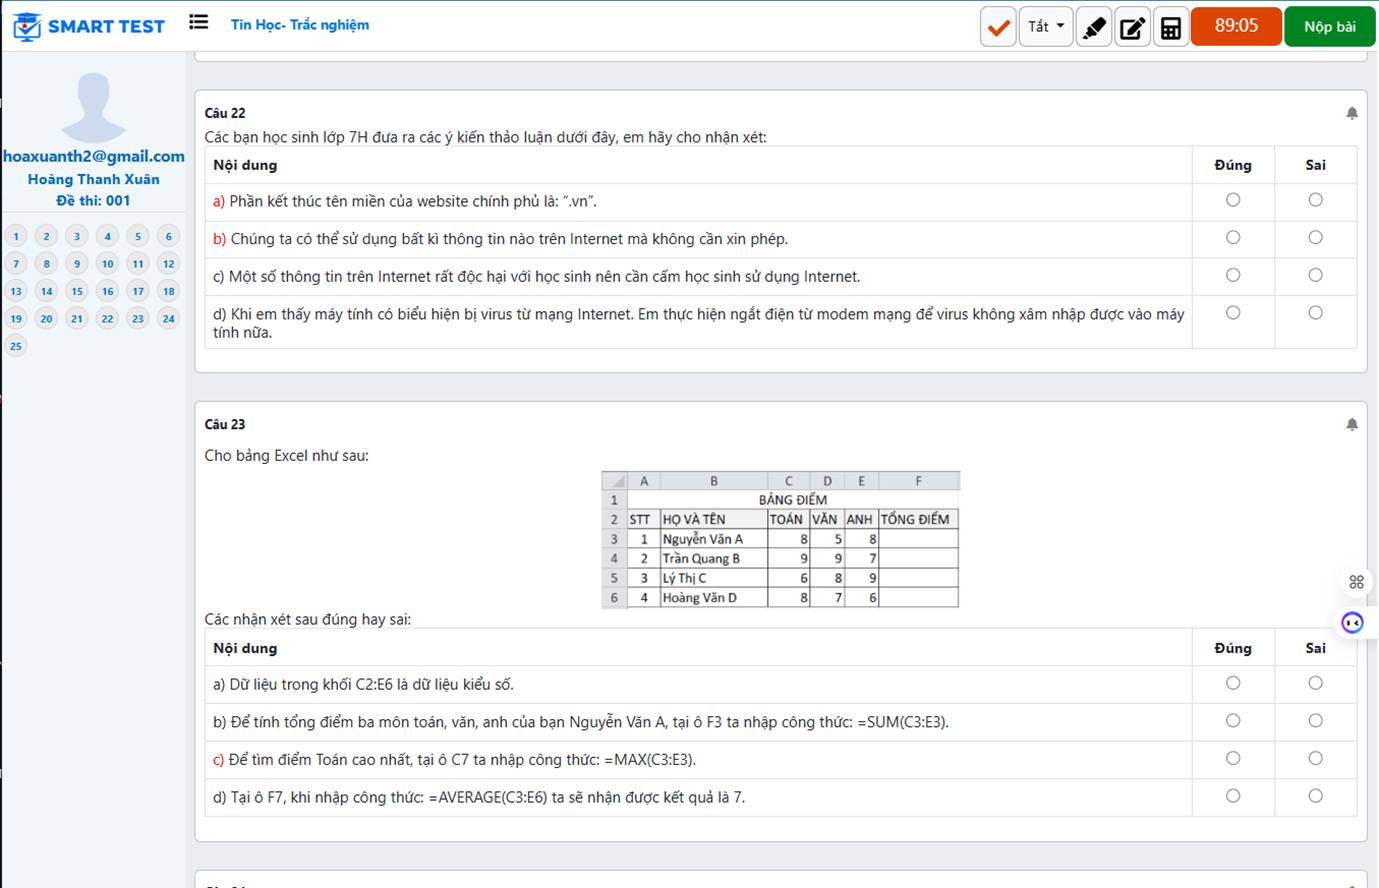
The screen shows:
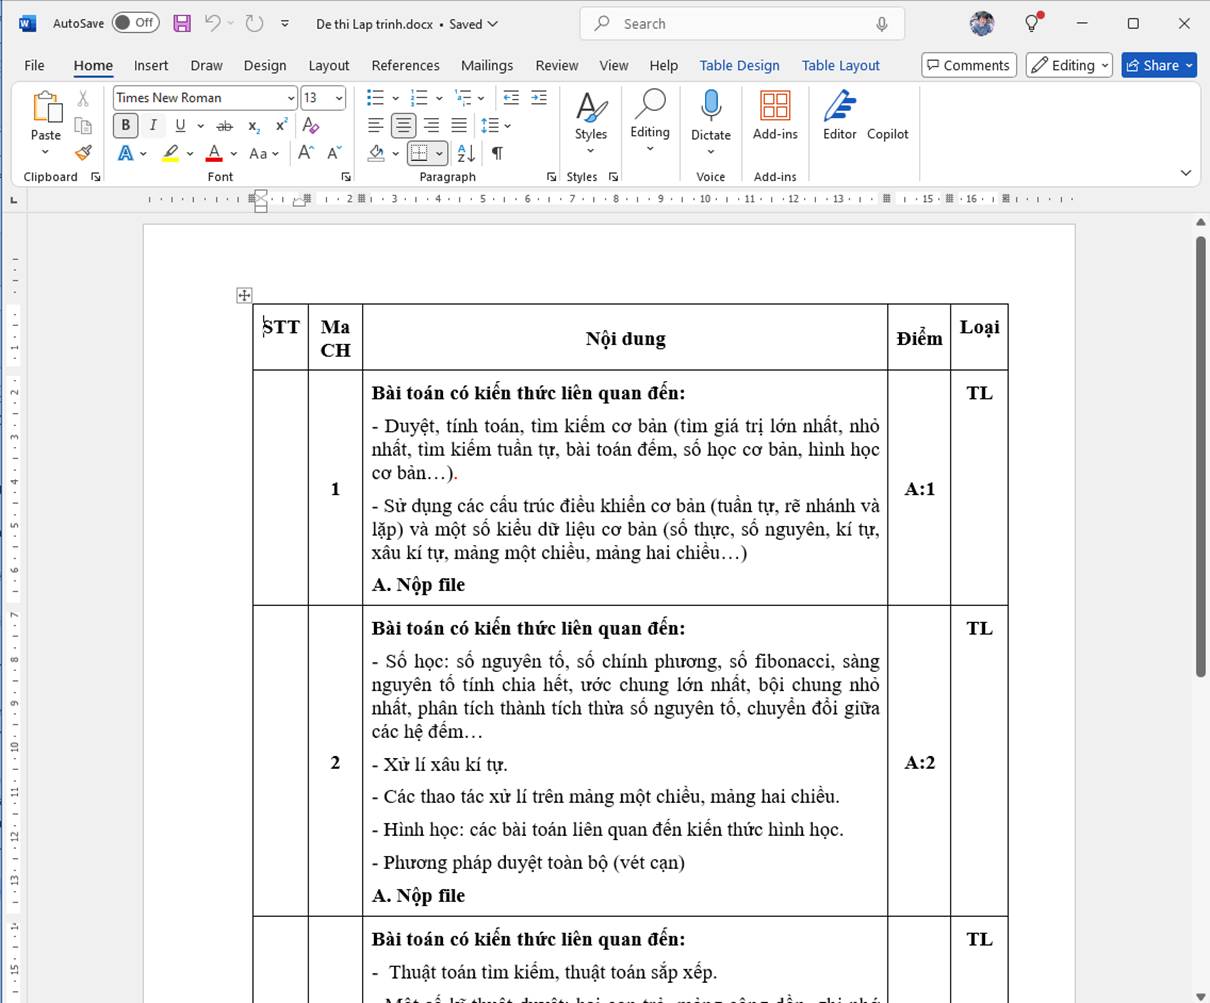
c. Structure for essay tests: for example, a practical programming exam
The question table must have 4 columns:
- No.:
- Question code: required
- Question content: the exam question (A. submit a file)
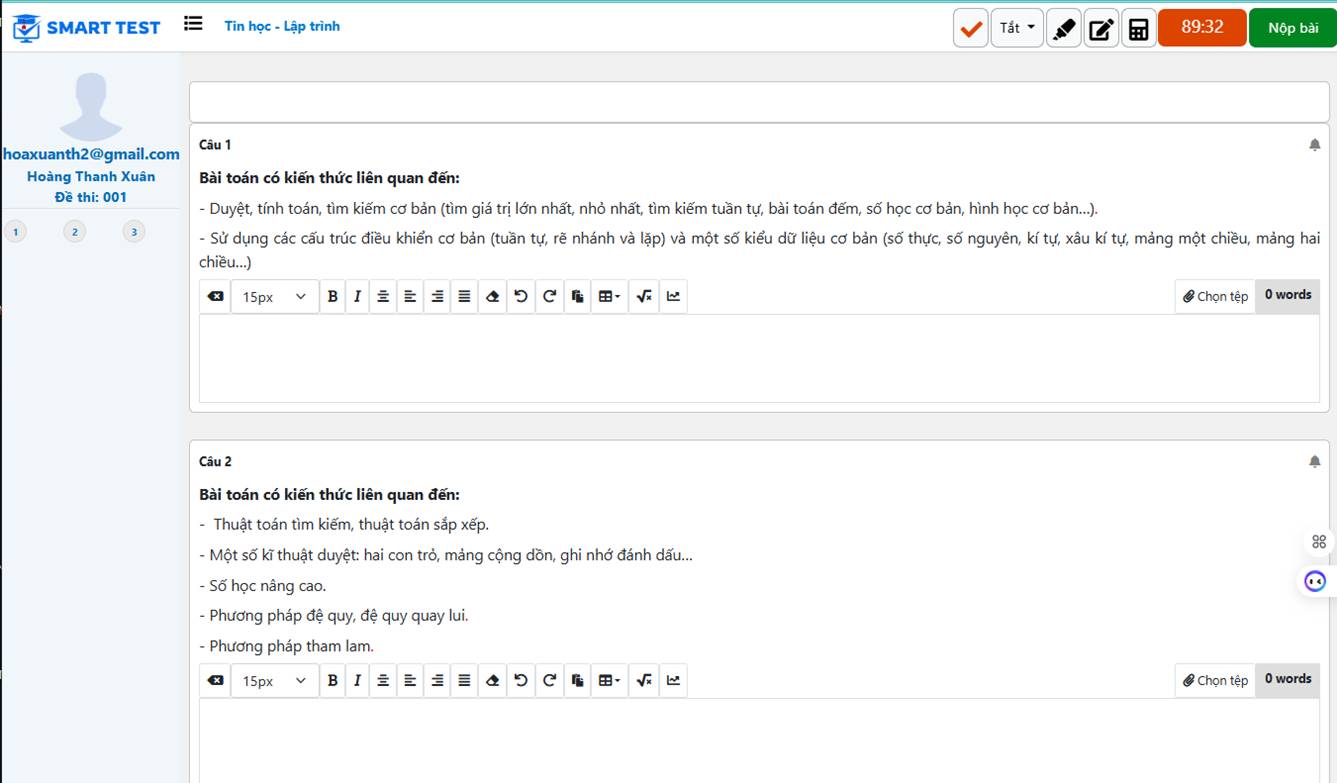
- Score: 1 or 1.5 or 2.5… (A:1 or A: 1.5)
- Type: TL (essay)
Notes:
- For each practical question, add a row below it to enter the answer guide for the question.
- Merge the first two cells of each question, as shown below.
The exam screen shows:
d. Matching questions: drag and drop content into the right position
The question table must have 4 columns:
- No.:
- Question code: required
- Question content: the exam question (A. submit a file)
- Answer: leave empty
- Question type: MC2
- Fixed: leave empty
The exam screen shows:
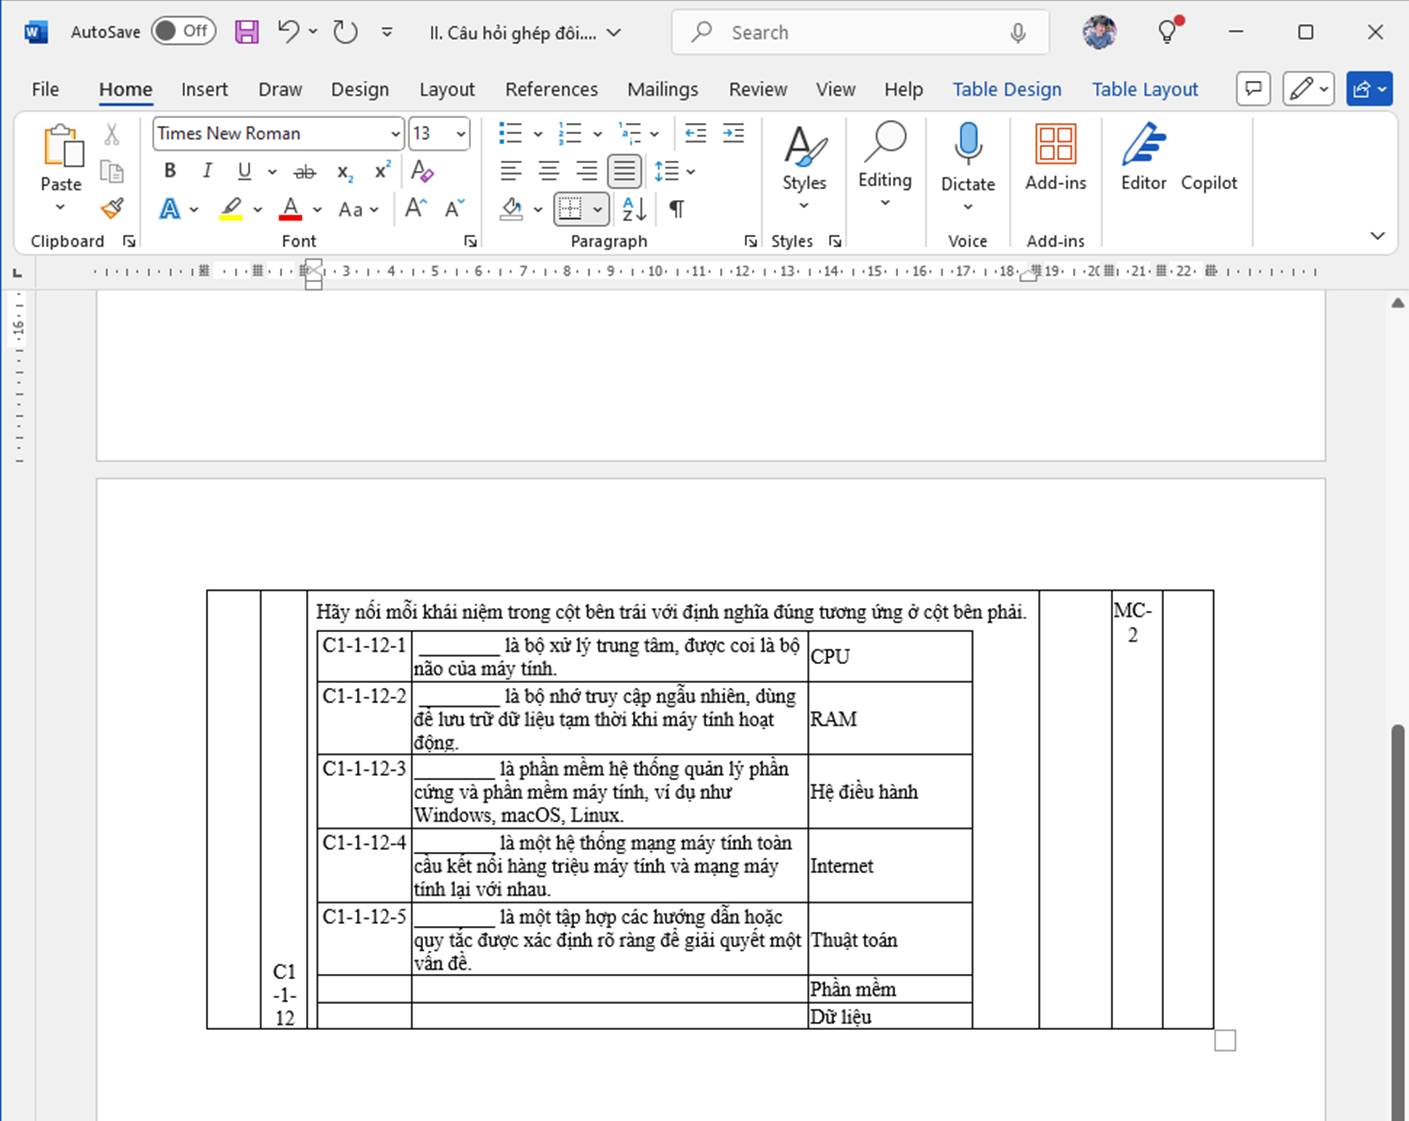
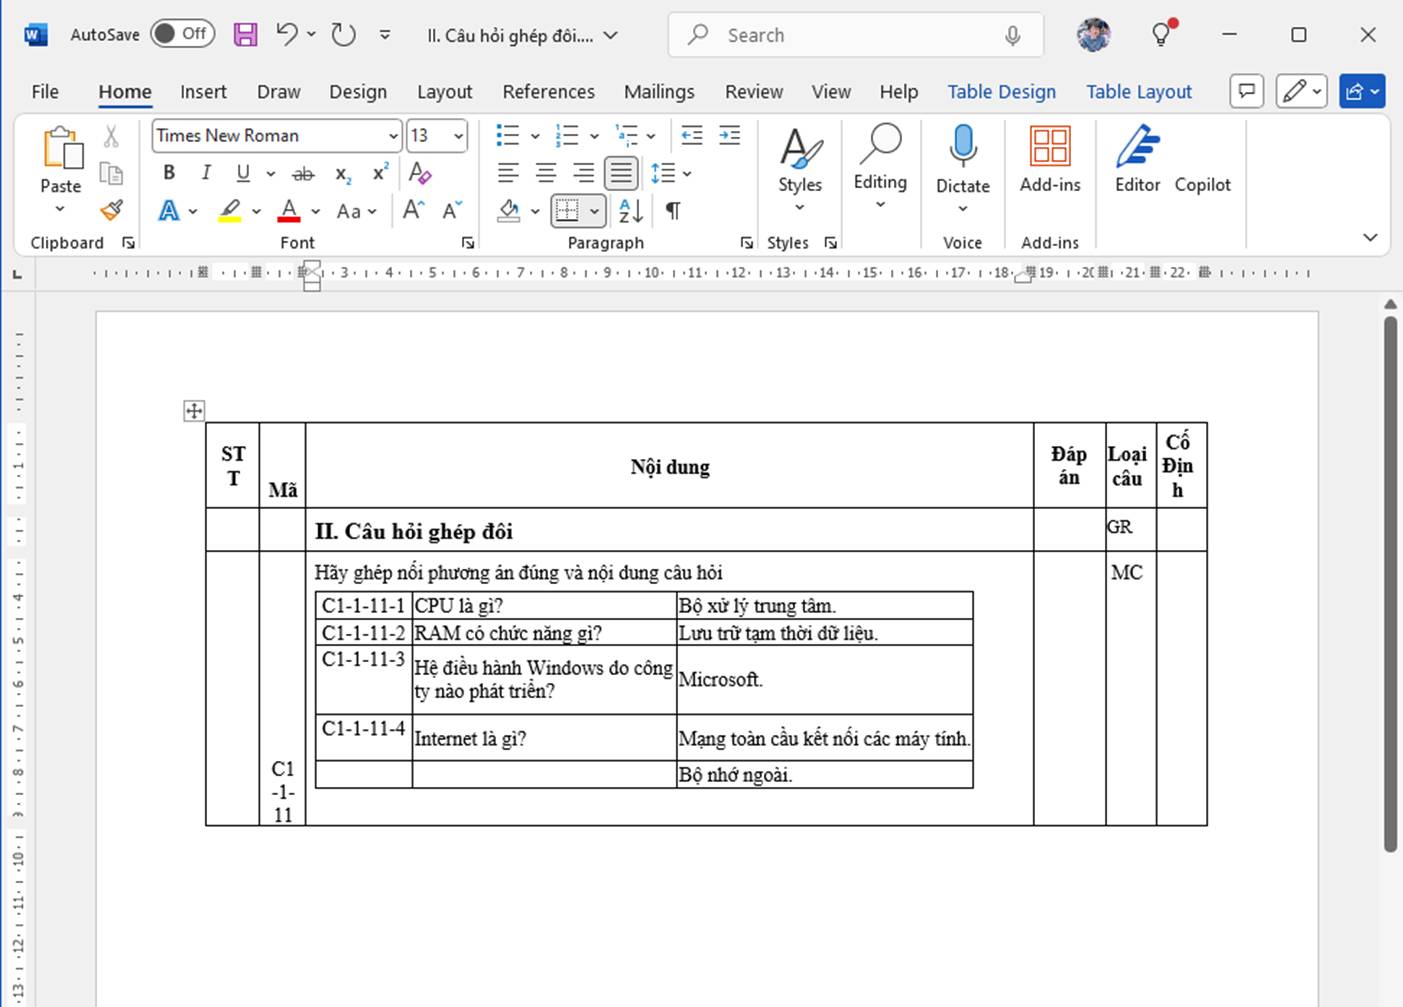
e. Matching questions: connect two columns
The question table must have 4 columns:
- No.:
- Question code: required
- Question content: the exam question
- Answer: leave empty
- Question type: MC
- Fixed: leave empty
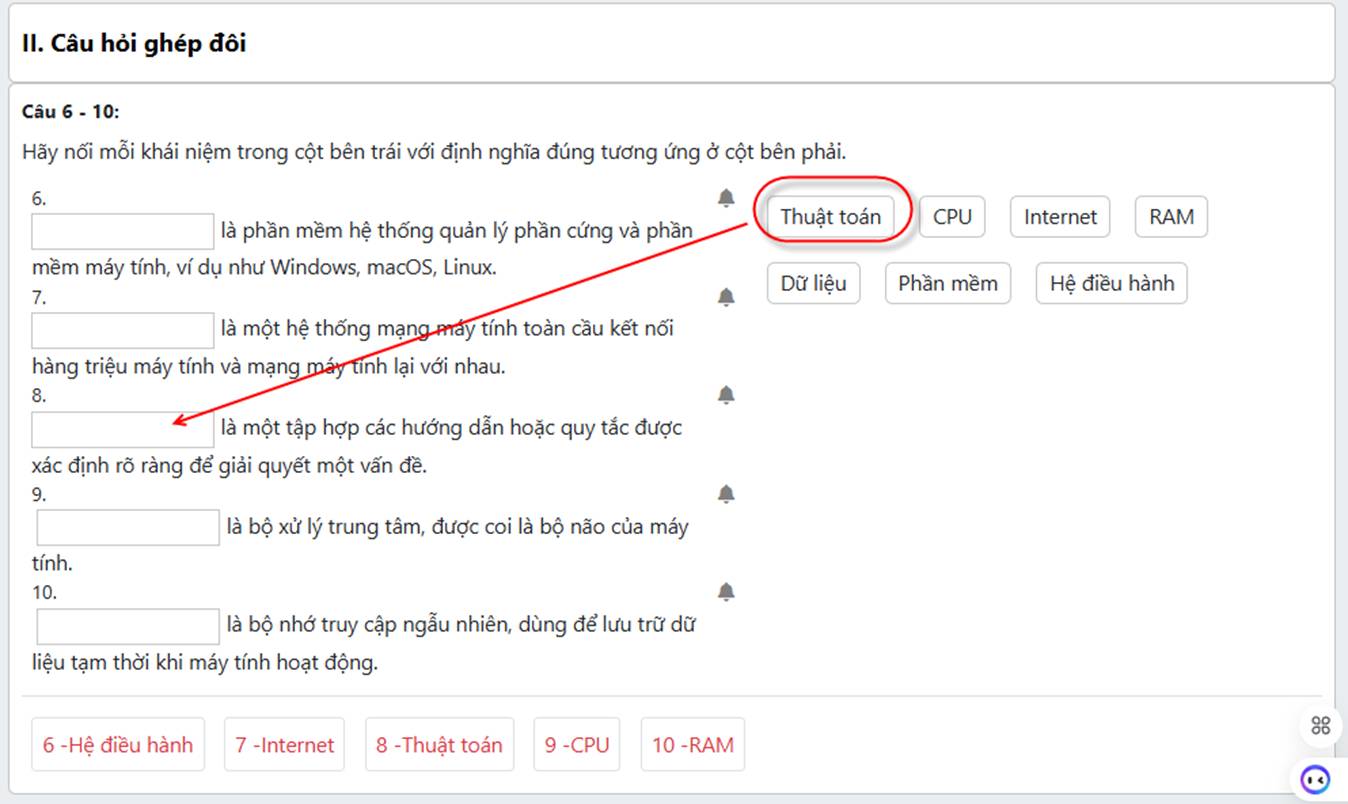
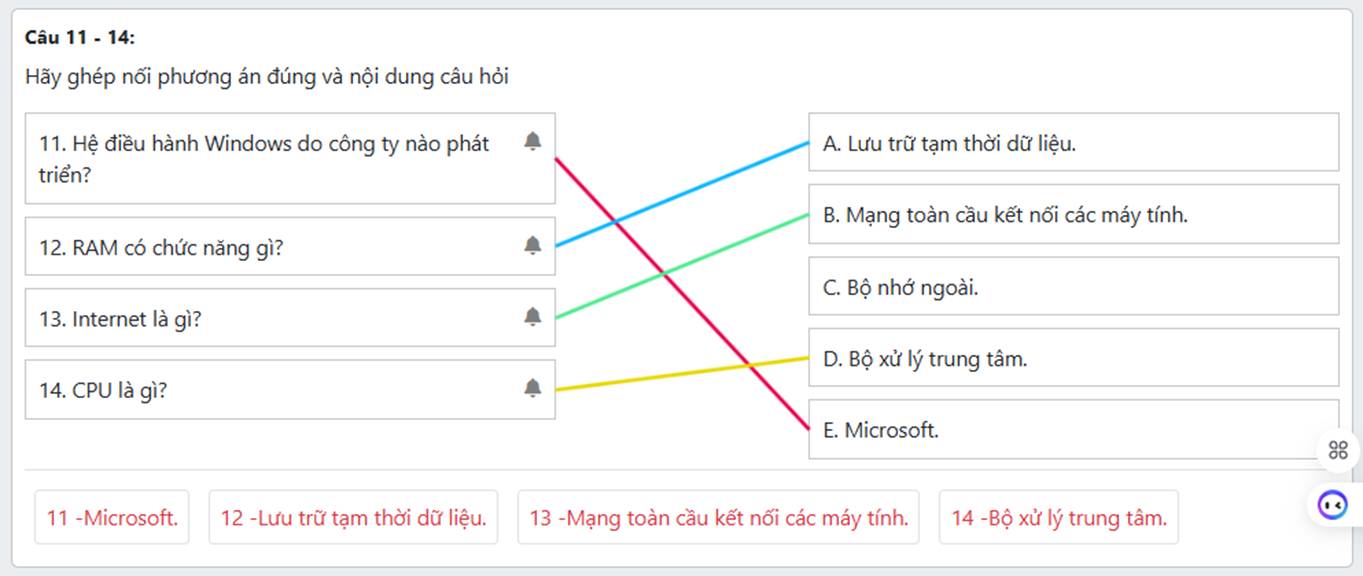
The exam screen shows:
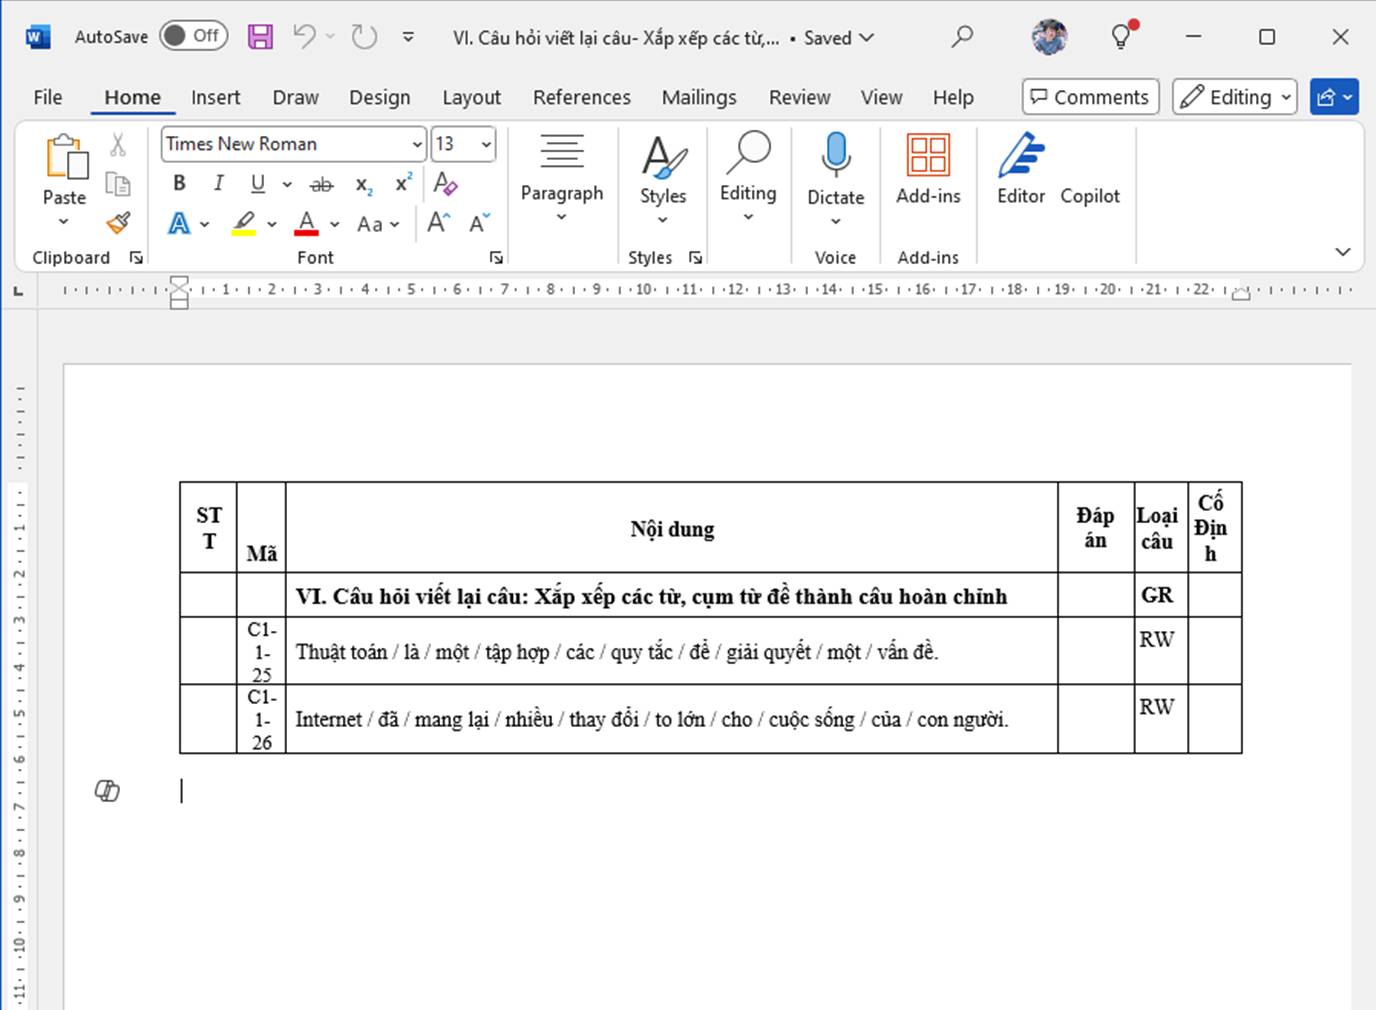
f. Sentence rewriting questions: arrange words and phrases into a complete sentence.
The question table must have 4 columns:
- No.:
- Question code: required
- Question content: the exam question (A. submit a file)
- Answer: leave empty
- Question type: RW
- Fixed: leave empty
The screen shows: